Monday, December 18, 2017

AUTHENTIQUE PAPER: A Colorful Christmas Pedestal Frame

When I created an Autumn version of today's project, I knew that I also wanted to create a Winter decor item as well. I imagined a snowy scene, filled with trees and snowflakes. I couldn't resist pairing the wonderful "snow" that I found earlier this year, with Authentique's Colorful Christmas.
 Today's project started with a lightly painted wooden base. I used some glitter mist from my stash, and added in some painting medium to soften the color. I then added in the trees. The two that were larger, I cut off the back of the tree, making the back of two of the trees flat. This was, they would fit into the frame once both pieces of glass were added back into the frame.
Once the trees were situated, I added in a piece of Colorful Christmas Seven.  This was a perfect backdrop for the trees in front. Before adding in the front glass piece, I glued in the bottom layer of snow. A few pieces were kept loose.
 Even the back of this is pretty! The stars from Colorful Christmas Seven are just beautiful.
 I then added strips of paper covering the front, sides and top of the frame. Gluing them with the Art Glitter Glue and burnishing really well will not only lock the top in place, but also give structure and detail to the frame.
 The tag was a tag from my stash, covered in a part of Colorful Christmas Eight, and a pair of Details stickers. The last touch for the topper of this frame was a beautiful bow.


Once the entire decor piece was put together, a couple of the Details stickers covered a smashed tree section, and added some great detail.

Another season, and another gorgeous home decor item. Wishing you a fantastic holiday season.
Supplies Used:
Authentique Collections: Colorful Christmas (Two, Six, Seven, Eight, Details Stickers)
Other Supplies: wood and glass pedestal frame (SPC Crafts), ribbon (May Arts), mini trees (Michaels), faux snow (Hobby Lobby), Art Glitter Glue, color mist (Heidi Swapp), twine and wooden tag (Maya Road) Pin It

Monday, November 27, 2017

AUTHENTIQUE PAPER: Remember December Mini Album

I would like to say that I always finish every project, but that is not always possible when the holidays are right around the corner. To make the completion of my Colorful Christmas December Mini Album a reality, I decided to prep a few things early to make it a little easier to create during the upcoming busy season.

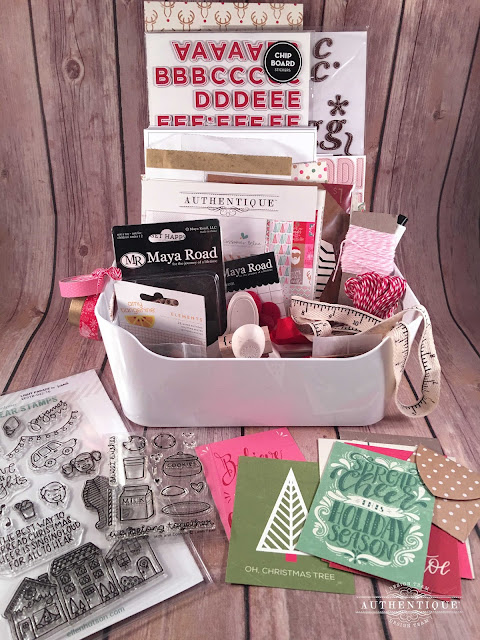
To start, I grabbed a container to keep everything in. This is an Ikea basket, but others are just as fantastic. Then I just started grabbing things from my stash. I have had some of these items for years!
I pulled stamps, washi tape, alphas, ribbons, wood pieces, enamel dots, and other fun embellishments to add to my mini as I go.
 The Colorful Christmas 6x6 Bundle is perfectly sized for projects like this.
I then grabbed my foundation pages. I bought a few of these foundation pages from a sale awhile back. The days would have been wrong, so I printed new day names on sticker paper and cut them out with scissors. Once I create each page, I'll either hand write, or type using my manual typewriter.
 Having each of the patterned papers pre-cut will save time when I start creating next month.
All I need to add is a stamp pad and a few colored pencils. Any leftovers could easily be turned into a couple of Christmas cards.
I found this cute album on sale, and gussied it up with a little punched reindeer edge, and a journaling card.
 Adding a little faux stitching makes this more personalized.
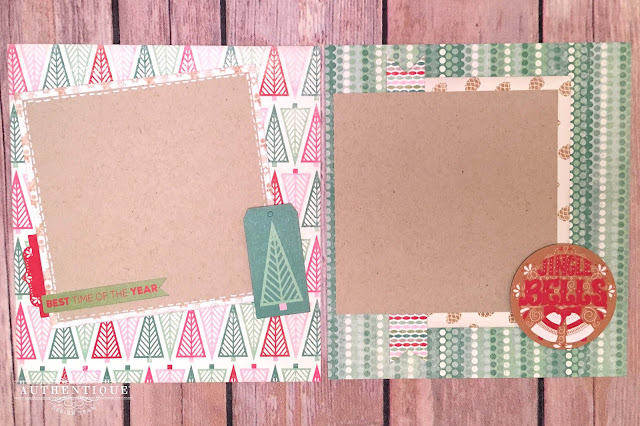
 Because I know that the first part of the month will be hectic, I created a few Colorful Christmas foundation pages to start.
 I wanted something for the inside cover, so used my Silhouette (#111484) to cut a large tree, and added a Details sticker and an enamel star. The "Story" page will have some of my hopes for the Christmas season, possibly a wishlist of fun events.
 The next three pages are to be used with the foundation pages. Each will sit on the larger squared section, with the journaling or messages below them.
Hopefully this inspires you to gather all of your supplies just a tad bit early for some fun December Mini Album making. A little preparation now, will make the project easier to complete.
Other Supplies Used: alphas (Thickers, chipboard and alpha stickers), various washi tapes, Twinery twine (Blossom, Cappuccino, Maraschino), ribbons, buttons, enamel dots & shapes, stamps (Lawn Fawn Milk & Cookies, Essentials by Ellen - Light Parade), mini album & inserts, Silhouette Online Store & Cameo
Pin It

Friday, November 24, 2017

AUTHENTIQUE PAPER: Frosty Winter Projects

Sometimes a paper collection is so easy to use, that I can create an entire set of cards or projects easily with it. Frosty Winter for me was this collection. Once I started using the fantastic violets and blues, I was hooked. 
  
I started with a fun layout. I really wanted something simpler than complicated. The patterns were just too gorgeous to add anything else. I wanted each to shine on their own, so used primarily straight cuts and layers, instead of more complicated shapes. A black and white photo kept from competing with the amazing violets and blues.
 To make the patterns stand out from one another, I used vellum between some of the layers, and as the snowflakes around the image.
 
 My favorite part of this collection is easy the tiny sentiment stickers that come on the Details sticker sheet. I just loved adding those throughout the layout.
 The tab stickers are also amazing. I loved adding all of the tiny snowflakes to this fun layout. Once the layout was complete, I could stop myself from creating MANY cards with all of the leftover bits and pieces of Frosty Winter.
I started with this adorable printable from Jessica Feig. I had to color him to match the colors of Frosty Winter. I cannot wait to send him to someone just for a smile.
An embossing folder, some scraps, and a little Glossy Accents made this snowglobe card sparkle.
Mirroring the snowflake sentiment on the Details Sticker with a stitched snowflake and embossing folder elevates this tone-on-tone beauty. 
A really simple trick to tone down the colors or patterns of a patterned paper is to place it under some vellum. The vellum is still translucent. so the snowflakes just peek through.
A deep impression, a little twine, and some beautiful sentiments make this an easy card to share.
Thank you for looking. I hope that you found some inspiration to get your Frosty Winter projects started.
Pin It

Monday, November 20, 2017

Paper Girls Challenge Blog: Gold

Good morning! Today's challenge on the Paper Girls Challenge Blog is Gold! I love anything that glitters, and this rose gold paper was itching to be all cut up.

I was fortunate enough to snag a few things from the Ellen Huston August sale, including this fantastic You Rock die set, and the Spread the Sparkle stamp set. I paired them with the rose gold glitter paper from Hobby Lobby and a Lawn Fawn Say Cheese die.
I popped up the gold frame onto a piece of white cardstock that I used both the Taylored Expressions Snowfall embossing folder, and the Lawn Fawn Small Stitched Rectangle Stackables die. The patterned paper is a scrap from my scrap pile, and I added some of the Nuvo Crystal Drops in Bubblegum.

Make sure that you join us on the Paper Girls Challenge Blog!  Pin It

Monday, October 16, 2017

Paper Girls Challenge Blog: Pumpkin Spice

Total honesty here... I'm not all about that pumpkin spice business. I'd much rather have a chai latte over a pumpkin spiced anything, anyday. However, pumpkin spice is an ingredient in Ooey Gooey Pumpkin Bars, and I LOVE those things! Today's card is just for fun. I knew exactly what I wanted to create when I saw this challenge, a shaped card.
Today's card uses all Authentique papers, some twine and a sentiment. What reminds you of Pumpkin Spice? Head on over to the Paper Girls Challenge Blog and enter in your Pumpkin Spice Challenge image!

Supplies Used: Authentique Paper (Bountiful Collection, Artisan Cardstock, Spectrum Series: Antique Lace), Silhouette Design Store #151232, Lawn Fawn (Love You a Latte), Twinery Twine: Mandarin, ink Pin It

Wednesday, October 4, 2017

Happy October! (Stampin' Up & Authentique)

I haven't been able to put the Bountiful Collection down since I got it. I just love all of the warm details, the rich colors, and the fabulous Autumn elements. For today's post, I have a pair of sweet, Fall inspired cards.
I started with the Merry Café Photopolymer Stamp Set from Stampin' Up. I wanted to match the rich colors in the plaid of Bountiful One, so used my Kuretake Gansai Tambi Watercolors, and mirrored the aqua and warm red-oranges with paint. 
To make the fun images of the cup pop, I paired each of the cards with multiple Details stickers. Some of which I popped up with dimensional adhesive.

Thanks for spending some time with us this morning. Have a great Fall day!
Authentique Supplies Used: Bountiful Collection (One, Details Stickers) Spectrum Series (Mustard Seed)
Additional Supplies Used: Merry Café Photopolymer Stamp Set, Coffee Café Photopolymer Bundle,
Kuretake Gansai Tambi Watercolors, Lawn Fawn Lawn Cuts Stitched Rectangle Frames, dimensional adhesive Pin It

Monday, October 2, 2017

Paper Girls Challenge Blog: Wooden Elements

I loved this week's challenge for the Paper Girls Challenge Blog!! I love most things that are wooden, wood grain, and wood-inspired. It's just a warm aesthetic, that I find so comforting. For this challenge I wanted to incorporate the super-fun Halloween collection from Authentique: Tricky. I loved the playful colors and paetterns.
Do the wooden elements, I used a combination of Seasonal Snapshot 2015 Project Life Accessory Pack, Studio Calico wooden stars, and Freckled Fawn wooden words. The larger wooden elements are covered with a Wink of Sella Brush Glitter Pen.
Pin It

Monday, September 18, 2017

Paper Girls Challenge Blog: Harvest

I'm officially a Paper Girl! To celebrate this fantastic news, I have this week's challenge for you... Harvest! Find a great Harvest image, create that fun, Fall card you've been thinking of, or anything that celebrates the Fall.

For my layout, I had to use the fantastically, Fall Authentique Collection: Bountiful. I really adored the fabulous Fall references and colors. The hinges were just too adorable, not to add to the layout as well. I even added Nuvo Drops in black to create little tacks to the hinges.
The title was just perfectly, perfect for this layout, and is found at the Silhouette Online Design Store. Make sure to come play along with all of the Paper Girls!

Supplies: Bountiful Collection - patterned papers and stickers [Authentique Paper], Spectrum Cardstock - Ginger Snap [The Wood Connection / Authentique], Nuvo Crystal Drop - black [Tonic Studios]
Pin It

Monday, September 4, 2017

Paper Girls Challenge Blog: Labor Day

Happy Labor Day everyone! Since I'm a teacher, Labor Day has a special significance in my career. It signifies that the school year has started, and summer is now over. In my little house, we have a new school-ager, and we once again have our favorite kindergarten teacher. This card is for her.
I used a fantastic little owl card by Jennifer Rush. I really loved how cute she was. And the apple!!!! I used a combination of scraps from my scrap bin, and a few bits and pieces of the Bountiful Collection from Authentique. I know that there are little bits of pieces from Elle's Studio and Studio Calico, but I've no idea what line anymore. The stamp is also from Studio Calico.

Make sure that you check out the Paper Girls Challenge Blog and participate in your own version of our Labor Day Challenge! Pin It

Monday, July 17, 2017

Paper Girls Challenge Blog: Welcome to the World Card

I haven't blogged since September 2016. And not regularly since September 2015. Blogging started feeling unnatural, extra, too much. It did not really bring me JOY. And since JOY was my 2016 One Little Word... I ceased blogging, and spent more time creating. Funny how when I stopped blogging, I actually made more stuff (this is where the IG feed comes into play).

There are MANY reasons that I quit, and I won't go into all of them... But I'm ready to start sharing again. And not just on my Instagram feed either (although I totally would love for you to follow me there as well!).

So, when my lovely friend Erica asked me to create a few things for the Paper Girls Challenge Blog, I said "Of course!!!". And it felt right to even plan out this post (although admitting that you weren't good about something for 1.5 years is hard!!).
I love this card. And I love even more how stinking easy it really is to do this!
So, for starters... This stamp set. Concord and 9th is one of my favorite manufacturers of amazing stamps. Their sets are large (this one is 6x8"!) and have some of the best sentiments. This stamp is from the Globe Greetings stamp and die set. Seriously. I made a ton of graduation cards (21..!) using this set and the dies, and they were perfect.
The space background was made with a mixture of various Distress Ink minis that I had. I used Mustard Seed, Picked Raspberry, Seedless Preserves, and Blueprint Sketch. Once the color was laid down in various patchy areas, I went over most of it in Black Soot. Do a few layers of dropping water and patting dry, and now the space scene is set. 
The last touches are created from flicking white paint with a stiff brush onto the image. Then I added a few extra stars with a white gel pen. The sentiment is embossed with a mix of gold and black powders, and the stamps are just stamped on... I did add some polar ice caps with the same white paint as the stars! 

I hope you had fun as I shared this card with you! I really adore it.

Supplies Used;
Concord and 9th (Globe Greetings stamp and die set), Distress Ink (Mustard Seed, Picked Raspberry, Seedless Preserves, Blueprint Sketch, Black Soot), white acrylic paint, various inks, watercolor paper, black cardstock, embossing powders Pin It