Showing posts with label Cameo. Show all posts

Monday, April 6, 2020

AUTHENTIQUE PAPER: Happy Easter Week from all of us at Authentique!

It's almost Easter and that means we are going to share some fabulous Easter and Spring projects with you! We have had so much fun creating some wonderful things, especially since the world is in such upheaval.
*   *   *   *   *   *   *   *   *   *
Hello, and Happy Monday! Heather here, and I created this fabulous Watering Can Box with 3D Daffodils. Daffodils are so prevalent in the Pacific Northwest, there are even parades for them.
For this project, I used a fabulous cut file from the Silhouette Store by a designer named Tanya Batrak.
I really wanted to stay true to the coloring of the watering can (and it even tricked my husband when I was putting it together!), so grabbed cardstock from the Spectrum Series, using both sides of Silver Dollar to get both the stripes and dots in my project.
The tag was a little tag cut from some of the Cottontail Eight and a few of the Elements die cuts. Using foam adhesive in between the layers created some fun interest.
The daffodils are a combination of simple, white cardstock, Lemon Drop Spectrum, and the March cardstock from the Calendar Collection Solids cardstock pad.
I am really happy about how this project turned out. I think that the Cottontail tag lends itself both to Easter, but is Spring enough to last the season. This will be a really fun decor item to leave out during the next few weeks to brighten our spirits.
To round out today's post, I have two Easter cards that I created a bit ago. I really loved how colorful the Cottontail collection was, and how easy it was to pull together a few cards featuring the Easter images.
The first card is a combination of papers from the 6x6 Bundle and the cut-aparts from Cottontail Eight. A little die cut border, and trimming down the cut-apart make this card sparkle. Remember, if you want just a little pop of additional color, use your Spectrum series as your card base.
The last card also uses some border dies for interest, layers a wood veneer rabbit that I stole from a banner found in the Dollar Spot, and a few of the die cuts from the Elements die cuts page. Thanks for "hopping" along with us today, and we cannot wait to share with you some more projects this week!

Authentique Paper:
Cottontail collection: (6x6 bundle, Elements die cuts, Three, Five, Six, Eight), Spectrum Series: (Orange Blossom, Silver Dollar), Calendar Collection: (March cardstock)
Other Supplies:
foam adhesive, die cuts, white cardstock, wood veneer rabbit, hot glue, Art Glitter Glue, Silhouette Cameo, cut file (#317513)
*   *   *   *   *   *   *   *   *   *
Come back Wednesday and Friday of this week for more Easter and Spring projects!
Pin It

Friday, March 20, 2020

AUTHENTIQUE PAPER: Let's Go On a Trip Voyage Mini Album

Are you ready to go on a trip yet? We have been at home for a week now, and everyone is getting a little stir-crazy. This little mini album is created for our next adventure. The Voyage collection was the perfect collection for this one page mini album. The lighthouses, the little crabs, and all of the nautical elements are perfect for living in the Puget Sound.
To start, I grabbed this fabulous mini album cut file from the Silhouette Online Store. The base of this mini album is just one sheet of Voyage Four. The red on the inside will be a great background for all of the smaller elements and patterns.
The ribbon is a combination of both sides of Voyage Ten. I like the combo of red, white, and blue and the nautical stars.
Once open, you can see all of the fun details and patterns that are used. I really liked using the larger patterns from the 12x12" papers, but you could also use the smaller patterns from the Bundle if you like the smaller patterns.
On the inside, I used a combination of many of the papers. 
Adding a little but of foam adhesive created just the right amount of dimension for the small sections.
I also cut down a few of the cut-apart pieces from Voyage Eleven, so that they would fit in the little boxes. The ones that are left alone will be perfect places for tiny photos from our next adventure.
The stickers from the Details sticker sheet are also great additions to the mini album. 
I love seeing how the pattern of the outside of the mini album goes well with the inside pieces. This will be perfect for our next adventure.
Supplies Used: 
Pin It

Monday, February 18, 2019

PAPER GIRLS CHALLENGE BLOG: Challenge #170 - Now & Then

Today's challenge is to compare two different things. I chose to compare snowstorms five years apart. Snow is pretty rare in the Pacific Northwest, so it's kind of fun to look at the two very different snowstorms. 2014 was pretty tame, as it dumped between 12-14 inches at our house in the span of just a few days.
I used my Lindsey kit from Felicity Jane. I loved being able to use all of the great Valentine's style for a non-lovey project. I used a few Silhouette Online Store cut files (#104197-Felicity Jane, #220866-Paige Evans). The only thing that wasn't from the Lindsey kit from Felicity Jane was a single Thicker from YEARS ago
Pin It

Monday, December 31, 2018

AUTHENTIQUE PAPER: "Love You Forever" Accordion Mini Album

I know that the New Year is coming up soon, but I really wanted to share with you this fun little "Love You Forever" Accordion Mini Album. To start, I used the wonderful Accordion Mini Album cut file by Paige Evans. She has a ton of great files, and quite a few mini albums. Make sure to watch the YouTube video she has for this if you get stuck. I followed the tips that she used for not taping the top of the middle pages to allow for extra tags.
The outer cover was a combination of Romance Three and Eight. I backed the image from Eight with a little bit of Five. Inking the edges a little bit gives the perfect amount of contrast between papers.
The inside focuses on the various patterns, highlighting the lace image from Romance Two. A sweet sentiment from the 12x8" Elements sheet sets the mood.
Once all of the pages were put together, I added the tags into the middles of each of the paired papers. 
A pretty gold threaded twine adds the perfect amount of sparkle. 
Once the accordion pages were all glued together, I added bits of cut papers from the 12x12 papers, and the cut-a-parts from Romance Eight
The opposite side is equally decorated. You could easily add mini photos or wallet sized photos to this as well. The pieces from the Elements 12x12" sheet have perfect sentiments and details to add more interest to your project.
The cut tags are a perfect space to write little messages to your beloved. Special memories, ephemera, or things that you loved about them would be a great place to start. 
Each tag is topped with the sparkly twine. Easy to remove to read.
The entire accordion is glued into the cover. I loved pairing different patterns together. Here, Romance Two, Three and Five all play nicely together.
A great side shot of the entire album all folded up. I love all of the different shades of pink and red that the Romance Collection has.
I hope that this inspires you to create a mini album for a loved one that you have. You don't have to create something huge from scratch, a simple cut file can help you start to create your perfect Valentine. 
Pin It

Wednesday, July 4, 2018

AUTHENTIQUE PAPER: Happy 4th of July from Authentique!!

Happy 4th of July! All of us at Authentique Paper wish America a Happy Birthday. We wanted to wish all of our American friends a Happy 4th of July this week! Before you all go out to celebrate with picnics and fireworks, we have a few patriotic projects to share that have been crafted up with our favorite, patriotic collections!  Remember, as with all Authentique Paper products, we are always Made in the U.S.A.! 

I created a cute banner to go on my mantle for the 4th of July. I really liked the pairing of the stars in the blue paper from the Authentique Heroic Collection, paired with the fabulous red striped paper from the Authentique Freedom Collection. I created the rosettes using my Silhouette Cameo, then hot glued those to bases before adding the letters/sentiments. The stars were just stickers that I purchased just for this project from Hobby Lobby.
Supplies Used: Authentique Heroic Collection, Authentique Freedom Collection, burlap banners pieces, star stickers, Silhouette Cameo, hot glue, Lawn Fawn alpha dies, ribbon
Pin It

Tuesday, November 11, 2014

AUTHENTIQUE PAPER: Merry Christmas Wine Tags with "Believe" & Petaloo

This week over on the AUTHENTIQUE BLOG, we are partnering up with the Petaloo Design Team to showcase some amazing projects featuring Authentique papers and Petaloo products. Today I have a pair of wine tags, featuring the Believe Collection, that can easily spruce up any bottle for a present or hostess gift this season. Come over to the BLOG today and check them out!
Pin It

Tuesday, September 23, 2014

Xyron and Anna Griffin: A Perfect Pairing for Gifts

Sometimes you just need a small gift (thank you, just because, hostess gift). This wonderful pairing of Xyron and Anna Griffin products definitely fits the bill for just that. This little gift set is a box, with four cards in it.
I started by making the box from some of the flocked paper and the amazingly thick, pearlized cardstock. I loved using the luxe flocked paper on the outside of this, as it is really soft. To create the sentiment for this boxed set, I used clear acetate in the "window". This way, I can let the cards shine. Using the Double-Sided High Tack 1/2" Tape made this super easy to put together, as well as let me easily add the acetate into the completed box. 
I created two vertical and two horizontal cards using the Grace Collection and pieces from Anna Griffin's other collections. For the two vertical cards, I started with a base of the thick pearlized papers, then added various patterned and flocked papers, borders, sticker borders and die cuts. Some of the die cuts came dimensional, and some I was able to add layers myself. By running the die cuts through my 3" Sticker Maker, I was able to make sure that they were not going to shift when they were mailed. Rather than pull out my Mega Runner and squish the dimensional die cuts, I just used my Double-Sided High Tack 1/2" Tape to attach them to the cards.
For the two horizontal cards, one had a base from the All About Her Cardmaking Kit, and one I used another piece of the Perfect Palette Cardstock Kit. Then I added more pieces of various die cuts. Lastly, I heat embossed a sentiment from one of Anna's stamp sets in black embossing powder. On these two cards, I really used my Double-Sided High Tack 1/2" Tape. It made the extra embellishments so easy to place. For the embossed section, I ran those two pieces through my 1.5" Sticker Maker before attaching them to the card.
 I really love how easily this small gift came together.
Supplies Used:
Xyron: 1.5" Sticker Maker, 3" Sticker Maker,  Double-Sided High Tack 1/2" Tape
Anna Griffin papers and die cuts    Anna Griffin® Grace Papercrafting Kit,
Anna Griffin® Perfect Palette Cardstock Kit, Anna Griffin® All About Her Cardmaking Kit, Anna Griffin® 60-piece Flocked Paper Collection
Additional Materials: acetate, ribbon, craft foam, Silhouette Cameo Pin It

Friday, August 22, 2014

XYRON: Gearing up for Kindergarten with Back to School Teacher Gifts

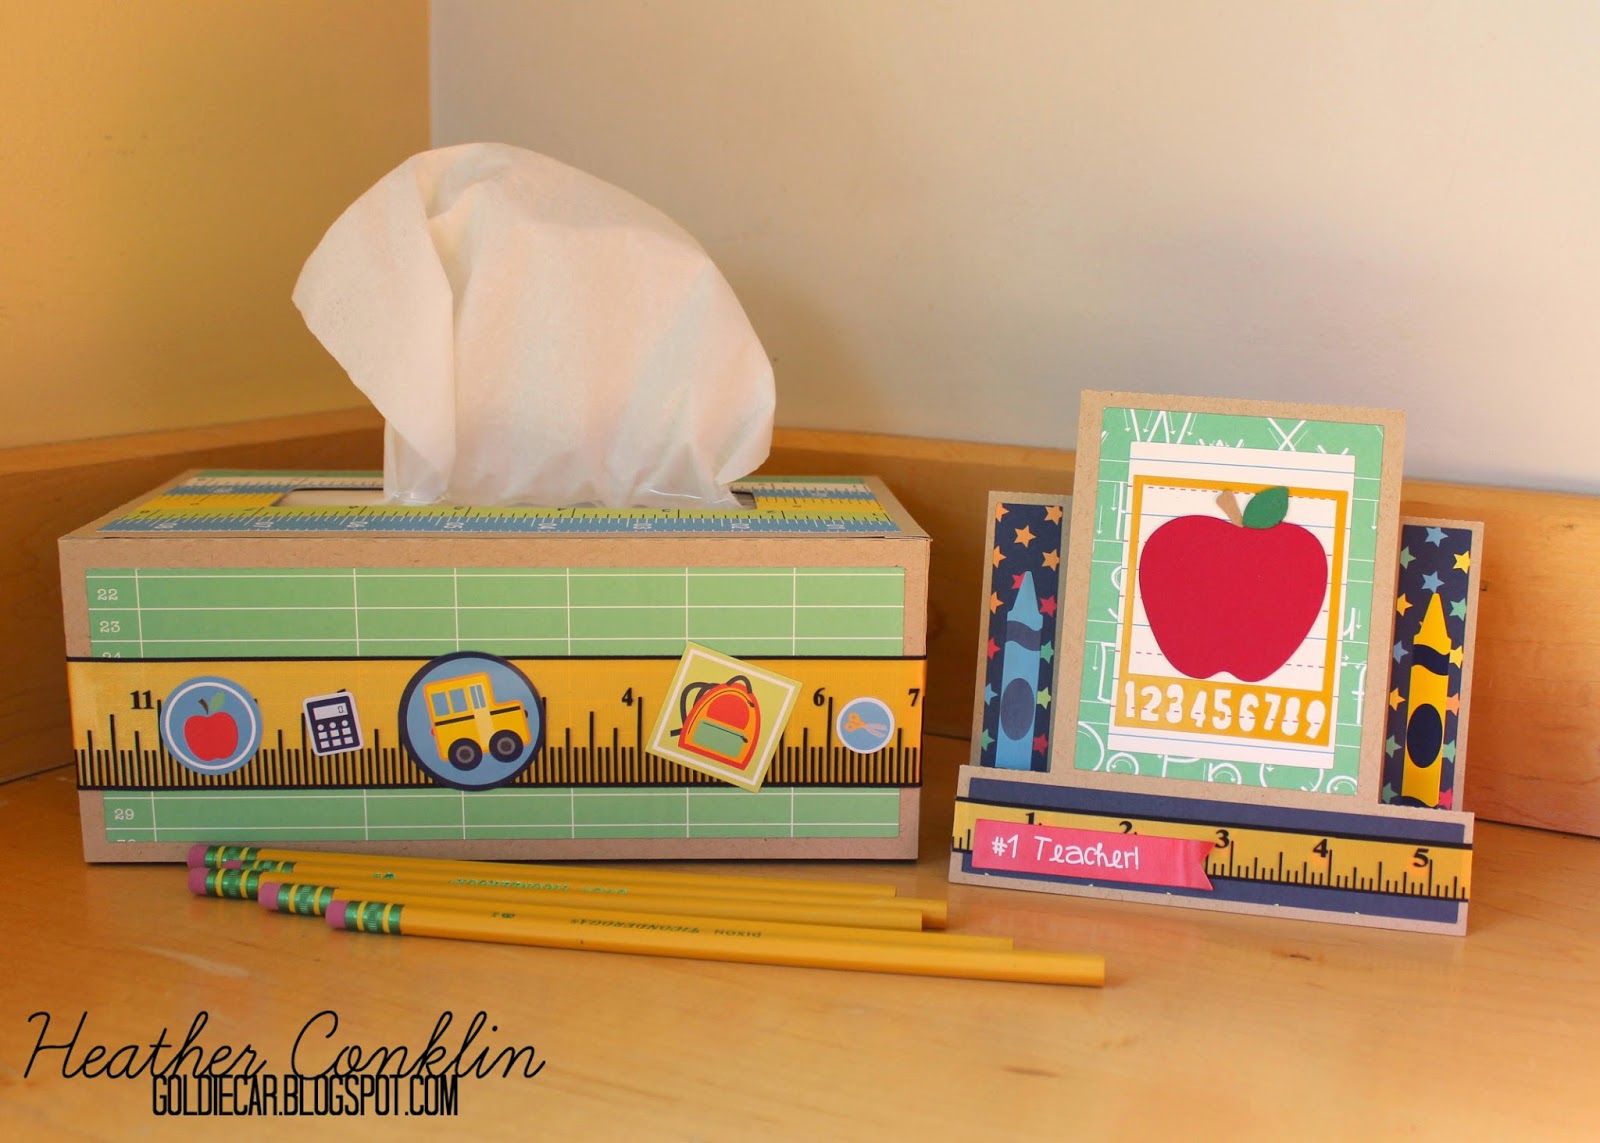
As a high school teacher, I never really use any of the cute school related papers and crafting supplies. However, my oldest is starting Kindergarten this year and I finally get to break out my cute supplies! For today, I made two little things for her new teacher: an easel card, and a cover for the classroom tissue box.
I started with the fun Square Center Step Card by Lori Whitlock. I started with a base of kraft paper, then added quite a few pieces from the Pebbles Back to School Collection (Apples, Notebook, Accent & Phrase Stickers). In order to make the apple pop, I layered pieces of Bazzill cardstock, and framed it with a Studio Calico Frame Sticker. To piece everything together, I used my Xyron 3" Sticker Maker. Since the Offray ribbon was a little thinner, I used my Xyron 1.5" Sticker Maker, attached, then trimmed the edges.
The 3D Rectangle Tissue Box by Jamie Cripps was a super fun project to put together. To add some cohesion between the projects, I started again with a base of kraft paper, then added more of the Pebbles Back to School Collection (Scissors, Rulers, Accent Stickers, Accent & Phrase Stickers) using my Xyron 9" Creative Station. Before I placed the stickers all around the box, I ran a wider piece of ribbon through my Xyron 3" Sticker Maker and wrapped it around the box. Then I placed quite a few of the Accent Stickers around the box.
The best part of this project, the "box" comes right off, and can be placed on a new box of tissues when this one is used. No more ugly boxes of tissues! I also kept the top pretty simple, since I knew little hands would be touching it quite often. 
Hope your Back to School is going smooth!

Supplies:
Xyron: 3" Sticker Maker, 1.5" Sticker Maker, 9" Creative Station
Other: Pebbles Back to School Collection (patterned paper and stickers), Studio Calico Stickers (Teach Kids Frames), Bazzill cardstock, Mohawk Via Vellum (kraft), Offray ribbons (Measure Up), tissue box Pin It

Friday, January 31, 2014

XYRON! A Fond Farewell, and Game Day Decorations!

Good Morning! Today is a bittersweet day for me, as it is officially my last post for Xyron Adhesives. I have had a complete blast sharing everything that I have made with all of you. I will forever cherish the time that I spent working for a fabulous company, and alongside some super-talented ladies. 

Even amongst the bitter part, it will be a fantastic weekend this weekend. For starters, today is my birthday! While I'm not going to tell you how old I am, I will say that I'm younger than the Seattle Seahawks who are going to the Super Bowl this weekend!!
Since I was born and raised in the Pacific Northwest, it's a pretty big deal that our Seahawks are playing on Sunday. We watch every Hawks game, and usually my husband attends at least one a year. While our family usually watches the big game, no matter who plays, we don't usually decorate. This year... All bets are off (at least on the decoration side of things!)
I really love this banner. It's fun, and because I didn't use the team name, only a PNG of the Hawks logo, I could break it out again later if I chose to.
My husband was gifted these quite a few years ago, and we get to decorate with them finally! Just a little bit of vintage Seahawks!
For the food picks and the larger logo, I just found a PNG file of the logo online. THIS is the version that I used for this project. My crafty friend Brenda shared with me a fantastic tutorial on how to use your Silhouette's Print and Cut feature. There really are quit a few out there, and this one just worked for me. Once those were all cut, I used my Xyron 1.5" Create-a-Sticker to adhere the logos to a scalloped rectangle that I sized just for this.
Once the logos were adhered to the rectangles, I simply attached some popsicle sticks that I cut in half (and made pointy!) with a couple of Xyron Adhesive Solutions 3/8" Dots.  Now I'm ready to spear some amazing game snacks!
The banner was really easy too! I took a football shape from the Silhouette store, and cut it in both kraft paper for the football, and white for the laces. I cut the title with cardstock, then offset the letters so that I could use a contrasting color with each letter. I then ran both the laces and the blue letters through my Xyron 3" Sticker Maker. I think that the 3" is my favorite Xyron tool.
Once the laces were attached to the footballs, and the blue letters were attached to the offset green ones, I needed to attach the title to each of the football pieces. Using the Xyron Adhesive Solutions 3/8" Dots, each of the letters was easily attached.
Once all of the letters were attached, I used a hole punch to create a place to use my grey twine and string up the banner.  
I'm kind of in love with the whole effect. Now all I need is some football snacks and one amazing game! GO HAWKS!
Supplies Used:
Xyron Adhesive Dots in 3/8", Xyron 1.5" Create-a-Sticker, Xyron 3" Sticker Maker, American Crafts Cardstock, Neenah Solar White Cover, Silhouette Cameo, Twinery Twine, printer, popsicle sticks. Pin It