Showing posts with label stickers. Show all posts

Monday, June 18, 2018

PAPER GIRLS CHALLENGE BLOG 154: Bicycles

Hello! I just started Summer Vacation, and loved the challenge of Bicycles for this week's Paper Girls Challenge 154! 

I knew that I had the cutest bicycle stamp from American Crafts. This is from their Peachy Keen collection from 2011! I couldn't find a good purchasing link, but I know that there are bits and pieces in various places. The papers are all retired as well, from the Sidewalks collection from October Afternoon.
 Make sure you come and play with us with our current challenge!!
Products:
Peachy Keen stamp (American Crafts), cardstock (Core'dinations), ribbons, embellishments (Prima) Pin It

Friday, November 24, 2017

AUTHENTIQUE PAPER: Frosty Winter Projects

Sometimes a paper collection is so easy to use, that I can create an entire set of cards or projects easily with it. Frosty Winter for me was this collection. Once I started using the fantastic violets and blues, I was hooked. 
  
I started with a fun layout. I really wanted something simpler than complicated. The patterns were just too gorgeous to add anything else. I wanted each to shine on their own, so used primarily straight cuts and layers, instead of more complicated shapes. A black and white photo kept from competing with the amazing violets and blues.
 To make the patterns stand out from one another, I used vellum between some of the layers, and as the snowflakes around the image.
 
 My favorite part of this collection is easy the tiny sentiment stickers that come on the Details sticker sheet. I just loved adding those throughout the layout.
 The tab stickers are also amazing. I loved adding all of the tiny snowflakes to this fun layout. Once the layout was complete, I could stop myself from creating MANY cards with all of the leftover bits and pieces of Frosty Winter.
I started with this adorable printable from Jessica Feig. I had to color him to match the colors of Frosty Winter. I cannot wait to send him to someone just for a smile.
An embossing folder, some scraps, and a little Glossy Accents made this snowglobe card sparkle.
Mirroring the snowflake sentiment on the Details Sticker with a stitched snowflake and embossing folder elevates this tone-on-tone beauty. 
A really simple trick to tone down the colors or patterns of a patterned paper is to place it under some vellum. The vellum is still translucent. so the snowflakes just peek through.
A deep impression, a little twine, and some beautiful sentiments make this an easy card to share.
Thank you for looking. I hope that you found some inspiration to get your Frosty Winter projects started.
Pin It

Tuesday, September 27, 2016

DIY treat bags using Harvest

Fall is here! Crisp leaves, warm and cozy afternoons, and squirrels gathering for Winter. I thought that I would create two cozy little bags using our Harvest Collection to tuck a few treats in for later this month.
I started with the lovely plaid patterns in the Harvest Collection (Harvest Four, Harvest Five). There is something about plaid that just screams Fall to me. I used my Silhouette to die cut each bag (Design ID #100592), making sure to enlarge each to get the most of my 12x12 paper.
Each of the two bags has a combination of various die cuts and Details cardstock stickers. I used things that reminded me of Fall, leaves (oak, standard), acorns and feathers.
The edges of all of the die cuts and the bags are all inked to show definition between the layered paper. Not only are the die cuts layered and inked, they are popped up with some dimensional tape to help add some interest.
Some of the larger stickers were a bit too big for this small of a project, so I used my embossing powder tool to make them "unsticky." Now each of the stickers is a die cut!
 Filled with some matching candies, they would make a perfect little hostess gift. 
The best part of this paper is the lovely weight and texture. I know that these little bags will hold a ton of fun goodies. The gorgeous insides are also a fun bonus!
Supplies Used:
Authentique Harvest Collection: Harvest Two, Harvest Three, Harvest Four, Harvest Five, Details 12x12 Adhesive Cardstock
Other Supplies: Silhouette, Silhouette Online Store, dimensional adhesive, ink (Distress Ink), embossing powder tool
I hope that you are enjoying the Fall weather and Harvest Collection! Thank you for stopping by!
Pin It

Thursday, June 2, 2016

AUTHENTIQUE PAPER: 4th of July Fun with the Freedom Collection

I'm going to Throwback Thursday on this fun post from last year using the fantastic Freedom Collection by Authentique! The cut files are all from the Silhouette Online Store, and the "Fireworks" flair is from Panda Eight Designs.


Pin It

Tuesday, February 2, 2016

AUTHENTIQUE PAPER: "Adore"-able Valentine's Packaging

I wanted to share with you a few quick and easy Valentine's that you could make using Authentique's new Adore Collection. To start, I found an adorable Heart Window Treat Wrap (#114931) that was just the right size for a little Valentine's Jelly Belly box. I cut the pieces from Blushing and the Enhancements page. I really love that black and white stripe that was on the reverse of the images, and wanted to showcase it. Finish them with ribbon and a sticker, and they are perfect!
The "Love" home decor was simply a fun wood piece I found at my local craft store, then painted white and covered with pieces from the 6x6 Bundle. To get the letters just so, I made sure to glue then down first, cut with a craft knife, then sand the edges smooth. Inking the edges last, makes any imperfections disappear!
The last little Valentine I have for my little family is a fun gift bag that I filled with yummy chocolates. I just love the Blushing paper, and had to use it once again. I used almost the entire sheet for this, and it's just the perfect size for an entire bag of goodness! To make the bottom more secure, I glued in a small square of 110# cardstock. To complete this, I used some wonderfully pink May Arts ribbons.
The fun gift tag is created from one of the Components die cuts, and a Details sticker that I hole-punched. Simple and perfect.
 Hopefully this gets you in the mood to create some fabulous Valentine's yourself!
Adore Collection: Blushing, Enhancements, 6x6 Bundle, Details stickers, 6x12" Components
Additional Supplies: May Arts ribbons, Silhouette Cameo, Silhouette Online Store [Heart Window Treat Wrap (#114931), Vertical Heart Box (#37202)], wood word, white paint, inks, adhesive, candies
Pin It

Friday, November 21, 2014

AUTHENTIQUE PAPER: Grateful Table Setting

One of the best things about the holidays are the decorations. I have for you today a few little additions to your table that can help to make your dinner really special using the Grateful Collection by Authentique. Make sure that you check out the entire table setting over at the Authentique Blog today!
And Happy (early) Thanksgiving!
Pin It

Tuesday, February 25, 2014

Gossamer Blue Life Pages (January 6-12)

This was a fun week. Mostly. We got back into the routine of non-Christmas vacation. Had a bit of 12th Man fever. GO SEAHAWKS! Miss I was able to go to TinkerTopia (and be on local TV!) and I figured out how to comb those My Little Pony dolls from Build-a-Bear (wig brush, warm water and detangler).

In the midst of the January Gossamer Blue kit, I mixed in some of my Elle's Studio stash, and whatever letter stickers I could find. This month uses some Fancy Pants chipboard, Cosmo Cricket Tiny Type and Basic Grey stickers.
If you are in the greater South Sound area, I suggest checking out TinkerTopia. It's a "Creative Reuse Center" that blends recycling and art. It's pretty darn fun!
I loved the sweet pics from this week. I love capturing honest, wonderful moments of pure joy. Pin It

Friday, August 30, 2013

Back to School... (Already?!?!?!)

Today I get to spend the day with my peers, planning out how to implement the next school year. In preparation for my own desk, I created this super cute pencil case and crayon box using Xyron products and Authentique's Curiosity Collection. Even a year later, I still love this line. 
The Xyron 9" Creative Station is perfect for gluing down those larger pieces of paper. Especially if you want them to really stick to your project. I'm pretty sure that the decoration on the pencil box is going to last longer than anything that will go in it. And all of those little pieces on the die cut pencil, those were all aided by Xyron's 1.5" Create-A-Sticker Machine.
I used a combination of both machines on the crayon box as well. In truth, I really wanted to minimize the amount of loose crayons my daughter has in my studio. (I think they are all over the place!)
I really love how this super fun project turned out. And yes, it did make me a little bit excited to start school this year!

Supplies Used:
Xyron 9" Creative Station, Xyron 1.5" Create-A-Sticker Machine, Authentique Curiosity Collection: Learning, Academic, Studious, Details and Elements Stickers, VersaMagic Ink in Turquoise Gem, Silhouette Online Store: pencil, crayon box Pin It

Wednesday, August 21, 2013

AUTHENTIQUE PAPER: A Thrilling Way to Add Interest to Layouts

On the Authentique blog today I show how you can recreate this great layout from the Create-N-Connect/Craft & Hobby Association show. There is a of interest by using almost every pattern in the 6x6 pad, and this is an easy way to use them all at the same time. Check it out!

Pin It

Sunday, August 18, 2013

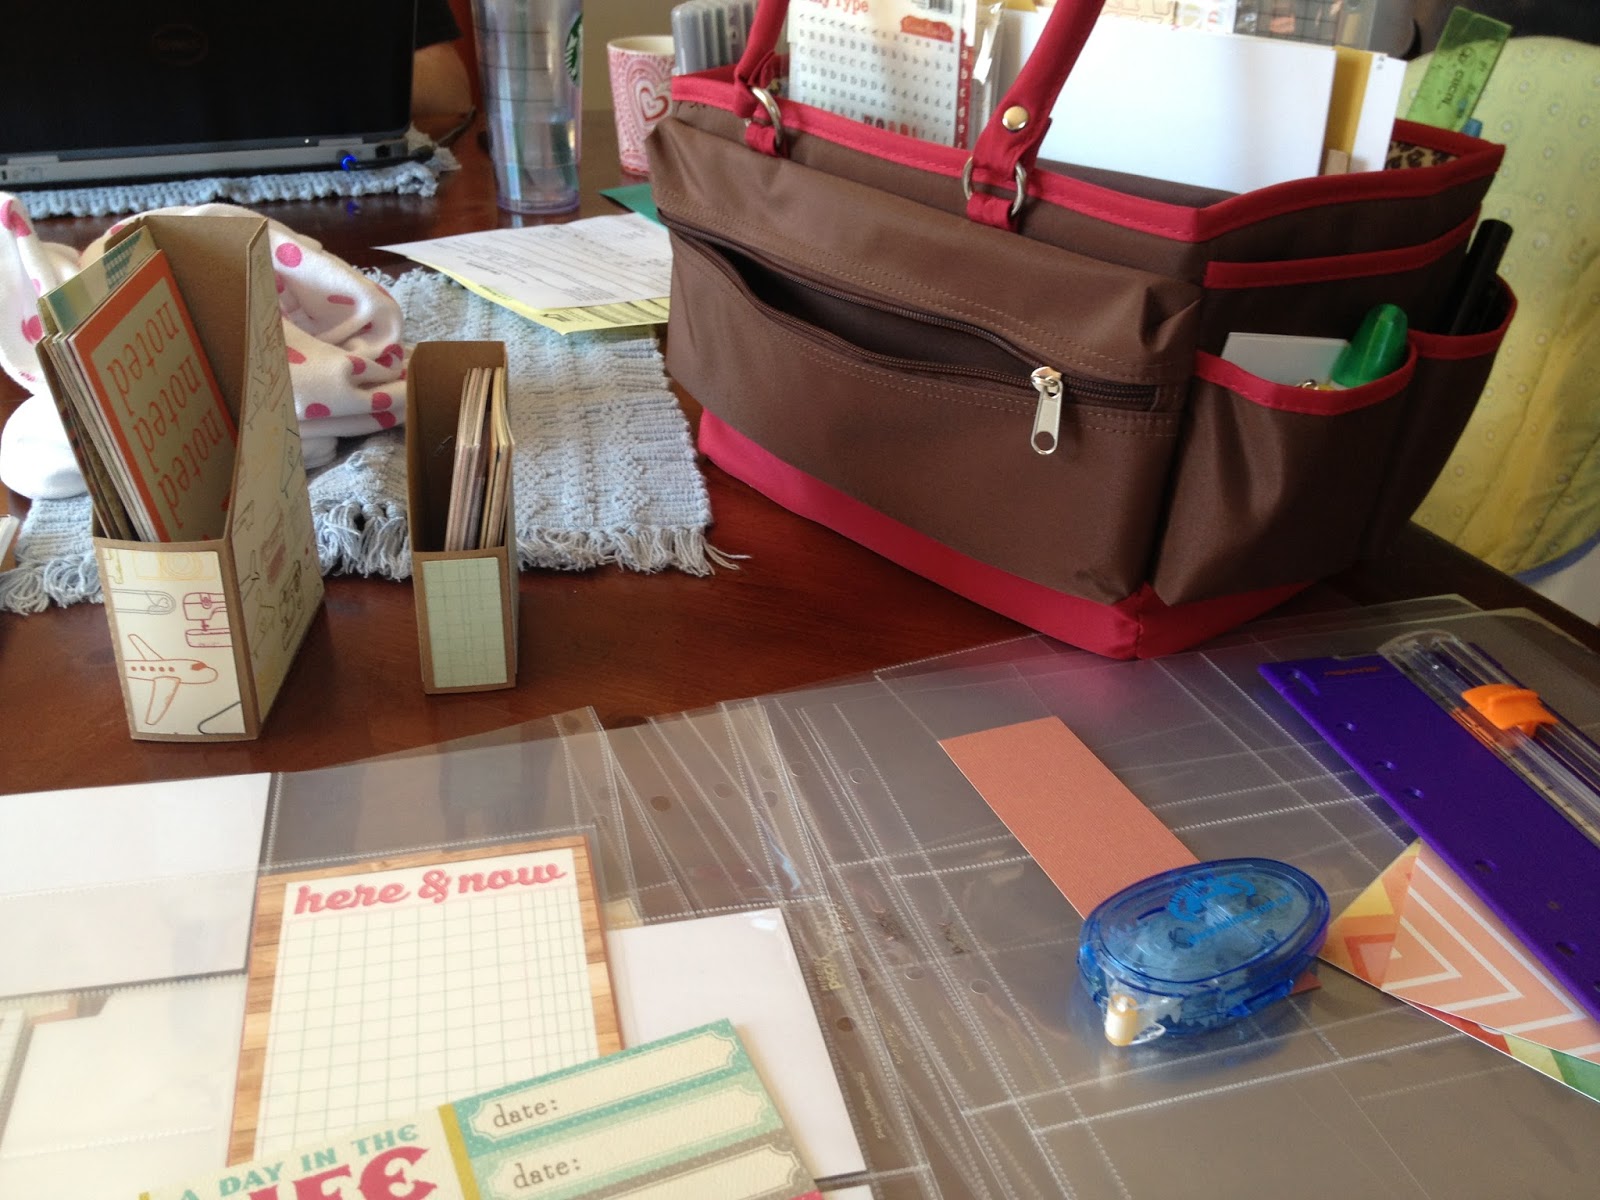
My Project Life Basket: How I Organize My Weekly Scrapbooking Part 1

I figured out the cause of my lack of mojo. An unclean room (since tidied!) and the lingering thought that I haven't really started my summer of Project Life... I like the idea of capturing what goes on during the week, however during the school year it's just not feasible. Not because I cannot keep up, more because life is a lot more monotonous, scheduled, the same each week.

And since I have a studio to work in, I really cannot drag all of my stuff downstairs, or other places. So I created a PL basket. Just enough stuff to create at least a month's of pages without having to have anything additional. I also kind of enjoy not being attached to my Silhouette (blasphemy, I know!!) for everything. I could just go buy the kits, but that's no fun!! I have the page holders, but really just want to use my stash for the filler cards.
Here's my basket!! It seriously has everything I need! I already made a month's worth of pages. In 24 hours. Seriously! Even my cute Xyron 1½" Create-A-Sticker Machine!!
And the other side.
I have quite a few pre-cut 4x6 and 3x4 cards that I made a couple of Silhouette magazine holders for (4x6, 3x4). Include a 6x6 pad of cardstock, and at least one of patterned paper, or the leftovers of one of my Gossamer Blue kits... And the month is set.  
A handful of various letter sets, used up (almost) and brand new. All small and rather thin. This way, I can put them on pics, pages, etc.
Random assortment of enamel dots, flair, Elle's Studio pieces, etc. Anything small and fun.
A date stamp and some sequins. In those little bags that come with sweaters.
Scissors, a ruler, corner chomper, Signo pen, at least one color of journaling pen (but who's counting... I have six on the other side).
Small cutter and 8.5"x11" cutting board.
Mini stapler and a sketch pad.
And here's the beginning of my pages. I'll have to show more this week. I'm super excited to start getting somewhat caught up!!

Tomorrow, I am going to share my tricks for organizing my weeks and my photos. I have a few Apps that I LOVE that make this whole process SO much easier. Especially when I don't have a great photo printer in my house.

And just because... My newly organized buttons and brads! I took out all of the tiny ones... Love the color, NEVER used them.
Don't they look all pretty now?!?!?! Although, I realized I really need more yellow buttons. That one is looking a little lonely.

***Project Life is a system of memory keeping created by Becky Higgins.  You can learn more here***


Pin It

Tuesday, July 30, 2013

Elle's Studio Sketch Thursday 7/25

Sometimes the right photograph needs the right layout. And the right products. I don't remember ever scrapping this picture. It's from Ro's newborn pics. I kind of love how the color in the photo works with the colors in the Serendipity line from Elle's Studio. I also pulled pieces from the past few monthly kits (June/July) and some older Lil' Snippets.
I even pulled out my Silhouette sketch pens and used them for my journaling!!
And a stamp!! I'm trying to use my inks and stamps in new ways. I'm still not so hip to the stamping on layouts (mainly in case it messes up), but I stamped it and fussy cut to give it a layered effect. Then used some Cosmo Cricket Tiny Type for the mini-title.

Pin It