Showing posts with label kraft. Show all posts

Monday, September 4, 2017

Paper Girls Challenge Blog: Labor Day

Happy Labor Day everyone! Since I'm a teacher, Labor Day has a special significance in my career. It signifies that the school year has started, and summer is now over. In my little house, we have a new school-ager, and we once again have our favorite kindergarten teacher. This card is for her.
I used a fantastic little owl card by Jennifer Rush. I really loved how cute she was. And the apple!!!! I used a combination of scraps from my scrap bin, and a few bits and pieces of the Bountiful Collection from Authentique. I know that there are little bits of pieces from Elle's Studio and Studio Calico, but I've no idea what line anymore. The stamp is also from Studio Calico.

Make sure that you check out the Paper Girls Challenge Blog and participate in your own version of our Labor Day Challenge! Pin It

Tuesday, September 6, 2016

It's a Fabulous Start to the School Year!

As a teacher, I love a nice desk set just like anyone else. Over summer, I decided to pull this cute little set together using the Fabulous Collection.
I started with a Moleskine book. My favorites are the graph paper Cahier Journals. They make just the perfect, small notebook that I can use for meeting notes. They are also really easy to decorate. In this case, I used my Xyron Creative Station to add adhesive to the Fabulous Six 12x12 paper, then used a craft knife to cut around the cover. Liquid glue would also work well.

I added some interest with some die cut pieces from the 12x12 papers, an Authentic Life Card and some of the stickers from the collection. Each of the edges were inked with Distress Ink to create some interest. To keep the journal closed, I added a cute binder clip.
I couldn't resist adding a few pencils into the mix and created this sweet little pencil holder. I just folded the Fabulous Five paper so that the back was slightly longer than the pencils, leaving the front slightly wider than the back. Then I folded over the flaps and glued them in the back.
To finish off the pencil holder, I added a sweet polka dot heart and a matching polka dot bow.
The last little piece to the set is a bright, buttoned tag. I couldn't resist layering the Details cardstock stickers to a punched tag. Then added the ribbon, and sewed on the button to keep it in place.
I hope that this inspires you to break out your collections for more than just cards and layouts.

Supplies Used:
Authentique Fabulous Collection: Two, Five, Six, Eight, Twelve, Authentic Life Cards, Details stickers, alpha stickers (older collection)
Other Supplies: Moleskine Cahier, ribbons (May Arts), button, kraft paper, binder clip & pencils (Target), Distress Ink (Antique Linen)
Pin It

Wednesday, October 22, 2014

BOO! from Xyron, Core'dinations and Petaloo


The Xyron Design Team is working alongside of our friends at Core'dinations Cardstock and Petaloo to create some amazing projects for you this week. 
Make sure that you check out all of their Facebook pages, as well as the designers' blogs. There are a ton of prizes to be had each day!


Today, I am showcasing a fun Halloween banner that I created for my front door. I love the distressed look that the Tim Holtz Kraft-Core Core'dinations cardstock gives to this project. To create this, I cut out each section using the Lawn Fawn Lawn Cuts Stitched Party Banner in both banner sizes, as well as the circle.

I then ran those sections through various embossing folders, then sanded them with the Core'dinations Sand-It Set. This way, the great kraft shows through in various sections. Flowered sections are layered with Authentique Paper (Conjure, Components die cuts), and Petaloo flowers (Embossed Mulberry Flowers -Daisies/Chartreuse, Forget me Nots-Soft Lavender). They are attached using Xyron's Double-Sided High Tack 1/2" Tape.
 
The letter shapes are created in a similar fashion. I started with the banners, layering them with dimensional adhesive that I made using my Xyron 3" Sticker Maker and some craft foam. Then, I ran the Petaloo Crochet Fancy Trim (purples).  through my Xyron 1.5" Sticker Maker and attached it to the smaller banner. Added the embossed circle and a DIY Thicker made orange with Neon WOW! Glitter. You could create this same effect by running the front of your alphas through any of your Xyron products and adding glitter. 
Lastly, I strung each of the banners onto some twine in my stash. One trick, if you have a banner like this, you can always tape the back of the string/twine/ribbon in place. No one will see it, and your banner pieces won't shift around.
This was a super fun project to make!! Hope you enjoyed this and all of the other projects this week. Joy over at Joy's Life and Marcia Dehn-Nix have both created some amazing items!


Supplies Used:


Petaloo: (Embossed Mulberry Flowers - Daisies/Chartreuse, Forget me Nots-Soft Lavender, Crochet Lace Fancy Trim-Purples)

Core'dinations: Tim Holtz Kraft-Core Nostalgic Collection paper pad

Additional Supplies: Lawn Fawn Lawn Cuts Stitched Party Banners, Authentique Paper (Conjure, Circles and Scallops die cuts), American Crafts (DIY Thickers, Wow! Extra Fine Glitter-Neon), craft foam, twine, Darice Embossing Folders (Wood Grain, Interlocking Circles), Cricut Cuttlebug Embossing Folder (Love Triangles, Swiss Dots)
Pin It

Tuesday, August 19, 2014

Popping Up to Say "Get Well Soon!

I just love when an idea actually happens the way that I thought it would. I love this Lawn Fawn set (Love 'N Breakfast). It's one of my firsts... I kind of found it behind a few things, under some more in a local store. I haven't really used it to it's full potential though, probably because it's intend is more "love" based. I do love trying to find new ways to use it.
I started by making my card base. I folded an A2 card (Via Vellum-kraft), then placed the fold right inside of the cut line of my largest Lawn Fawn Lawn Cut Stitched Party Banner. Once that was complete, I stamped my images (Love 'N Breakfast) onto some Neenah Solar White paper, then colored them in with Spectrum Noir pens. I used sentiments from both the Love 'N Breakfast and the Get Well Soon sets. Once it was complete, it was a little too white, so I used some Distress Ink (Frayed Burlap) on the white banner. Then I needed some contrast between the two kraft colors, so cut and attached some white, striped paper behind and glued it all down. Last, I added two enamel dots in the holes that didn't cut all the way on the top of the banner.

Supplies: Lawn Fawn (Love 'N Breakfast, Get Well Soon, Stitched Party Banners), ImagineCrafts (Tuxedo Black Ink), Distress Ink (Frayed Burlap), Neenah Cover (Solar White), Mohawk (Via Vellum-kraft), enamel dots, Spectrum Noir pens, patterned paper Pin It

Friday, July 4, 2014

Neon Thank You Cards!!

Im really loving my ImagineCrafts Radiant Neon inks lately. Here's another quick project using them all! I have both warm and cool versions. The enamel dots are Freckled Fawn and My Minds Eye, the stamp is an older Hero Arts stamp, and the kraft cardstock is Mohawk. Loving their thick vellum!!
Pin It

Monday, March 3, 2014

Gossamer Blue Life Pages (January 13-19)

Sometimes, weeks don't go the way that you plan...We watched the football game, got Guinness groomed, hung out a bit, and my friend figured out what colors she wants for her wedding. A little bit of illness (it's been a bit crazy as of late) and the week was done.
I really loved all of the Gossamer Blue printables this month, and used them throughout the layout quite a bit. Xyron's Adhesive Dots made them a breeze to apply.
And those sweet wood veneers by Elle's Studio are pretty fantastic.
I'm not sure who makes that sweet kraft envelope, but I love it. My wonderful friend Brenda sent me a couple of them and I have been hoarding them for uses like this. Pin It

Tuesday, October 8, 2013

Xyron and Doodlebug Help Celebrate Fall!

I am loving the fall weather. Fall in the Pacific Northwest is usually gorgeous, but this year has been all about rain and thunderstorms. I kind of love it. It was on one of these very days that we took a ferry ride that this adorable photo was taken. I love my little monkeys, and they normally aren't this sweet with one another.

For this layout, I really wanted to play off of the aqua skirt that my oldest was wearing. I used the Happy Harvest Plentiful paper in the background, and die cut a piece of Happy Harvest Sunflowers to base the layout from. I'm a sucker for woodgrain of any kind, and the Happy Harvest Sunflowers paper is a beautiful red.
I used kraft paper to give the photo a little bit of a natural border, then popped that against the opposite side of the Happy Harvest Plentiful paper. The journaling was created by running two die cut pieces of kraft and Happy Harvest Autumn Leaves through my Xyron 9" Creative Station and using a Signo Uniball pen for the journalling.
A sweet banner made from pieces of the Happy Harvest Fancy Frills stickers and Happy Harvest Doodads, along with some burlap alphas finished off this layout.
This little foxy card was so easy to put together using mainly stickers from the Happy Harvest Icon Sticker and Happy Harvest Quotes stickers. I also used a corner punch to add some detail to the Happy Harvest Apple Orchard and Happy Harvest Autumn Leaves papers then ran all of them through the Xyron 9" Creative Station. And the aqua blue makes the orange stand out. LOVE!
I cannot stand to see scraps of paper lying around without a purpose, so created this card using some die cuts that reminded me of Fall using the Happy Harvest papers, Happy Harvest Quotes, Happy Harvest Doodads and Happy Harvest Pumpkin Gingham Washi Tape. I even popped in a little ticket from the Happy Harvest Fancy Frills sticker sheets. The leaf was easy to create, just die cut, then wrinkle it up as much as you can right before gluing it down with Xyron’s Adhesive Solutions 3/16"  Dots. This way, I could get the leaf to look a little more realistic.
Lastly, a sweet little card for a friend who just bought a new house. I loved the Harvest Homes paper, and it will be perfect for moving in the Fall. I didn't want to busy up the streets too much, so added a few simple touches with the Happy Harvest Quotes, Happy Harvest Doodad and Happy Harvest Fancy Frills border sticker.
Thanks for celebrating just a little bit of Fall with me! I hope this inspires you to get some adorable Doodlebug papers and your Xyron products and start creating!

Supplies Used:
Xyron: Xyron MegaRunner, Xyron 9" Creative Station, Xyron Adhesive Solutions 3/16" Dots
Doodlebug: Happy Harvest Collection: Autumn Leaves, Apple Orchard, Plentiful, Sunflowers, Harvest Homes, Icon stickers, Fancy Frills stickers, Quotes stickers, Doodads, Pumpkin Gingham Washi
Other Supplies: twine, dimensional adhesive, cardstock, kraft paper, die cut machine, corner chomper Pin It

Saturday, August 17, 2013

Summer Card Camp 2 Cards!

I'm back again with more cards!! These two sets are created using sketches from the Summer Card Camp 2.
I really loved this little card. I still have to send them out, but they are just too cute. The popsicle is a fun Silhouette cut. I used Crate Paper's Pier 6x6 for this card. And some kraft for the "sticks". Some dimensional adhesive makes the Popsicle stand out on this card.
This was just a fun card. I used some older Sassafras Lass and Echo Park's Little Girl, along with some older American Crafts buttons. These will be super fun for a kid's birthday!!
Pin It

Thursday, March 14, 2013

It's a Good Day (GB February)

The only problem (and it really isn't a problem!!) with using a kit service, is you do run out of full 12x12 sheets. My solution, (OH DARN!) is to go into my extensive stash and find something that both works with the kit, and the photo. In this case, I went searching through my Sassafras Lass papers. I found this great sheet of Simply Smitten, and checked the back for the most fantastic matching page. It even has journaling lines!!

I even was able to use up almost all of the Amy Tangerine letters that I got earlier! I love when a title makes me use a bunch of otherwise wasted letters.

What isn't shown, is the little kraft envelope behind the photo is actually filled with another photograph taken about seven months after the main image. It's of the two girls laying together on the bed. My hope for the two girls to get along is so far happening. I couldn't be happier! Pin It

Tuesday, October 30, 2012

AUTHENTIQUE PAPER & Love My Tapes!

Come check out my project today for Authentique Paper and Love My Tapes! I just loved being able to use their great washi and fabric tape again! PS. There is a mini tutorial on the adorable trees... :)
Pin It

Saturday, August 18, 2012

AUTHENTIQUE COLOR CHALLENGE: September

I love the new Curiosity line. It's bright, fun, and doesn't always have to be used for school-related items! Loving this picture of my little girl who turned three over summer. <3 br="br">
Authentique Patterned Papers in Studious, Academic and Interested,  Details Stickers
AC Kraft, ribbon and Thickers, Pebbles sticker, OctoberAfternoon Mists, Chalk Ink
 
We have two challenges per month:
• Inspiration Color Challenge - The Inspiration Color Challenge will be posted on the third Saturday of each month. There will be a color storyboard posted for you to use as inspiration.
I would love for you to play along!
A few details:
Just use the challenge inspiration to create as many projects as you'd like.
A winner will be randomly selected from all the qualified entries to receive an Authentique Paper prize pack!
{The more projects you create, the better your chances are of winning!}

Head to the Authentique Blog for all of the rules and details, as well as amazing inspiration from all of the design team members. Pin It

Thursday, January 19, 2012

A Fistfull of Cards...

 Congrats baby card
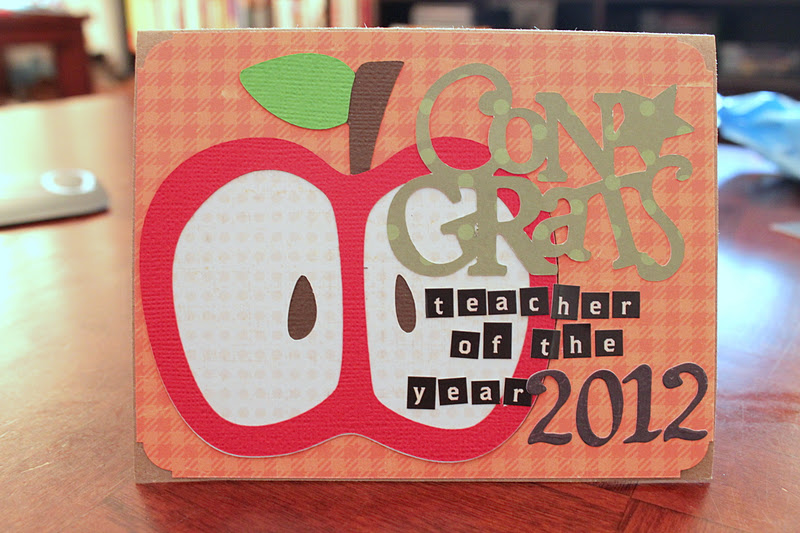
Congrats: Teacher of the Year 2012
 This is Not a Goodbye Card, this is an I'll See You Soon Card
 62 is Beautiful
 Personalized Halloween candy tubes
Congrats baby card
Pin It
Saturday, October 8, 2011

Just a few cards...


Pin It

Monday, October 3, 2011

Topaz #10: Grumpy Monkey Face

Another 10 weeks down, and another 10+ layouts done... 

This week's Topaz #10 signifies the end of another gemstone over at ScrapbookSteals. I am continuing to use my lovely Counterfeit Kit (I cannot wait to get this month over and create another one this week!!! Seriously, they are that fun!!)

For this week's Mid-Week Mojo, I used a couple of funny photos that I had of Miss I. Seriously, she does make the silliest of faces. 
 
The sketch was one of Kristy's fantastic MWM's!! I loved all of the layers, and was able to mix up a ton of the different patterns and styles of my Counterfeit Kit. Of course, I added some green woodgrain, kraft, clouds and a felt ribbon!
Rather than go with the more traditional circles or flowers... I went with stars, and pop-dotted them to make them stand out more.
I also did the same to the cloud... Before I used the sticker, I fastened it to kraft paper first.
Rather than using the standard Thickers, I used the smaller Echo Park letters to create my "Grumpy Monkey Face" title.
 
All in all, this was a great way to end my Topaz career. Loved the last 10 weeks!!
Pin It

Wednesday, September 28, 2011

Topaz 9: Friends (w/ Counterfeit Kit)

For this project, I wanted to use a few photos of my lovely Miss I, and her two best friends! I love how the natural light on these photographs just picked up the cutest expressions on each of the girls. I also really wanted to keep using my fantastic Counterfeit Kit that I made for September. I still have SO much paper and supplies, that it might just run me into October as well! Or, I could just find more time and keep crafting away...
I decided to finally use the elusive Crate Paper Bouquet paper. I'm not one for using a ton of florals in my projects, so this was kind of a stretch for me. I loved the flowers, and the colors, but just do not choose them everytime. I also used Kristy's fantastic Mid-Week Mojo for Topaz #9. I loved the idea of using photographs more than once, and so mirror the larger photos with the same photos in wallet size.
Instead of another journaling area, I decided to use some Glue Dots (I couldn't find my Glubers, homemade or otherwise) and a piece of kraft scrap to make this muslin flower. Super easy!!! I then adorned it with a Studio Calico butterfly that I had sprayed with Lunchtray Mr. Huey, then adorned with my MME bling.
I mirrored the small butterfly, with a larger one that was created in the same way. I just adore how the Mr. Huey's is SO bright. And it matched my color palette perfectly!

After piling all the pieces together, I realized that the blues needed something to 'pop' against, so used the reddish paper to make the polka dots stand out. I didn't want to waste paper, so strategically pieced together a border in reverse. All of the seams are hidden behind the flower, bracket or butterfly (you didn't notice, did you???!). I also added a small kraft scalloped edge to reflect the journaling box. Lastly, foam Thickers made up the title.
All in all, I think it went just well! I'm sad to see most of the inspiration paper from my Counterfeit Kit gone, but I have enough to make a card or two...
Pin It