Sunday, March 22, 2020

Capsule Crafting - March Edition

My craft room is a disaster. If there's one thing that will happen from being stuck at home for weeks on end... it's going through and getting rid of all of the things that are just not being used. However, there's a TON of stuff that I actually DO want to use. More. A few weeks back, Kristina Werner was posting about her "Capsule Papercrafting List" and actually using more, with less. Ingenious.

Here is my Capsule Papercrafting Supplies for March. I plan on making at least 10 cards, or some other projects with these. Maybe more! Who knows. ALL materials (except the Authentique Bundle - as I design for them) have been purchased exclusively by me, and are only used for my personal projects.

THE STAMPS:
I wanted to include a few various companies and ideas. Or things that I've had for awhile and really haven't used much, if at all. Concord & 9th: Feathered Bundle, Here's the Scoop Bundle, Wonderful Florals, The Stamp Market: Friendly Bunch Stamp Set, Neat & Tangled: Dazzling Stamp & Die, Stampin' Up (this is a retired dots stamp from forever ago...)

THE DIES & TOOLS
Some of the tools I will use. These are specific things. Dies - stencils - floss
Waffle Flower: A2 Layer Dies, Lawn Fawn: Flippin' Awesome Dies & Lawn Trimmings, random die from Amazon (gift), DMC Floss: 604, 165, 964, 702, 3812, 962, 3712, 352, Neat & Tangled: Dimensional Triangles Stencil, heart stencil - (I forget what brand)

THE ODDS AND ENDS:
These are a bit of everything... Authentique Paper: Refreshed 6x6" Bundle, Pink Paislee: Moonstruck cork stickers, Felicity Jane: Essentials Puffy Alphabet, Shimelle: Enamel Dots, Clique Kits: bits of a past kit, Gelly Roll: wide white pen, Chameleon: black pen

THE PAPER & TOOLS:
These are my colors. Stamp Market Color Crush paper - just leftovers from past projects, Zig Clean Color Real Brush Markers, Wonder Forest Paintbrushes, waterbrush, some already colored images from Jessa Feig (she is AMAZING!!)

INKS, INKS, & MORE INKS:
I purchased the entire Color Crush set a few weeks back. The lovely people at Stamp Market even fixed an error quickly. I love them! I also snagged the newer Black, Navy and No-Line inks!

THE BASICS:
Lastly, it's the basics. VersaMark Ink, VersaFine Ink, Hero Arts White Embossing Powder, Ranger Multi Medium Matte, and an acrylic block.

Alright... Here goes! Pin It

Friday, March 20, 2020

AUTHENTIQUE PAPER: Let's Go On a Trip Voyage Mini Album

Are you ready to go on a trip yet? We have been at home for a week now, and everyone is getting a little stir-crazy. This little mini album is created for our next adventure. The Voyage collection was the perfect collection for this one page mini album. The lighthouses, the little crabs, and all of the nautical elements are perfect for living in the Puget Sound.
To start, I grabbed this fabulous mini album cut file from the Silhouette Online Store. The base of this mini album is just one sheet of Voyage Four. The red on the inside will be a great background for all of the smaller elements and patterns.
The ribbon is a combination of both sides of Voyage Ten. I like the combo of red, white, and blue and the nautical stars.
Once open, you can see all of the fun details and patterns that are used. I really liked using the larger patterns from the 12x12" papers, but you could also use the smaller patterns from the Bundle if you like the smaller patterns.
On the inside, I used a combination of many of the papers. 
Adding a little but of foam adhesive created just the right amount of dimension for the small sections.
I also cut down a few of the cut-apart pieces from Voyage Eleven, so that they would fit in the little boxes. The ones that are left alone will be perfect places for tiny photos from our next adventure.
The stickers from the Details sticker sheet are also great additions to the mini album. 
I love seeing how the pattern of the outside of the mini album goes well with the inside pieces. This will be perfect for our next adventure.
Supplies Used: 
Pin It

Friday, February 14, 2020

AUTHENTIQUE PAPER: Valentine's Day Love Notes Wreath


This wreath began as simply a fun paper mache base that I purchased at a craft store. I glued and trimmed papers (Two & Three) from the Love Notes collection to the base, sanding edges to perfectly match the shape.
Once the paper covered the front, inside and outside of the heart-shaped wreath, I hot glued the pom pom ribbon in place.
Took the sticker banner from the Details sticker sheet and used dimensional adhesive to layer the stickers onto slightly larger banner pieces (I just used the sticker as a guide). Once those were complete, I hot glued those pieces to the ribbon banner, and glued that in place on the edges of the wreath.
I added a few die cuts, a couple of Details stickers, and some extra embellishments from my stash, and the wreath was complete.


Thanks for spending Valentine's with us this week. ~ Heather 

Pin It

Monday, January 20, 2020

Challenge #192 - Winter Color Challenge

Hello! Heather here, and I'm so glad that I can share with you today's challenge. I love creating based off of color palettes and images. It's a great way to challenge yourself to use materials or items you normally wouldn't use, create during a rut, or just use up what you have.

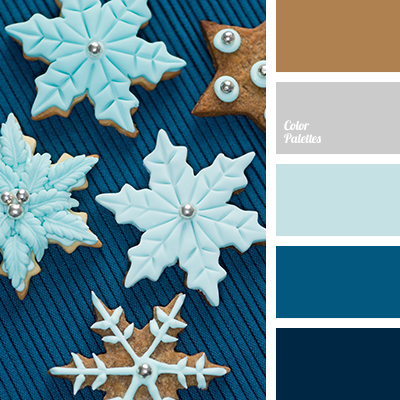
Today challenge is all about winter colors, snowflakes, silver, and texture. Or not! It's all about how YOU read the color palette, the reference image, or both! Create something that is inspired by this image and/or color palette.
https://colorpalettes.net/color-palette-2499/

Heather
For this project, I combined both the image AND the color palette to create this card. I knew that I wanted to emphasize the texture of this card, so I started by embossing the dark blue cardstock with silver embossing powder. Once that was complete, I die cut the embossed piece, the snowflakes and the sentiment. Once this was complete, I added the burlap ribbon, glued down all of the pieces, and added an enamel dot for interest.

*   *   *   *   *

ARE YOU INTERESTED IN BEING PART OF THE PAPER GIRL CHALLENGE BLOG?
We have spots open on the Design Team for you!
If you are interested in joining a fun team with flexible commitments
(once or twice a month project, and $20 a year donation for follower prizes) 
you can apply now to become a PaperGirl!
To apply just send an email to papergirlschallengeblog@gmail.com 
Deadline is the end of January 2020.
We thank all who apply, and new members will be contacted.

*   *   *   *   *

We want to encourage all of our challenge participants to refer our rules and prize structure here: http://thepapergirlschallenge.blogspot.com/p/how-to-play.html
Also, follow us on Instagram for more chances to win! For this challenge use #PGCBchallenge192 and tag us @papergirlschallengeblog for an extra entry.

Go to the BLOG: http://thepapergirlschallenge.blogspot.com
Pin It

AUTHENTIQUE PAPER: Love Notes Altered Mailbox

After Christmas ends, I love decorating for the winter and then Valentine's Day. Ever since my littlest has started to express opinions, one of them has been to make sure that the house is ready for each holiday. This year, a little mailbox is joining the decor, wrapped up in our new Love Notes Collection
I started with a sweet little mailbox from the Dollar Spot at Target. I have seen similar mailboxes in other big box craft stores as well. 
The mailbox is wrapped in Love Notes Three. In this case, the paper measured 4.5"X12", and wrapped over the entire mailbox.
Right where the flag is was a bit tricky. I cut a straight cut to where the flag and the mailbox connected. Behind the flag is a little hole that I cut out of the paper. Once it was in place, I made sure to add adhesive around the flag and down the length of the cut in order to hide it. To make this perfect, I practiced on a separate piece of paper and traced it onto my Authentique paper.

Adding a few stickers to each side made for some interest, as did the die cut border. The handle for the mailbox is a grouping of stacked buttons. In this case, three buttons in similar colors to the paper were stacked and hot glued together.
The front of the mailbox has a couple of stickers from the Details sticker sheet and a heart die cut from Love Notes Five
A few more stickers from the Details sticker sheet, and this mailbox was complete. 

Thanks for looking at this fun project. I hope this inspires you to find a cute mailbox and alter it yourself!
Supplies Used:
Other Supplies: Mailbox, Scor-Tape, buttons, hot glue
Pin It

Monday, January 6, 2020

PAPER GIRLS CHALLENGE BLOG: Challenge #191: NEW!

I got a few new stamp and die sets during a few of the sales that were going on during the holiday season, and finally got some time to play with some of them. Here is my card using the Stamp Market Color Me Happy Stamp Bundle and some new (but an older collection) paper from Felicity Jane.

Are you interested in playing along with us? We are looking for some new members! 

Design Team Call:
If you are interested in joining a fun team with flexible commitments
(once or twice a month project, and $20 a year donation for follower prizes) 
you can apply now to become a PaperGirl!
To apply just send an email to papergirlschallengeblog@gmail.com 
Deadline is the end of January 2020.
We thank all who apply, and new members will be contacted.

We want to encourage all of our challenge participants to refer our rules and prize structure here: http://thepapergirlschallenge.blogspot.com/p/how-to-play.html

Also, follow us on Instagram for more chances to win! For this challenge use #PGCBchallenge191 and tag us @papergirlschallengeblog for an extra entry.
Pin It

Friday, December 13, 2019

AUTHENTIQUE PAPER: Stamped and Watercolored Wobble Snowfall Collection Tags

Hello! It's getting to the point in the year where the gifts are starting to pile under the tree, and I am starting to run out of gift tags. For today's post, I created a sweet gift tag set using the Snowfall Collection. These are super easy to make, and just take a bit of time.
I started with the cute Snowfall Collection, and then painted the three children to match the colors in the collection. I really loved adding a bit more of the red tones, as they added a cute Christmas flair to this collection. This way I could use the fun colors into the Christmas season.
 
Each of the children images are stamped and cut using the Bundled Up Bundle from Concord and 9th, then painted with Jack Richeson Collegiate paints. The images were just perfect for the Snowfall Collection.
The first tag is created using Snowfall Six with a tag topper of Snowfall Eight. I just loved the sweater texture of Snowfall Eight, and used it as the tag topper for all three tags. 
 The second tag uses Snowfall Five and a few of the Snowfall Elements cardstock dies.
My favorite of the three tags uses Snowfall Seven and features a couple of the Snowfall Elements cardstock dies. Each of the stamped images is popped up with an Action Wobble Spring. Each will move and shake as the tag moves. The ribbons are also just stapled on with the Tiny Attacher. This way the ribbon will not shift. A simple piece of twine or string could attach each of these to a package or present. 
Thanks for stopping by to see today's Christmas tag set. I cannot wait to see what you make with the Snowfall Collection
Authentique Supplies: Snowfall Collection (Five, Six, Seven, Eight, Elements)
Other Supplies: Bundled Up Stamps & Dies (Concord & 9th), Shay Tag Dies (Felicity Jane), Collegiate Watercolor Set (Jack Richeson), Tiny Attacher (Ranger - Tim Holtz), 3/4" Chevron Twill - Green ribbon (May Arts), Action Wobbles - mini (Hampton Arts) Pin It