Saturday, September 17, 2011

AUTHENTIQUE: September Color Challenge

We will have two challenges per month:
• Sketch Challenge - The Sketch Challenge will be posted on the first Saturday of each month. There will be two sketches posted {one card sketch and one layout sketch} for you to use as inspiration.
• Color Challenge - The Color Challenge will be posted on the third Saturday of each month. There will be a color palette posted for you to use as inspiration.

We would love for you to play along!
Just use the challenge inspiration to create as many projects as you'd like.
A winner will be randomly selected from all the qualified entries to receive an Authentique Paper prize pack!
{The more projects you create, the better your chances are of winning!}

*****
Here is the color palette for September 2011:

Here is my interpretation of the color options. I really wanted to focus on the Foundations paper, as well as use more of the Splendid that I received. I also used some of the Blissful papers and die cuts for the sentiment. The pink bow is actually paper rafia that I unwound and tied around the card.
 (Supplies Used AUTHENTIQUE: Journey Foundations Front, Splendid Renown, Blissful Prosperity, Splendid Icons; OTHER supplies: paper rafia, a•muse studio stamp, cardstock)

I used an a•muse studio stamp for the sentiment. I like how the script works really well with the Blissful die cut.

It's a brighter card, but I like the fact that it will help to brighten my friends day. 

*****
Make sure that you link your color challenge to the AUTHENTIQUE blog!! Also, check out the AUTHENTIQUE Facebook page for information on getting the new Free Bird loose 6x6 papers!!
Pin It

Thursday, September 15, 2011

Counterfeit Kit Challenge: Crate Paper "Bouquet"

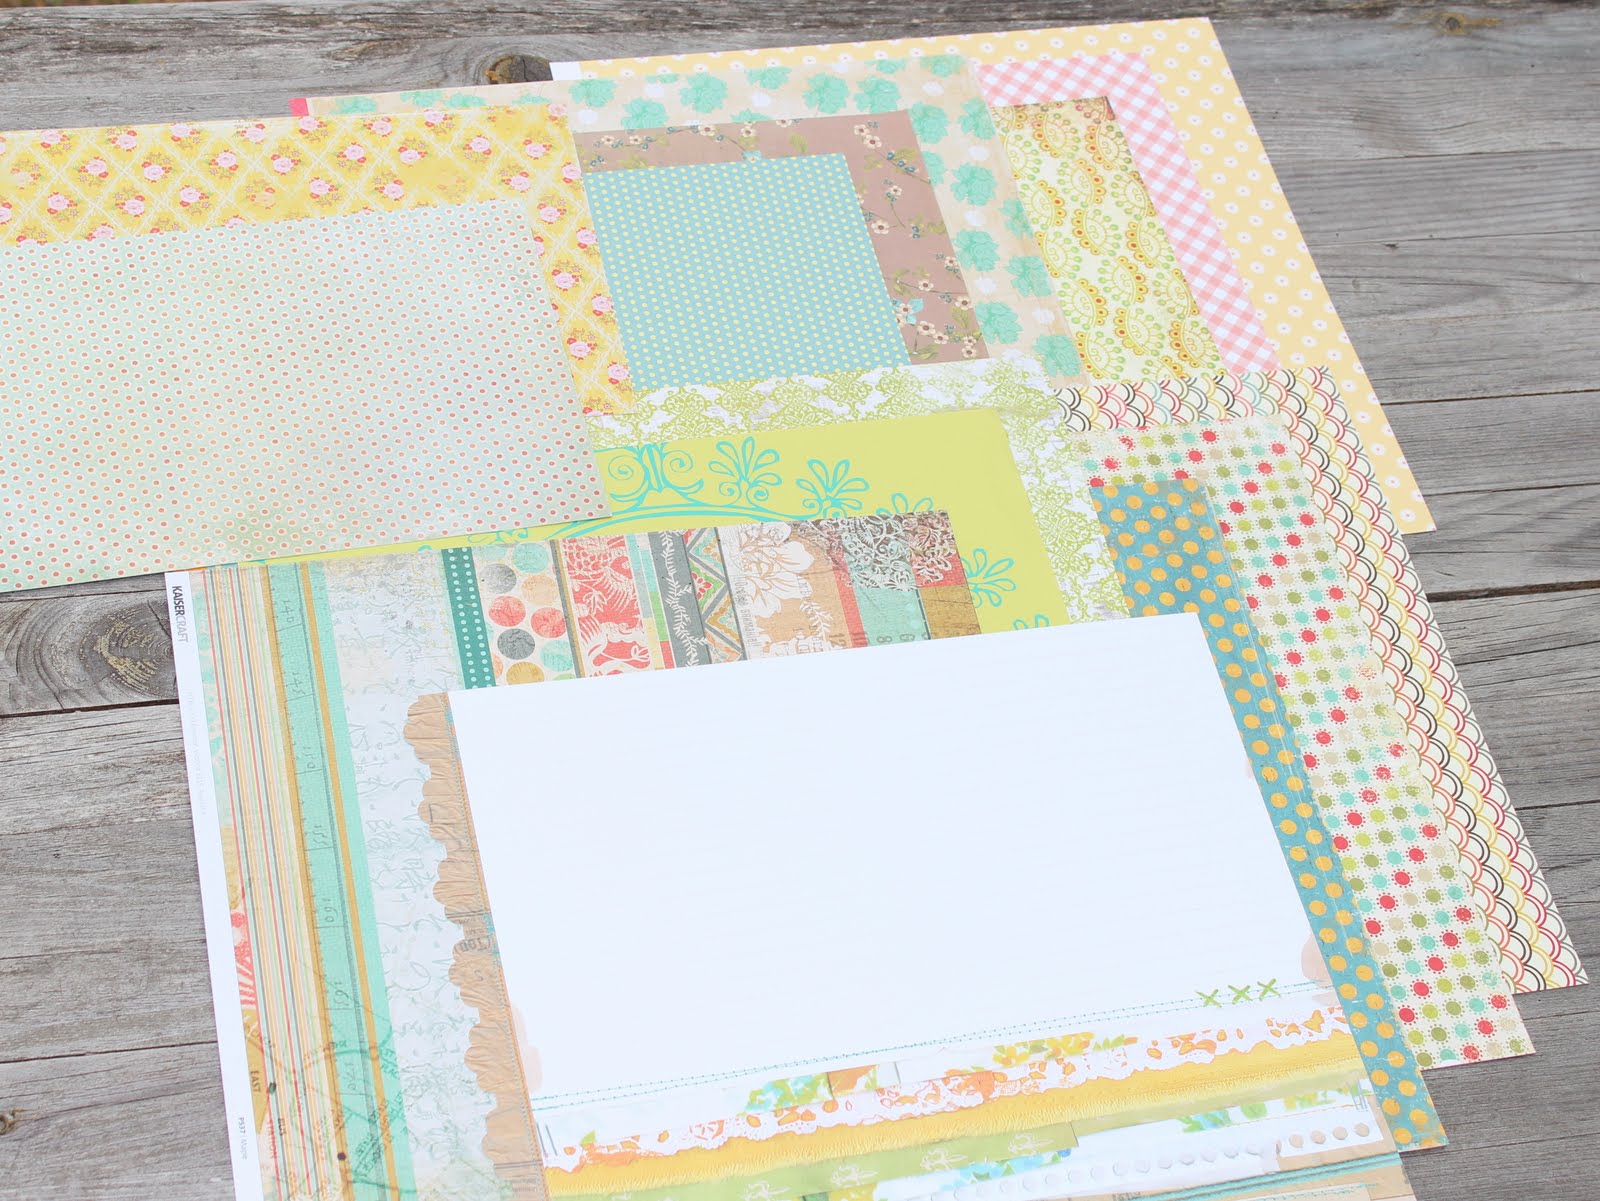
Today, I am showing my Counterfeit Kit Challenge. I chose to use a piece of paper that was similar to this month's kit of choice, but different in color tones. I chose this piece of paper from Crate Paper's Portrait line called "Bouquet".
The colors for this paper were not the same as the Sassafras paper's blue and yellows... but I found a great pin off of Pinterest that held similar colors.


Since I don't use a ton of plain cardstock, I chose a few pieces that would be great for my uses. 
Kraft paper, reddish/pink Bazzill, Green Bazzill, Crate Paper Emma's Shoppe "Inventory", Little Yellow Bicycle Twig's "Fern", Prima Madeline Collection"Parfait"& Crate Paper Emma's Shoppe "Dolls".

My patterned paper included a few pieces (14)... Including a couple of half sheets...
American Crafts Peachy Keen in "Easy as Pie" and "Good Golly Gee", Basic Grey's Hello Luscious "Scrumptious", Crate Paper Portrait "Something Blue", Prima Madeline Collection "Skyward", Pebbles May Bouquet Collection "Front Porch", Pebbles Lil' Miss Collection "Sunshine", MyMindsEye So Sophie "Never Enough", Crate Paper Restoration "Refinish", Prima Coquette "Chemise", Hambly "Big Vintage Circle", Kaisercraft Lush Collection "Maple", Sassafras Lass Mix & Mend "Free Composition", Crate Paper Emma's Shoppe "Dresses", MyMindsEye Stella & Rose "Joy",
 

Embellishment Kit #1: AC Thickers in Dear Lizzy, and Honey puffy Thickers, Sassafras Lass stickers in Mix Sweet Treats, Studio Calico tickets, American Crafts rose ribbon, MME adhesive bling, hemp twine, BG Hello Luscious fabric flowers, MME Lime Twist cardstock embellishment, Echo Park mini type, YLB doilies, Studio Calico spray in Bluegrass

Embellishment Kit #2: aqua ribbon (unknown), AC Delights, AC tags, MarthaStewart kraft tags, AC Flair, MME Lime Twist stickers, MME Fine and Dandy ribbons, Studio Calico Mr. Huey Sunshine, CosmoCricket Tiny Type in Yellow and Top Secret, YLB dimensional embellishment Twig
 

Chipboard Kit: MME Fine and Dandy chipboard set, Studio Calico wood veneer butterflies, MarthaStewart adhesive ribbon, muslin, white and black paperclips, BG brads, CC Blackboard mini book
 

My goal is to use this kit all month. I hope to use more of my existing materials, and purchase less and less. That means that I can snag more tools when I see great deals!!
Pin It

Wednesday, September 14, 2011

Snippet: Counterfeit Kit Challenge & Design Seeds Preview

My lovely friend Brenda over at The Imperfect Scrapper found a great blog called the Counterfeit Kit Challenge. The goal over at The Counterfeit Kit Challenge is to use your own supplies to create an amazing kit! Why buy more, when you have TONS of stuff already?

Their kit used a great kit from Sweet Peach Crop Shop's September 2011.
While it is completely cute and lovely... It's a lot of Sassafras Lass. Sass that I don't have. While I could just toss a bunch of Sass in and call it a day, I wouldn't go the easy route. When do I ever do that? So... I found a piece of paper that I love, but was challenging me... And was floral. Which I hardly EVER use!

(Crate Paper "Bouquet" from their Portrait line)

I then matched the colors with a great color palette from Design Seeds that I found on Pinterest.

I ended up including quite a bit of yellow and green. Again, colors I don't use a lot of. My kit includes 8 pieces of "cardstock", 14 pieces of patterned paper, a mini chipboard book that I have NO idea what to do with, 2 mists, a handful of ribbon, chipboards, alphas, twine, wood veneer, brads, tags, and a few more embellishments. Okay, so a couple of "add-on" kits...

I'll post my own pics tomorrow!! Pin It

Friday, September 9, 2011

I. Love. Twine!

I. Love. Twine!

Seriously... I love twine. I think twine has to be one of the prettiest things that I can add to my papercrafting. It looks fantastic with kraft paper. Twine is just lovely.  So, when my lovely friend Kristy over at www.scrapbooksteals.com asked me to showcase how I keep my twine, as well as a few of my projects... I JUMPED at the chance. 

A little while back a few of my crafty friends and I bought a bunch of Twinery twine in bulk, then divided it all up. This way, I was able to have each of the colors for the same price of one roll!!
  
 Although I love love love how many people creatively hold their twine... I'm all about function! I used strips of chipboard 1.5"x6" to use for two colors. I tried to use complementary colors, or colors that I felt weren't necessarily the same, but I could use together. The concept worked perfectly, until I had to get the newest Twinery colors: Denim, Buttercream and Stone.
I may rearrange at some point... But it's not too important at the moment!
For this card, I used a bee that I had lying around from a previous bout with my Cricut. I copied the Echo Park rainbow pattern in twine. It just ended up really cute!
 I really liked how the colors of twine matched all of the rainbow colors in the EP paper.
(Supplies used: Echo Park Summer Days 6x6, American Crafts cardstock-blue/white, Bazzill cardstock-black, Basic Grey yellow patterned paper, Sassafras Lass In-a-Stitch Blooms, Cosmo Cricket Tiny Type, Twinery Twine, Hero Arts stamp)

For the next card, I really wanted to make a knitted looking stocking. I started by actually trying to knit using skewers, and quickly realized that I am NOT a knitter. I'm okay with that information. I ended up using a really quick slip knot stitch and made one long braided looking string. I had previously cut out the stocking, and so wrapped the braid around the stocking shape.
I really liked how this gave the impression of being knitted, without all of the bother! I ended the stocking, by looping the leftover twine to make a loop.
 (Supplies used: Basic Grey patterned cardstock, PaperZone white cardstock, A*Muse stamps, ColorBox ink, Twinery Twine)

I also use twine on layouts! This brightly colored layout was screaming for more pink!
(Supplies used: Basic Grey Patterned Paper in Olivia, MyMindsEye patterned paper SoSophie, BG embellishments, Sassafras Lass letters, Twinery Twine)


For this layout, I attached a chipboard piece to the twine, then made it stay in place using grommets. I love how the twine just adds that extra bit of wonderfulness!!!

All in all... I LOVE Twine! PS. Scrapbooksteals is having Twinery twine on sale today!! Just sayin'!

Also... Head over to my friends' sites to see how they use Twinery twine! ALL  of these ladies are downright GENIUSES!!!


Pin It

"Splendid"ly Authentique...

Good Morning! As my first post for Authentique, I decided to make both a layout and a card using Splendid papers. Before joining the Authentique Design Team, I had not had the chance to play with either line, and I loved finding ways in which to mix the different colors.
 
(Supplies Used AUTHENTIQUE: Splendid patterned papers-Delight Back, Richness Back, Foundations Back, Renown Back, AUTHENTIQUE die cuts: Splendid Icons & Tabloids, AUTHENTIQUE Petite Type Squares)
(Other Supplies: kraft cardstock, American Crafts buttons, Twinery twine, Basic Grey brads, Glossy Accents, Signo white pen)

I really wanted to create a layered look, but wanted to keep the look of the layout soft. To achieve this, I used a base of kraft paper, and let the colors of the Splendid line speak for themselves. As you can see, I really like using the backs of paper lines! 

For a lot of the smaller accents, I used Glossy Accents to make the great details in the Icons and Tabloids just a little extra sparkle.
I also chose to cut off the end of the quote on the Icons piece. I felt that for these images, it created just the perfect sentiment.
*****
For my card, I used some of the scraps that I had leftover from my layout. I used white cardstock for the base, and layered the Splendid "Delight" Back (pink) with the Splendid Foundations Back (green). I then added twine, a button, and a Blissful Icon for the sentiment. I also used a paper punch on the green Foundations paper.
(Supplies Used: AUTHENTIQUE Splendid-Delight (back), Foundations (back); AUTHENTIQUE die cuts: Icons-Blissful)
(Other Supplies: Twinery twine-Blossom, Basic Grey button, Staedler pen-yellow, Signo White pen, Martha Stewart punch)

To tie in the yellow on the Splendid paper, I faux stitched the white cardstock with a yellow pen, and then "stitched" the green Foundations in white gel pen. I loved how the pink in the Blissful Icon popped on the Splendid paper!
I hope you enjoyed today's projects!

Heather Pin It

Saturday, September 3, 2011

AUTHENTIQUE PAPER: September Challenge

AUTHENTIQUE has started to issue challenges in both color and sketch form. I loved using the card sketch this week!

(From the AUTHENTIQUE blog)
We will have two challenges per month:
• Sketch Challenge - The Sketch Challenge will be posted on the first Saturday of each month. There will be two sketches posted {one card sketch and one layout sketch} for you to use as inspiration.
• Color Challenge - The Color Challenge will be posted on the third Saturday of each month. There will be a color palette posted for you to use as inspiration.

We would love for you to play along!
Just use the challenge inspiration to create as many projects as you'd like.
A winner will be randomly selected from all the qualified entries to receive an Authentique Paper prize pack!
{The more projects you create, the better your chances are of winning!}

******
Here is the card sketch that Tifany created:
And here are my cards, I created one masculine and one feminine. For both, I used the Authentique I had gotten prior to my acceptance on the Design Team. For the masculine card, I used my Cricut to cut the fleur-de-lis out of pearl AC cardstock, Twinery twine, Glossy Accents, and a iRock gem.
For the feminine card, I continued to use my A stash, used some AC ribbon, a Theresa Collins bling, and a few of the stickers that A sent me for the sentiment.
I hope that you join the AUTHENTIQUE team in creating some fantastic cards or layouts using some wonderful products! Make sure you link yours on the blog!
Pin It

Wednesday, August 31, 2011

How To'sDay from www.scrapbooksteals.com

Tuesday, I was featured on the ScrapbookSteal's blog for my take on printing cool photos like those from my Hipstamatic (the COOLEST app!!). Here is the blog post:

*****

With the advent of smartphones and those neat apps like Hipstamatic, Retro Camera and Instagram, there is a square photo revolution. For those of us who upload our prints and get our photographs from other sources than a personal printer, it can be difficult to take an awesome square photo, with all of its quirks, and cut it to fit a standard size 4×6 or 5×7.

By some happy chance, I figured out how to use Picasa3 to keep the square aspects of the photo, but make it so that I can upload to my favorite photo printer (Costco, Shutterfly, Snapfish, Walgreens, etc.) All I have to do when I get my photos is cut off the edges into the perfect square!

Step 1: Take your cool square photo and upload it to your computer. Open Picasa3.

Step 2: On the bottom of Picasa is a “collage” button. Click it!

Step three: On the left hand side of the collage section, you can choose your photo paper size (4×6, 5×7, 8×10, etc.) Remember, you want to choose a size that reflects the size of the photo you want. 4×6 would make a 4×4 square, 5×7 = 5×5 square, etc.

Step four: Once you have chosen the size of the photo that will be printed (small area), click on the photo itself. When you do this, a circle with a pull arrow will pop up. Pull this and play around with it until it is the size you want.

Step five: Here the photo fills up white space, except for the edges. This means that the photo will print 4×4. Remember about your neat photo app edges. If you want to keep them, make them fit within the white space.

Step six: Click the box “create collage.”

Step seven: The now “collage” photo should save in Picasa3, but double check. I always save to the desktop, and then delete it once I have uploaded to my printer’s server.

That’s it! Now you can print your cool app photos at your normal printing spots. It’s a little odd that you just made a collage out of one photo, but it works!

******

Hope you enjoyed that! Check out www.ScrapbookSteals.com daily at 9 PST both AM and PM for some sweet deals!!!

Pin It