

Showing posts with label Free Bird. Show all posts
Showing posts with label Free Bird. Show all posts
Monday, June 18, 2012
AUTHENTIQUE's Fantastic "Plain" Papers Sneak
Hello folks, check out today's AUTHENTIQUE BLOG POST on using those fantastic plain papers from Authentique! So much more depth in them than using plain cardstock!!
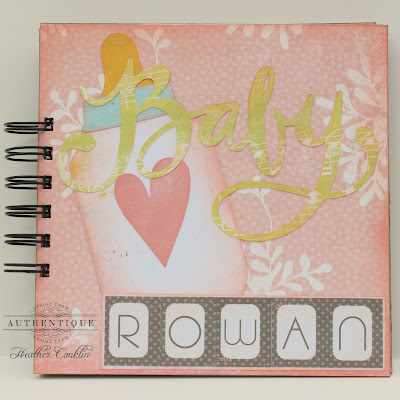 Kind of fun, isn't it?!?! Plus, I got to play with my Silhouette quite a bit!
Pin It
Kind of fun, isn't it?!?! Plus, I got to play with my Silhouette quite a bit!
Pin It


Wednesday, March 7, 2012
AUTHENTIQUE: A "Loyal" Matching Gift Set
Hello Authentique fans, Heather here with another blog post. This time I'm focusing on how to use those little scraps and Details stickers. For today's post, I have a card and matching bag with a gift tag. I find that it is often really nice to take the extra step from simply making a lovely card, to decorating a little kraft bag with scraps and stickers to match.
For the bag itself, I took scraps and pieces of the Loyal Collection (Honest, Brave, Durable) and solids from the Free Bird Nest including Comfort and Familiar. I really wanted to use the little Detail with the silhouette of the man's hat and mustache, so used a fun mustache stamp in both a chalk ink (tag) and using clear embossing powder (the bag).


Supplies Used:
Loyal Collection: Steady, Brave, Honest, Durable, Elements, Details
Free Bird Nest Collections: Comfort and Familiar Additional Supplies:
buttons, dimensional adhesives, ribbon, stamps, twine, embossing powder, kraft gift bag, card base Pin It
Wednesday, February 15, 2012
AUTHENTIQUE PAPER: A Genuine Snow Day
Hello Authentique fans! Heather here, with a layout incorporating both the Genuine Collection, and some of my favorite Free Bird Collection "B" sides.
A few weeks ago, the Northwest had a pretty large scale snow and ice storm. Overnight, seven inches of snow fell. Probably not a lot for most places in the US, but in our neck of the woods, the snow and ice pretty much shut down cities. The beginning however, did make for some pretty cute photos of my little girl.
 I knew when I saw the Genuine Collection, I wanted to incorporate some of the papers with these photos. I loved how the Friendship paper had snowflake-like stitching.
 I backed all of the photos with Natural from the Genuine Collection. I also added a phrase from the Genuine Elements, as well as some of the Genuine Tiny Type (also on the Elements sheet).
 The Free Bird papers helped to make the perfect snowflakes. I looked
through the whole collection, and settled on solids from Fair-Weather,
Endless, and Comfort. And one large background snowflake using Genuine's True.
The Free Bird papers helped to make the perfect snowflakes. I looked
through the whole collection, and settled on solids from Fair-Weather,
Endless, and Comfort. And one large background snowflake using Genuine's True.

 Adding a little bling helped to make the snowflakes stand out against the background paper.
 And one final Genuine Details sticker to set off one of the miniature photos.
While I do love paper collections by themselves, don't be afraid to mix and match! And if you need some fantastic color additions, check out the various solids that all grace the back of those Free Bird papers! They really are fun to add to your favorite Authentique collections.
A few weeks ago, the Northwest had a pretty large scale snow and ice storm. Overnight, seven inches of snow fell. Probably not a lot for most places in the US, but in our neck of the woods, the snow and ice pretty much shut down cities. The beginning however, did make for some pretty cute photos of my little girl.


While I do love paper collections by themselves, don't be afraid to mix and match! And if you need some fantastic color additions, check out the various solids that all grace the back of those Free Bird papers! They really are fun to add to your favorite Authentique collections.
Supplies Used:
Genuine Collection: Friendship, Natural, True, Elements, Details
Free Bird Nest Collections: Fair-Weather FBS120, Endless FBS115, Comfort FBS107
Additional Supplies: American Crafts Thickers, Teresa Collins Bling, Colorbox Fluid Chalk Ink
Pin It
Monday, January 23, 2012
AUTHENTIQUE TUTORIAL: Free Bird Coasters
Hello Authentique fans! Heather here with a simple tutorial for making some pretty cute coasters using Authentique Free Bird.

To start, you are going to need your tiles (I chose 4" untreated stone tiles just from my local hardware store), ModPodge or other crafting medium, spray Shellac, a spongey applicator or brush, felt, contact or rubber cement and your papers (I chose to use the Blush and Delight Nest FBN001). You'll also need some basic papercrafting tools.

To start, I cut my papers down to 3 3/4". I know that my tiles were 4", but they sloped down a bit on the edges, and this just made the most sense, as the paper wouldn't peel off the edges if it was slightly smaller.

Also, because of the tiles that I chose, and the fact that I didn't want the edges to peel or pull up, used my corner rounder on all of the squares.

A nice covering of ModPodge on the tiles themselves (untreated stone sucks some of the glue up...) so you may find that you need more than you think.

And placing all of the lovely papers on top of the stone tiles. Another generous helping of ModPodge finishes them all off for the time being.

If you want to embellish them at all, after the first coat is dry, use some paper elements to add some interest, and ModPodge those to the coaster.

While the glue is drying, I just used scissors to cut out my felt pieces. They are slightly smaller than the 4", and I rounded the corners slightly (FYI: corner edgers don't help with felt). Again this is to prevent the edges from pulling up. I used contact cement for this, but you could probably use most glues or epoxies that aren't water based.

Here is the bottom of the finished tile!! Now it won't scratch the furniture. If you wanted to not deal with felt, you could also use those felt squares or circles that they have at hardware stores instead.

When the layers of ModPodge had dried, I used the spray Shellac on them to protect the paper. I probably will put a few layers of this on. I don't suggest using these right away... Give them a week or two to properly dry. If you choose to only ModPodge them, I suggest waiting a few weeks, just to make sure that you don't ruin all of your hard work.

And the finalized tiles with all of the lovely Blush Free Bird. I purposefully chose to have two patterns and two solids, but did use all four of the papers (FBS101, FBS 102, FBS103, FBS104). I really love how lovely these all ended up, and cannot wait to give these away as a cute Valentine's gift.
In fact, I even wrapped them up with some parchment paper and twine, so that one of the butterflies peeked through. And created a cute little tag out of the scraps with another butterfly to reflect the ones in the package.

Of course I hate crafting alone, so my wonderful and most dear friend Venetia created her own tiles using the same Nest as I did, although choosing to use the Delight Series instead (FBS110, FBS111). Hers ended up being just as lovely, though very different.


To start, you are going to need your tiles (I chose 4" untreated stone tiles just from my local hardware store), ModPodge or other crafting medium, spray Shellac, a spongey applicator or brush, felt, contact or rubber cement and your papers (I chose to use the Blush and Delight Nest FBN001). You'll also need some basic papercrafting tools.

To start, I cut my papers down to 3 3/4". I know that my tiles were 4", but they sloped down a bit on the edges, and this just made the most sense, as the paper wouldn't peel off the edges if it was slightly smaller.

Also, because of the tiles that I chose, and the fact that I didn't want the edges to peel or pull up, used my corner rounder on all of the squares.

A nice covering of ModPodge on the tiles themselves (untreated stone sucks some of the glue up...) so you may find that you need more than you think.

And placing all of the lovely papers on top of the stone tiles. Another generous helping of ModPodge finishes them all off for the time being.

If you want to embellish them at all, after the first coat is dry, use some paper elements to add some interest, and ModPodge those to the coaster.

While the glue is drying, I just used scissors to cut out my felt pieces. They are slightly smaller than the 4", and I rounded the corners slightly (FYI: corner edgers don't help with felt). Again this is to prevent the edges from pulling up. I used contact cement for this, but you could probably use most glues or epoxies that aren't water based.

Here is the bottom of the finished tile!! Now it won't scratch the furniture. If you wanted to not deal with felt, you could also use those felt squares or circles that they have at hardware stores instead.

When the layers of ModPodge had dried, I used the spray Shellac on them to protect the paper. I probably will put a few layers of this on. I don't suggest using these right away... Give them a week or two to properly dry. If you choose to only ModPodge them, I suggest waiting a few weeks, just to make sure that you don't ruin all of your hard work.

And the finalized tiles with all of the lovely Blush Free Bird. I purposefully chose to have two patterns and two solids, but did use all four of the papers (FBS101, FBS 102, FBS103, FBS104). I really love how lovely these all ended up, and cannot wait to give these away as a cute Valentine's gift.
In fact, I even wrapped them up with some parchment paper and twine, so that one of the butterflies peeked through. And created a cute little tag out of the scraps with another butterfly to reflect the ones in the package.

Of course I hate crafting alone, so my wonderful and most dear friend Venetia created her own tiles using the same Nest as I did, although choosing to use the Delight Series instead (FBS110, FBS111). Hers ended up being just as lovely, though very different.
I hope this inspires you to find new ways to use Free Bird and your other favorite Authentique lines!!
Supplies Used:
Free Bird Nest Collections: Blush FBS101, FBS 102, FBS103, FBS104 & Delight 110, 111
Additional
Supplies Coasters: stone tiles, ModPodge, spray Shellac, contact cement, felt, butterfly punch
Additional Supplies Tag: butterfly punch, AC glitter and rose ribbon, brad, Office Depot paperclip, Twinery Twine, parchment paper
Pin It
Additional Supplies Tag: butterfly punch, AC glitter and rose ribbon, brad, Office Depot paperclip, Twinery Twine, parchment paper
Friday, November 25, 2011
AUTHENIQUE PAPER: Putting a Bird on Free Bird
From the Authentique Blog:
*****
Hello folks!! Heather here. I hope that all of your Thanksgiving feasts were wonderful, and that you were able to spend time with loved ones. Today for you, I have a nifty piece of decor that you too could whip up before the holidays!
Samantha showed me a fantastic pin over at Pinterest, and I was inspired to use the Free Bird Series to craft something similar. I even drew a lovely little chickadee to place on it!

I chose to use Warmth for the wreath, as I felt that it reminded me of all of winter. It does have some lovely colors and patterns.
I didn't have a little chickadee, so I actually drew one up using my scrapbooking pens and a little bit of chalk ink. Yup... the yellow is chalk ink!

The wreath itself is simply concentric circles of cones of paper. I just cut the Free Bird pages in half using decorative scissors, then trimmed off one of the 3" sides with decorative scissors as well. Roll the paper into cones, then attach the trimmed edge to the cone with a glue dot.

To attach the cones to the wreath, each cone is pinned in place, then hot glued. I haven't quite made up my mind whether or not I want to replace the drawing with a little faux bird or not yet. At the moment, I rather like him.
I hope that you enjoyed my take on a fun decor project. Just another way to use those fantastic Free Bird papers!! Have a great start to the holiday season!!
Supplies Used:
Authentique Free Bird Series: Warmth FBS 129, 130, 131 & 132
Additional Supplies: wreath form, American Crafts Memory Markers in Charcoal and Black, AC ribbon, AC white cardstock, Colorbox Chalk ink in Yellow Cadmium, stick
Pin It
Monday, November 14, 2011
AUTHENTIQUE BLOG: Wooden Christmas Ornaments with Free Bird!
From the AUTHENTIQUE PAPER BLOG:
*****
Hello Authentique fans, it's Heather!
I have a really inexpensive idea for either a small decor item, or
possibly a beautiful, and toddler-proof Christmas ornament. My little
girl found this on an end-cap of one of the large chain craft stores. At
first, she grabbed the more expensive birdhouse, but I was able to
trade her for this smaller (and only $1!) one instead. She was happy
throughout the rest of the shopping trip, and I wasn't out a lot of
money.


I then grabbed my first piece of Free Bird ("Delight" FBS 111). Rather than measuring and cutting out, I was able to fit most of the pieces in without spending too much time measuring. In this case, the eave of the roof was 90 degrees, and I was able to use the corner of the paper as my angle. I then just creased the edges and cut them off so that the piece fit properly.


Mod-Podge the wood base, then the paper to make it all stick! I found out that the more Mod-Podge you use, the better it all sticks! Plus, it dries clear... So even if it looks like it's all weird... Wait a few hours.


For the roof, I used half of a piece of "Delight" FBS 109. One side of the roof was simple, and just needed an edge punch to add some extra dimension to the roof. The other side needed to have some of the roof notched in with a hole punch so that it fit the rope. I just played with the amount I cut out until it fit right.


I haven't shown this to my little toddler yet, but I know that she is going to love it. Best part, the total bill on this project (if you already have Mod-Podge and paint) is under $3!! Even if it doesn't last toddler hands... I can make another one for just a few dollars! Pin It
Subscribe to:
Posts (Atom)