Showing posts with label Xyron. Show all posts

Wednesday, January 31, 2018

AUTHENTIQUE PAPER: Party's that POP! with Authentique

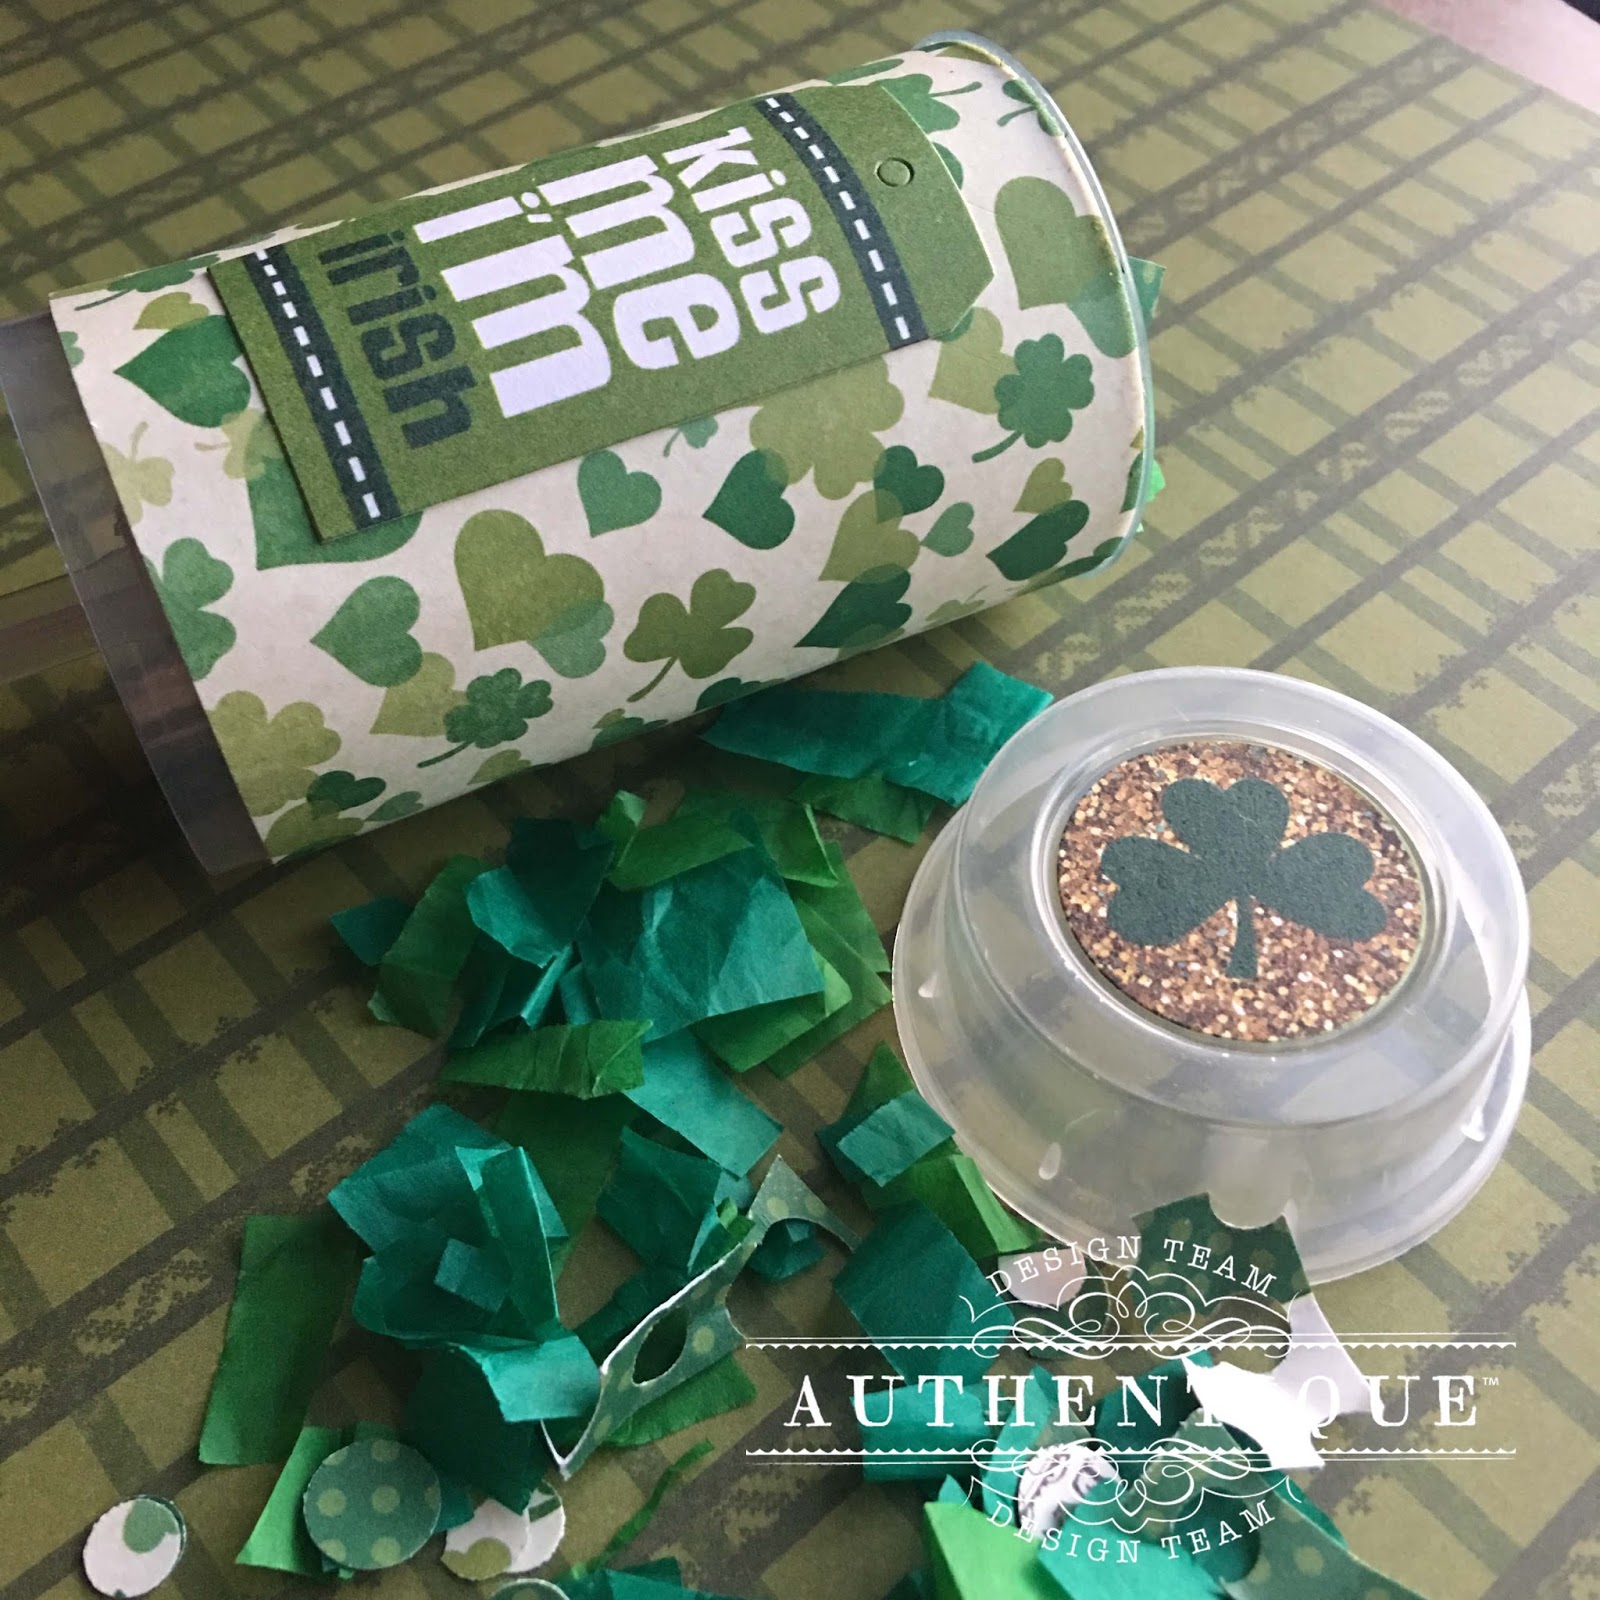
Hello! I wanted to share a fun idea that would be easily repeatable for any holiday or occasion. I created two for Valentine's and St. Patrick's Day using our Lovestruck and Shamrock collections, but depending on what paper collection you use, you could also use them for weddings, showers, or my favorite, birthdays. 
I started with a set of Cake Pop / Push Pop plastic holders. I found mine on Amazon, but there are tons out there at other stores.
I looked for a set that was able to have a lid that could be resealable. 
 
Then I created all kinds of confetti. I punched matching paper until the paper couldn't take it anymore, then I cut those punched areas into strips and added those to my pile. Then, I cut mini strips of colored tissue paper, then cut those strips down to mini pieces. 
It's not horribly time consuming, but it will take more "fluff" than you originally think. 
 
Once all of your confetti and fluff is all cut and punched, put it aside to decorate your plastic holders. I found that the best glue for this was dry adhesive, so got out my Xyron 3" sticker maker. Any strong, non-liquid adhesive (edge-to-edge, strong runner, or strip adhesive) would work best since you will be adhering paper to plastic. 
I cut my paper down to 3x8", then added adhesive. It was enough paper to wrap around the plastic holder, with a little bit of extra coverage in the back to stick the paper to itself. Once you add your paper, decorate with stickers, firmly adhering those to the paper. Then stuff those plastic holders and stick on the lid! 
Once your confetti poppers are all put together, you do need a bit of force to make them pop open, but the results are worth it! 
I would probably use these for indoor use, as you could easily clean them up. 
 I hope that you create some fun party poppers of your own!
 
Pin It

Tuesday, September 6, 2016

It's a Fabulous Start to the School Year!

As a teacher, I love a nice desk set just like anyone else. Over summer, I decided to pull this cute little set together using the Fabulous Collection.
I started with a Moleskine book. My favorites are the graph paper Cahier Journals. They make just the perfect, small notebook that I can use for meeting notes. They are also really easy to decorate. In this case, I used my Xyron Creative Station to add adhesive to the Fabulous Six 12x12 paper, then used a craft knife to cut around the cover. Liquid glue would also work well.

I added some interest with some die cut pieces from the 12x12 papers, an Authentic Life Card and some of the stickers from the collection. Each of the edges were inked with Distress Ink to create some interest. To keep the journal closed, I added a cute binder clip.
I couldn't resist adding a few pencils into the mix and created this sweet little pencil holder. I just folded the Fabulous Five paper so that the back was slightly longer than the pencils, leaving the front slightly wider than the back. Then I folded over the flaps and glued them in the back.
To finish off the pencil holder, I added a sweet polka dot heart and a matching polka dot bow.
The last little piece to the set is a bright, buttoned tag. I couldn't resist layering the Details cardstock stickers to a punched tag. Then added the ribbon, and sewed on the button to keep it in place.
I hope that this inspires you to break out your collections for more than just cards and layouts.

Supplies Used:
Authentique Fabulous Collection: Two, Five, Six, Eight, Twelve, Authentic Life Cards, Details stickers, alpha stickers (older collection)
Other Supplies: Moleskine Cahier, ribbons (May Arts), button, kraft paper, binder clip & pencils (Target), Distress Ink (Antique Linen)
Pin It

Friday, March 6, 2015

AUTHENTIQUE PAPER: Lucky Us Home Decor (Tutorial Linked)

Today on the Authentique Blog, I am sharing a tutorial using the Lucky Collection, my Xyron 9" Creative Station, and Silhouette Cameo. A special shoutout to Michelle Buck for her amazing photography of the girls in 2013.
Make sure that you stop on by the Authentique Blog and check out how to make your own home decor! Pin It

Tuesday, January 27, 2015

Creating Gift Bags with Xyron!

Good morning! I wanted to share with you a fun tutorial on making gift bags using a few of my favorite Xyron products, the Xyron Double Sided Tape, Xyron 1.5" Sticker Maker and the Xyron 3" Sticker Maker. I absolutely adore my Xyron 9" Creative Station, but my purple, sparkly X will forever hold a special place in my heart. I really love the Double Sided Tape, the 1.5" Sticker Maker and my 3" Sticker Maker, because I can toss them in a bag and go crafting with them easily. I love portable, but effective products.


I started with paper from a giant roll of kraft paper that I bought a few years ago. In short, you are going to wrap a box as if it was a present, but only on one side. To keep everything clean, I used the Xyron Double-Sided Tape. This makes all of your seams beautiful and crisp. Place your box on the paper (even an inside out paper bag will work!), tape one edge before you fold the paper over the box. Make sure that you only tape the paper to the paper (the box will come out when you are done).

Once the paper essentially makes a tube around the box, crease all of the edges. This will make your bag look more professional when you slip the box out. Then fold the edges in, and use your Double-Sided Tape to tape the bottom of the bag shut.
Here's how the box looks while it's in the bag.
Once you take out the box, you can re-crease the edges of the bag, to make it look more professional if you want. Then, cut off the bag to get the desired height. To reinforce the top of the bag, I folded the top edge down into the bag, and sealed it with more of the Double-Sided Tape.
To reinforce the bottom of the bag, take some scratch cardstock, cut it to the size of the bag, and use your Xyron 3" Sticker Maker to attach it to the inside.
I then took the top of the bag and punched holes in it with the Teresa Collins Chipboard Punch.
And then strung the bag with some leftover ribbon pieces.
For decoration, I took some pieces of paper that had previously been die cut from another project, and ran those through my Xyron 1.5" Sticker Maker and the Xyron 3" Sticker Maker. Doing so turned those fun die cuts into stickers that I simply adhered to the bag.
Using my Xyron products turned those fun die cuts into stickers that I simply adhered to the bag.
I even made a fun little tag to match! (See my die cut storage using the Xyron 9" Laminate Magnet Refill! Here's the link for that tutorial!

Doesn't this just make the cutest bag? And you can totally use up some of those scraps that you have lying around!

I made a second bag, and let my little girl play with some old chipboard pieces that weren't sticky anymore. My solution, run those cute die cuts through the Xyron 1.5" Sticker Maker and the Xyron 3" Sticker Maker. Now something that could have been tossed out is usable once again. 
These little bags make great bags for birthday presents or small gifts. Plus, because you can use any box, you can size your bag to your present.
Products Used: 
Pin It

Wednesday, December 31, 2014

Stamp Organization Using Xyron Laminate Magnet Refills

I have to say that one of my late night obsessions is watching stamp videos from Jennifer McQuire and Kristina Werner. They have some amazing technique videos, and I love watching their projects come together. One of my goals for next year is to get myself a bit more organized so that I'm not trying to look for the products that I want for my projects. This includes stamp organization. I grabbed most of my inspiration from Jennifer McQuire's stamp organization post HERE. She has an amazing system that works for my growing collections of clear stamps and manual dies.
I followed Jennifer McQuire's whole system (minus the fridge container... I used a basket instead) for her stamp storage. However, the floating metal dies were driving me nuts. So I pulled out my Xyron 9" Creative Station and tossed in the Laminate Magnet Refill.
To start, I cut down some cardstock to fit in the envelopes and fit the dies that I wanted to store. It really doesn't matter what color or style, you won't see this anyway.
Run those through your Xyron Creative Station, then cut the edges down to the size of the paper.
Place your metal dies on the magnet side of the sheet, and place inside your envelopes as if they were the clear stamps. For my stamps with matching dies, I placed the dies on the back of the envelope.
This even works with the leftover strips and smaller die sets.
I will admit, that once I did this, I realized that I could have saved a few steps by just running and entire sheet of 8.5x11" cardstock through my Xyron using the Laminate Magnet Refill. I then, would have cut that into sized pieces as I went. Hope this helps keep your matching dies more organized!

Products Used:
Xyron 9" Creative Station, Xyron Laminate Magnet Refill, Target Room Essentials Branch Weave Small Bin, Avery Elle Stamp and Die Storage Pockets, Brother P-Touch Label Maker, white cardstock Pin It

Wednesday, December 3, 2014

December Pocket Pages Kit and Covered Christmas Notebook using Xyron Products

https://www.facebook.com/xyroninc
For thirty days, the Xyron Design Team is creating and sharing various tutorials focused on the holidays. Today, I have two projects: my December Pocket Pages kit that I created to document the holiday season, and a Christmas notebook that I can use to keep myself organized throughout the season. Make sure that you keep checking back on the Xyron Facebook page daily for more inspiration.

To start today's post, I want to share my December Pocket Pages kit that I created. I love all of those fantastic kits that are all around, but really wanted to create my own. I had a few pieces of amazing Christmas paper from the Gossamer Blue Get Happy line, and a great mini kit from Paper Issues.  
The kit is pretty basic. I really wanted to have something that I could take with  me, so kept everything fairly easy to work with and portable. If we do something great over the holiday, I wanted to be able to write about it in the moment. This means that I also kept my Xyron products portable as well. The Iris 12x12 Portable Project Case was a great holder for everything. From my Xyron items, I included  my Xyron Mega Runner, Xyron Double-Sided High Tack Tape, Xyron 3" Sticker Maker, and Xyron Wedge Shaped Glue Stick
I also found some great things in the Target $1 Spot that I could add to my kit. I LOVE the gold!
 And some fun, bright papers!
So to make this fun cover, I pulled out my Xyron 9" Creative Station and got to work. The thing that I really love about Xyron products, is that because the adhesives are edge-to-edge, they completely cover vellum, without seeing any of the adhesive. So that gorgeous gold vellum is in perfect condition.
I manual die cut the circles, then ran those through my Xyron 9" Creative Station.
Then I stacked those and adhered them to the Simple Stories 8x6 Sn@p Binder
To add some interest, I then took the die cut from the Merry Memories Limited Edition Swag Bag and ran that through my Xyron 3" Sticker Maker. This way, it wouldn't peel off of the cover.
Those $1 Spot stickers aren't the greatest sticking stickers, so I took a strip of Xyron Double-Sided High Tack Tape and placed it on a piece of striped paper. Then I adhered the stickers to the Xyron Double-Sided High Tack Tape, and cut it out and adhered it to the cover with some more Xyron Double-Sided High Tack Tape.
Add a quick die cut, some Thickers and a red nose (Liquid Pearls) on the reindeer, and there's my cover!
And of course it needed a title, so to make sure that the little title stuck in place, I made sure that it wouldn't move or shift by adding some Xyron Double-Sided High Tack Tape to the back of the die cut.
I also wanted to share my fun way to keep organized throughout the Christmas season. I love small Moleskine cahiers, as they have enough pages for a larger event, but not too much that I don't use most of the pages. Plus, if I see something I really like, I can always sketch something out.
These are super easy and quick to cover and decorate. I started by running a piece of paper through my Xyron 9" Creative Station. Once that was sticky, I adhered it to the journal, making sure that it would still open easily and lay flat.
Once it was positioned correctly, I trimmed the edges with a kraft knife. If you overcut, just scrape the knife around the edges to rough them up and hide any imperfections.
To start decorating the book, I cut a strip of paper, ran it through my Xyron 3" Sticker Maker, and attached it to the book. 
To add some decoration, and again play with some non-traditional papers, I ran a die cut and a piece of glassine envelope through my Xyron 9" Creative Station. Just like the vellum, the glassine can be difficult to work with as most other adhesives you would notice. 
Once that was attached to the book, I tied it off with some Lawn Fawn (Lawn Trimmings-Gold Sparkle Single Cord) and stamped a sentiment using the Catslife Press stamp (1185B)
Thank you for stopping by to see today's tutorial. Make sure that you check out all of the Xyron's Design Team member's blogs (links are to your right), and the Xyron Facebook page regularly this season to see all 30 Days of Holiday!

Supplies Used:
December Pocket Pages Kit

Covered Christmas Notebook
Pin It