Showing posts with label projects. Show all posts

Friday, July 5, 2013

Preparing for CHA: How to Restick Silhouette Mats

While I cannot (yet!) give a bunch of sneaks of some of my CHA/Create-N-Connect projects for Authentique, I can share with you how I am re-sticking my Silhouette mats. I find that after awhile, they get unsticky, and then the paper goes all sorts of wonky, and then, yeah... Makes for an unhappy crafter.
Here's my simple fix. Wipe the entire mat with a baby wipe. I get mine scent-free and from Costco. Mainly because I don't like baby wipe smell, and they are cheap there. We go through a lot. They are ALL over the house. You could probably use dish soap and just gently clean without scrubbing...

LET DRY. ALL THE WAY. Seriously, this is an important step. The caps are for me. I'm not patient. 

Use glue of some sort that still stays kind of tacky. I like the ZIG Memory System's 2 Way Glue. The big one.  Some people use spray glue. I think Making Memories has one that you use with their cutter that works... I always like the ZIG glue. Probably because I can stay in the lines better. Cover the entire mat (within the lines) with a thin layer of glue. Let dry. 

At that point, if you covered all the parts of the mat, you're good to go. Otherwise, do another thin layer of glue and let dry again. Until the mat is falling apart (and you've run out of clear packing tape for the back!) you can restick as needed. 
Pin It

Tuesday, October 30, 2012

AUTHENTIQUE PAPER & Love My Tapes!

Come check out my project today for Authentique Paper and Love My Tapes! I just loved being able to use their great washi and fabric tape again! PS. There is a mini tutorial on the adorable trees... :)
Pin It

Friday, February 3, 2012

A Little Uncommon Treat from ScrapbookSteals.com

Hello all!! It's Heather here, and I have a cute little Valentine's project using Authentique. Currently, ScrapbookSteals.com has Uncommon as their deal of the day!! Better get this fast, as it is going quick! 

So, my little project is a cute treat holder, and a wonderful little Valentine's card for a special someone. 

For the candy holder, just create a tube of paper, and use your ATG gun (my FAVORITE!!) to close the paper into the tube. Crimp one side, and staple or stitch with your favorite tine (Twinery, again from ScrapbookSteals.com!!)
Fill the end of the tube with your treats, and crimp the opposite end the opposite way. Again, staple or stitch together.
The card is pretty easy too. It just looks a lot more difficult than it really is!
I just cut out a heart (you could also use a punch or machine) from my cover paper. Then I ATG'd a piece of clear plastic (you can use whatever is around... This is actually wrapper from some embellishments). Glue around the heart, over the plastic, place your punched shapes, and lastly place the background color. Then, just glue the whole thing onto your card base. Decorate and you're done.
I hope that you enjoyed my little projects today. I also hope that you really snag the great deals that ScrapbookSteals.com has!! Every day at 9 am MST.

Project 100 update:  29/100 Pin It

Monday, November 14, 2011

AUTHENTIQUE BLOG: Wooden Christmas Ornaments with Free Bird!

 *****
Hello Authentique fans, it's Heather! I have a really inexpensive idea for either a small decor item, or possibly a beautiful, and toddler-proof Christmas ornament. My little girl found this on an end-cap of one of the large chain craft stores. At first, she grabbed the more expensive birdhouse, but I was able to trade her for this smaller (and only $1!) one instead. She was happy throughout the rest of the shopping trip, and I wasn't out a lot of money.
While this step is completely optional, painting the pine birdhouse can tie all of the colors together. I chose black, and painted the inside as well. Since it was pine, the paint dries very quickly.
 
This is seriously the hardest step... Take a piece of copy paper, to figure out where the posts are. In this case, I was able to use an office hole puncher in order to slide the paper over the roosts. If you are using a larger birdhouse, you may want to cut the holes out with fine-point scissors.

I then grabbed my first piece of Free Bird ("Delight" FBS 111). Rather than measuring and cutting out, I was able to fit most of the pieces in without spending too much time measuring. In this case, the eave of the roof was 90 degrees, and I was able to use the corner of the paper as my angle. I then just creased the edges and cut them off so that the piece fit properly.
I had to use an X-Acto knife to slice the very bottom from the paper. Then, I felt for the holes in the birdhouse, and used the back of my X-Acto knife to slightly push in the edges of the entrances.
 
To cut the holes, I used a rotary nail file to "sand" them off. You could also use a wood file or even a thin nail file.
Mod-Podge the wood base, then the paper to make it all stick! I found out that the more Mod-Podge you use, the better it all sticks! Plus, it dries clear... So even if it looks like it's all weird... Wait a few hours. 
Repeat the same steps on the other sides of the birdhouse. I ended up using just one sheet of Free Bird for all of the sides! I then added a thin strip of a different paper ("Delight" FBS 112) for the bottom edge of the birdhouse. Rather than piece the paper, I diagonally cut a strip from corner to corner. I punched only part of a hole in the top, so that the roost would fit around the edge. Then, Mod-Podge'd it all down.

For the roof, I used half of a piece of "Delight" FBS 109. One side of the roof was simple, and just needed an edge punch to add some extra dimension to the roof. The other side needed to have some of the roof notched in with a hole punch so that it fit the rope. I just played with the amount I cut out until it fit right.
For the last detail, I added small strips of the same paper (FBS 109) to the front and back of the roof eaves.
When you have finished with your decoration, Mod-Podge the entire thing once more. Let it dry completely for a few hours.

I haven't shown this to my little toddler yet, but I know that she is going to love it. Best part, the total bill on this project (if you already have Mod-Podge and paint) is under $3!! Even if it doesn't last toddler hands... I can make another one for just a few dollars! Pin It

Wednesday, August 10, 2011

How To: Yarn Wreath (Part 3: Decorating!!!)

Here is the final version of my yarn wreath! I love this, and am planning on gifting it next month! For this project, I wanted to use some of the papers from Authentique.
Here are the rest of the directions on how to complete this project.

Side note... I dropped the wrapped wreath this morning and the seam busted open. So, I had to glue it, fix the yarn, then wrap this wide ribbon around the wreath's seam to cover up my accident. No one will ever know!!

Step 1: You can cover the seam of the wreath with a wide ribbon (totally by choice, but it does add that extra something!)
Step 2: Pin the ribbon using fabric pins. Don't spend lots of money on these, those gorgeous stick pins are too expensive for something that is not going to be seen.
Step 3: Stick on of your flowers where you want to add it, I used a combination of stick pins, and hot glue to make it stay in place.
See my hot glue. Again... It's in the back. No one will know :)
Step 4: Add more flowers, bling them if you want more sparkle! I attached a Theresa Collins (thanks swap buddy!) gem to the center of a flower.
Step 5: Make smaller flowers!! I just used a couple of strips of paper (about 1/2") to add smaller flowers. Take the strip...
...and crumple it up! The more damage you can do to the paper fibers, the better!! Rips don't really matter either, they will just help to give the flower more detail.
Step 6: Fold the strip of paper in half lengthwise, perfection is NOT your friend in this!
Step 7: Wrap up the "rose", leaving some extra paper to finish the flower. Then use a glue dot at the bottom to stick the extra paper to the bottom! Cut it when you are done.
Here is what the front looks like.
And the back with the extra cut off!
Step 8: Use another stick pin, in a color that matches, or contrasts, the paper flowers. I chose pink, as there are small bits of bright pink color in the Authentique Blissful papers!
Step 9: Make more flowers, use buttons, brads, stick pins, etc. to add more definition, color and interest. Stick pins just stick into the foam. I used glue dots to attach the threaded buttons (the thread just finishes them off). Brads are super simple... Just make sure that the tines of the brad are together... And try to slip them between yarn pieces.
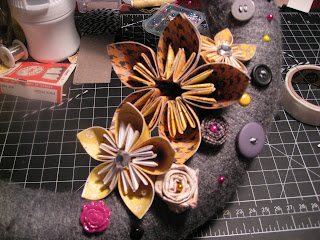
Step 10: I know that the majority of the items are located on one side of the wreath... Create a visual triangle (which makes the eye travel back and forth through your work) by adding a few pieces of interest in a different part of the wreath.
Step 11: To hang the wreath, I hot glued a circle of thinner ribbon on to itself. I used another stick pin to make the ribbon stay in one place. Again... Color doesn't matter since you won't see it!
Final version!!
Closeups of the wreath.
And the visual triangle!
See how the small amount of detail creates a more powerful image...
I hope you enjoyed this three part project! It probably took me about 6 hours to create the entire wreath.

As far as my 100 projects... I'm counting this as three!! Hee hee!!

P.S. I'm still in love with Authentique!!

Pin It

Tuesday, August 9, 2011

How To: Yarn Wreath (Part 2: the flowers!)

Before I debut my finished project... I really want to share how I make these cool flowers! The flower is one of what would be many flowers used in order to make a kusudama flower ball. I like them seperate though, especially using them for fantastic patterned papers!! To make this a little easier to see, and so that the pattern wouldn't distract from the folds... I used a piece of dual colored paper.

Step 1: Cut 5 squares of paper. I used 4" paper, but you could go smaller or bigger. My suggestion however, would be use thinner paper for smaller flowers. It's also helpful to have a straight-edge of some kind, and a bone folder. Not necessary, but helpful.
Step 2: Use your bone folder (if you are using one) and score the center of the paper, diagonally.
Step 3: Fold the paper into half, so that it makes a triangle.
Step 4: Fold the 'arms' of the triangle up to the top of the first triangle.
(Step 4 again!)
See the work in process, you end up with a square again.
Step 5: This is a little complicated, so I'm going to try to make it simple. You're going to take the folded 'arms' of the triangle you made in Step 3, and flatten them out. Line up the crease of the edge of the paper with the outside of the square shape. This is a perfect spot for using your bone folder to sharpen those folds!
Step 6: Fold down the pointed area of the arm. Do the same to the other 'arm'.
Step 7: Fold the arm in half onto itself. Do this to both sides.
Step 8: You are going to round the origami shape so that the folds are now touching. This is where the glue dot will go. Whatever you do, just don't make a fold!
Step 9: Use a glue dot, and stick the two arms together!
Like this!! Round the shape as needed.
Step 10: Do this to the other four pieces of paper!!
Step 11: You're ready to 'build' the flower. Use glue dots, or some kind of adhesive to stick all of the petals together.
Here are three petals stuck together!
And the completed flower!!!!
The back of the flower!
Step 12: Getting ready to use for the wreath... I realized that the flowers themselves aren't particularly sturdy... So, I used a low-temp glue gun to add some solidity to the back of the flower. The way that I'm going to show you tomorrow how these are used, doesn't need the back showing.
If you are going to use the flowers in a more visible way, you could pipe glue into the center of the flower if you wanted. Just make sure that you cannot see it from the top of the flower!

I will post the finalized project using my Authentique papers tomorrow!!!

Pin It