Showing posts with label ribbon. Show all posts

Friday, February 14, 2020

AUTHENTIQUE PAPER: Valentine's Day Love Notes Wreath


This wreath began as simply a fun paper mache base that I purchased at a craft store. I glued and trimmed papers (Two & Three) from the Love Notes collection to the base, sanding edges to perfectly match the shape.
Once the paper covered the front, inside and outside of the heart-shaped wreath, I hot glued the pom pom ribbon in place.
Took the sticker banner from the Details sticker sheet and used dimensional adhesive to layer the stickers onto slightly larger banner pieces (I just used the sticker as a guide). Once those were complete, I hot glued those pieces to the ribbon banner, and glued that in place on the edges of the wreath.
I added a few die cuts, a couple of Details stickers, and some extra embellishments from my stash, and the wreath was complete.


Thanks for spending Valentine's with us this week. ~ Heather 

Pin It

Friday, August 3, 2018

AUTHENTIQUE PAPER: A Fall Wreath with a Sneak Peek of the Pleasant Collection!

I love Fall. I love when the air turns crisp, the leaves start to fall, and the promise of cooler weather comes about. However, it's firmly August, and summer is here for now. I can wish just a little bit, and play with Authentique Paper's newest collection, Pleasant. I knew when I saw this collection, I needed to make a new Autumn wreath.

I started with a heart-shaped wreath from Michaels. I loved the simplicity of the grapevine wreath, and didn't want to overwhelm the organic nature of it with too much. This is why I chose the Silhouette cut shapes I did, as they allowed for some sense of the wreath underneath them.
I started with a heaver base of three flowers (Pleasant Six, Seven, Eight) using the same rolled flower design. Once those were glued together, I added the leaves so that the flowers would sit on top of them. Each of the leaves is glued at the stem, then once or twice towards the top of the leaf.
The flowers all use the same Silhouette cut file. Just by altering the color of your paper, and how you roll the edges, each flower can look slightly different. I also added gems inside each of the flowers. 
I loved all of the tone on tone colors that each of the flowers had. The subtle look was effective. I also added a simple bow under the flowers to pull together the blue in the patterned paper.

For the opposite corner of the wreath, I started with a few more of the same leaf cut files in some of the warm toned papers of Pleasant. I added a die cut from the Elements sheet, which I used dimensional adhesive to pop it up a bit.
 To mirror the other side, I added in another little ribbon bit and some gems.
Lastly, I used a large loop of burlap ribbon to create a slipknot and give some extra for hanging. The wreath is complete, and ready for the turn in the weather. I hope you're ready to see more of our Pleasant Collection!


Supplies Used:
Pin It

Wednesday, July 4, 2018

AUTHENTIQUE PAPER: Happy 4th of July from Authentique!!

Happy 4th of July! All of us at Authentique Paper wish America a Happy Birthday. We wanted to wish all of our American friends a Happy 4th of July this week! Before you all go out to celebrate with picnics and fireworks, we have a few patriotic projects to share that have been crafted up with our favorite, patriotic collections!  Remember, as with all Authentique Paper products, we are always Made in the U.S.A.! 

I created a cute banner to go on my mantle for the 4th of July. I really liked the pairing of the stars in the blue paper from the Authentique Heroic Collection, paired with the fabulous red striped paper from the Authentique Freedom Collection. I created the rosettes using my Silhouette Cameo, then hot glued those to bases before adding the letters/sentiments. The stars were just stickers that I purchased just for this project from Hobby Lobby.
Supplies Used: Authentique Heroic Collection, Authentique Freedom Collection, burlap banners pieces, star stickers, Silhouette Cameo, hot glue, Lawn Fawn alpha dies, ribbon
Pin It

Tuesday, September 6, 2016

It's a Fabulous Start to the School Year!

As a teacher, I love a nice desk set just like anyone else. Over summer, I decided to pull this cute little set together using the Fabulous Collection.
I started with a Moleskine book. My favorites are the graph paper Cahier Journals. They make just the perfect, small notebook that I can use for meeting notes. They are also really easy to decorate. In this case, I used my Xyron Creative Station to add adhesive to the Fabulous Six 12x12 paper, then used a craft knife to cut around the cover. Liquid glue would also work well.

I added some interest with some die cut pieces from the 12x12 papers, an Authentic Life Card and some of the stickers from the collection. Each of the edges were inked with Distress Ink to create some interest. To keep the journal closed, I added a cute binder clip.
I couldn't resist adding a few pencils into the mix and created this sweet little pencil holder. I just folded the Fabulous Five paper so that the back was slightly longer than the pencils, leaving the front slightly wider than the back. Then I folded over the flaps and glued them in the back.
To finish off the pencil holder, I added a sweet polka dot heart and a matching polka dot bow.
The last little piece to the set is a bright, buttoned tag. I couldn't resist layering the Details cardstock stickers to a punched tag. Then added the ribbon, and sewed on the button to keep it in place.
I hope that this inspires you to break out your collections for more than just cards and layouts.

Supplies Used:
Authentique Fabulous Collection: Two, Five, Six, Eight, Twelve, Authentic Life Cards, Details stickers, alpha stickers (older collection)
Other Supplies: Moleskine Cahier, ribbons (May Arts), button, kraft paper, binder clip & pencils (Target), Distress Ink (Antique Linen)
Pin It

Monday, September 22, 2014

AUTHENTIQUE PAPER: Authentique Paper, May Arts, Imagine Crafts Blog Hop- Create a Fall Wreath with "Harmony

Good Morning!! Check out the Authentique Blog, as we are excited to share our projects also using products made by ImagineCrafts and May Arts. Today, I am sharing a fun Fall wreath using Harmony Collection by Authentique, three May Arts ribbons and my favorite ImagineCrafts Memento Ink. I even have a fun mini-tutorial on the great ribbon flowers!
Be sure to check the Authentique Blog every day this week for more project inspiration! We have an Authentique Prize Pack as well as prizes from May Arts Ribbon & Imagine Crafts to give away to a couple of our lucky commenters on the original blog post.

For another chance to win, make sure you follow us on Instagram @authentiquepaper 

Also, make sure you stop and visit us as well as our friends over at May Arts Ribbon & Imagine Crafts on facebook for prizes and lots of wonderful inspiration coming your way!

Supplies:
 Authentique Harmony Collection: Abundance & Awakening 12x12 Papers, 6x6 Bundle
Additional Supplies: wreath, brad, Xyron 1.5" Sticker Maker, liquid glue, wire, Epiphany Craft's Shape Studio Round 25 tool and epoxy stickers, Kiwi Lane Designer Templates (Scallops)
Pin It

Friday, August 22, 2014

XYRON: Gearing up for Kindergarten with Back to School Teacher Gifts

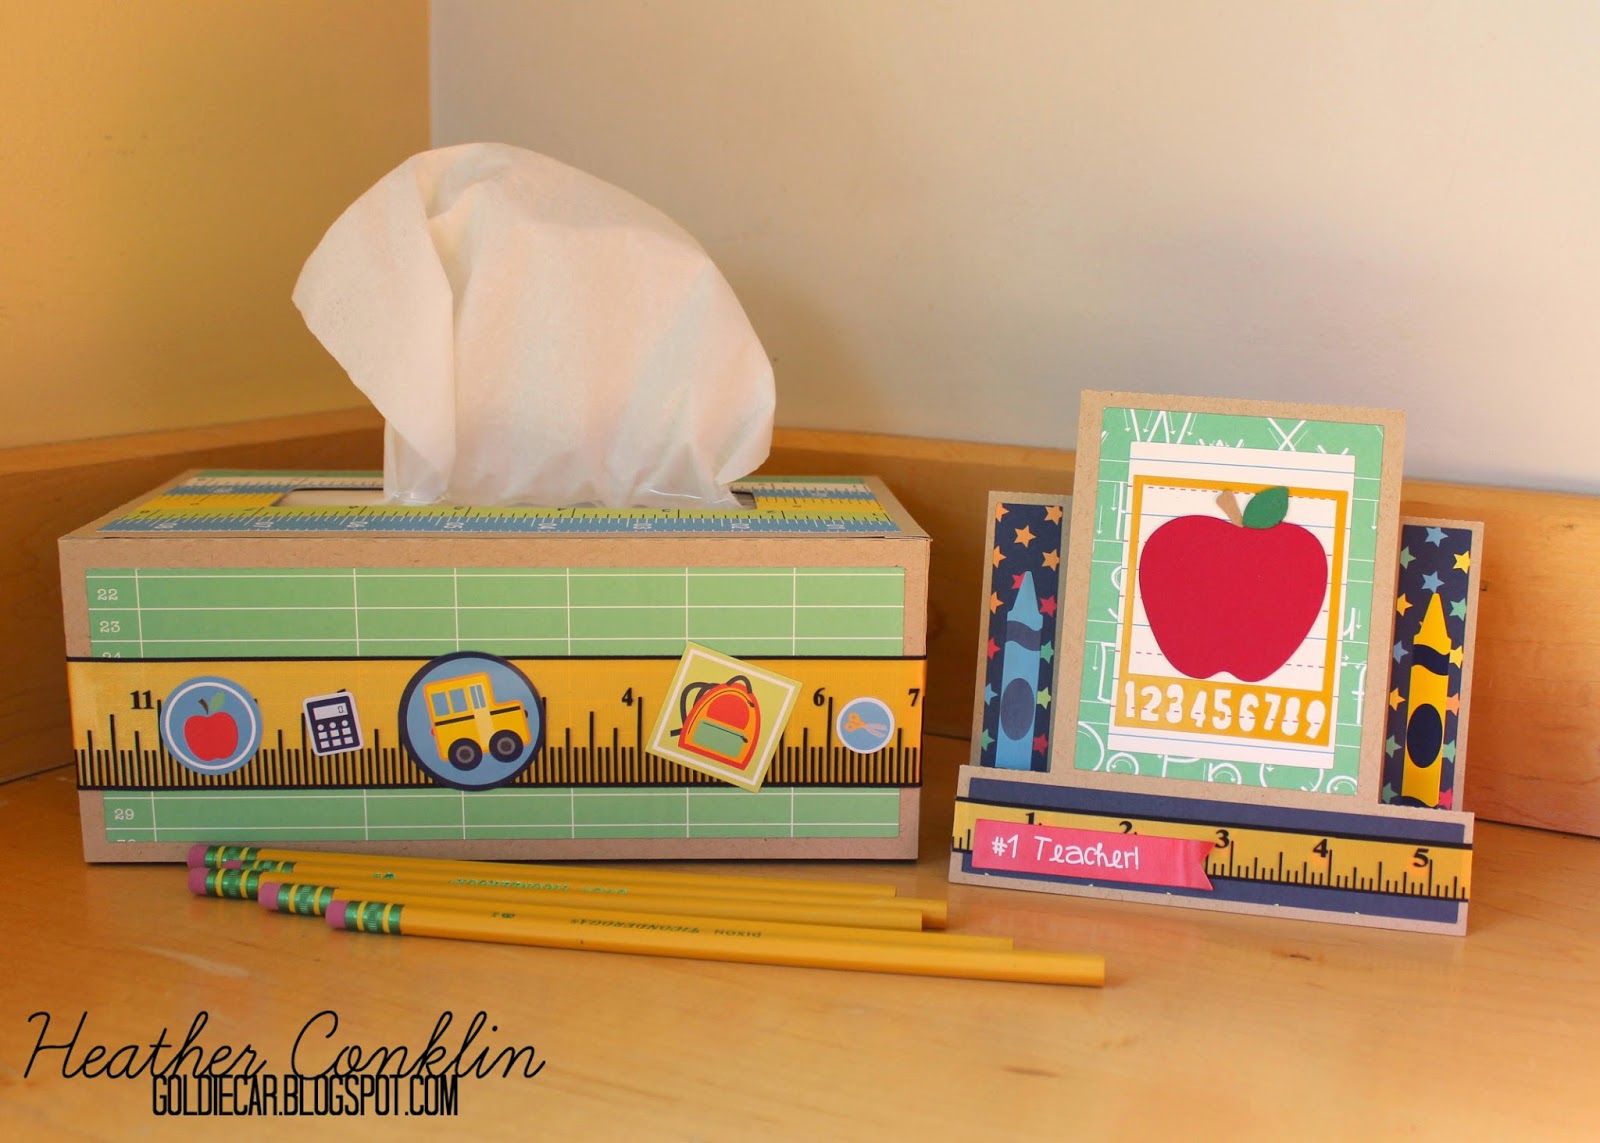
As a high school teacher, I never really use any of the cute school related papers and crafting supplies. However, my oldest is starting Kindergarten this year and I finally get to break out my cute supplies! For today, I made two little things for her new teacher: an easel card, and a cover for the classroom tissue box.
I started with the fun Square Center Step Card by Lori Whitlock. I started with a base of kraft paper, then added quite a few pieces from the Pebbles Back to School Collection (Apples, Notebook, Accent & Phrase Stickers). In order to make the apple pop, I layered pieces of Bazzill cardstock, and framed it with a Studio Calico Frame Sticker. To piece everything together, I used my Xyron 3" Sticker Maker. Since the Offray ribbon was a little thinner, I used my Xyron 1.5" Sticker Maker, attached, then trimmed the edges.
The 3D Rectangle Tissue Box by Jamie Cripps was a super fun project to put together. To add some cohesion between the projects, I started again with a base of kraft paper, then added more of the Pebbles Back to School Collection (Scissors, Rulers, Accent Stickers, Accent & Phrase Stickers) using my Xyron 9" Creative Station. Before I placed the stickers all around the box, I ran a wider piece of ribbon through my Xyron 3" Sticker Maker and wrapped it around the box. Then I placed quite a few of the Accent Stickers around the box.
The best part of this project, the "box" comes right off, and can be placed on a new box of tissues when this one is used. No more ugly boxes of tissues! I also kept the top pretty simple, since I knew little hands would be touching it quite often. 
Hope your Back to School is going smooth!

Supplies:
Xyron: 3" Sticker Maker, 1.5" Sticker Maker, 9" Creative Station
Other: Pebbles Back to School Collection (patterned paper and stickers), Studio Calico Stickers (Teach Kids Frames), Bazzill cardstock, Mohawk Via Vellum (kraft), Offray ribbons (Measure Up), tissue box Pin It

Tuesday, March 25, 2014

AUTHENTIQUE PAPER: "Suave" Gift Wrap and Cards

I love these cards!! And even more, love the Suave Collection by Authentique. I'm showing off these cards, along with some gorgeous gift wrap today! Make sure that you check it out, and let me know!

Pin It

Tuesday, March 11, 2014

AUTHENTIQUE PAPER: A Spring Wreath with "Flourish"

Make sure that you check out today's Authentique Paper blog post today!! I'm welcoming Spring with this beautiful wreath that uses the amazing Flourish Collection.

I just LOVE all of the elements!

Pin It

Monday, September 2, 2013

A little "Thrilling" without the Thrill!

Emily at Authentique challenged each of us to attempt to use the Thrilling Collection in a non-Halloween way. This was perfect for me, as Halloween isn't as huge of a thing in the Pacific Northwest. We hardly have any Trick-or-Treaters... And I even have little ones! For this challenge, I created two fun gift boxes.
Both of these I created using my Silhouette (LOVE that thing!) and some gorgeous May Arts ribbons.
Heart Pillow Box using Mystic and 2" Solid Crushed Wired Ribbon (AW03 - BLUE/LIGHT BLUE).
Star Top Box using Forworn and 2.5" Burlap/Wired Ribbon (398-25)

Check out the rest of the team's projects (they are AMAZING!) over at the Authentique Blog today! They are also giving away a set of Thrilling papers, and they are gorgeous! Pin It

Tuesday, August 13, 2013

Lots and Lots of Cards!!!

During the summer, I build up both my personal card stash, and the stash that I use for the Social Committee at school. For my personal stash, I tend to make more celebratory cards: birthdays, well wishes, miss you, etc. For school, I end up needing more sympathy and get well cards than anything else. Every once in awhile, I get to make a great wedding or baby card!

For the first two, I create a pair of cards using the same idea. I had just purchased a Fiskars hexagon punch (on 40% off with 25% off on top of that... SCORE!) and really wanted to use it. So, I pulled out my lovely Xyron 1½" Create-A-Sticker Machine and got to work. The lovely little hexies were super easy to stick on, and so were the banners. Add a little AC button (clearance at Target... SCORE again!) and Delicata (ImagineCrafts) inked A-Muse sentiment and they are perfect to send to someone in need.
For the next three, I used a Counterfeit Kit that I made up a LOT of months ago. I think there is some Prima paper, some cardstock in different colors, AC ribbon, and some MyMindsEye chipboard elements. I even found a cute Prima resin flower (I totally forgot I had those things!) to add to one of the cards.
I'm a card making machine! Or at least, I really need to be. Making them in an assembly line is super quick. I'll have more sets tomorrow! Pin It

Monday, May 20, 2013

Pretty Pink Posh Challenge #18: Green, Yellow & Violet


I'm really loving the challenges from Pretty Pink Posh. This week's challenge was combining green, yellow and violet. I never knew how many companies shy away from violet until I really started looking for the color in all of my stash.

I remember chatting with Samanatha over at Authentique about this over a year ago. And she created a fantastic line that includes a deeper violet than I could use for this project in her Remembrance line. However, for this card, I used a combination of Cosmo Cricket, Crate Paper (Maggie Holmes) and Simple Stories. For all of my embellishments: MME enamel dots, May Arts ribbon and some sequins from JoAnns.
This one uses a few layers of dimensional adhesive. I now know why the ladies at PPP suggest tape. It ate up quite a bit of time to take off the plastic off of each piece of adhesive. And my ribbon was too big for the sentiment tag. So I made a knot. Love it!!

Time to complete this card, including cutting the pieces, etc.

9:02 min.
Pin It

Saturday, March 16, 2013

Post CHA... Cards!!

Just a few cards that I haven't blogged yet. All were created using Authentique Seasons collections in Seasons: Spring and Seasons: Winter. I added a few embellishments using May Arts and random ribbons, Maya Road stick pins, Pebbles flowers, and some cuts with my Silhouette.

Pin It

Wednesday, March 13, 2013

AUTHENTIQUE PAPER: A Hoppy Easter Ornament

Today I am featured on the Authentique Paper blog with an adorable bunny ornament. Check it out this morning! There are a ton of cute pics and details.

Products Used-
Authentique Paper- Hope Collection: Custom, Faith, Lavish, Adorn
Other-May Arts Ribbon, Colorbox Chestnut Roan ink, Globecraft Memories Little Fancy Oval frame, Imaginecrafts, Basic Grey brad
Pin It

Friday, February 15, 2013

February's Pinspired with Gossamer Blue Challenge

I often stumble through Pinterest pinning random things to all of my boards. However, it's not often that I actually go through and create something based on anything I pin. Which is kind of unfortunate, because I do pin cute stuff all of the time. I'm trying to get better about it, and actually create things. When Gossamer Blue started their new "Pinspired with Gossamer Blue Challenge", I was completely tempted to join in. I also needed a couple of cards, so it was a perfect excuse to play along. HERE is my inspiration pin, and it's from the Glitz Design Team located HERE. I couldn't find the original post, sorry...
This lovely little pretty was created for my mom. She needed a little bit of cheering up, and it's perfect for her. Bright, cheery, and has green. I also used some more of the bits and pieces of my January Gossamer Blue kit.

This next card uses Authentique's Lovely Collection. I have used almost every scrap of this collection. It's just that perfect. Seriously. If you haven't snagged it all up before it goes away, make sure that you do! It's just beautiful.
I think one day I might just have to make a tutorial on how to get that ribbon... I'm not sure how the original cardmaker did it, but I sure have a fun trick!
Pin It