Showing posts with label gift set. Show all posts

Tuesday, September 27, 2016

DIY treat bags using Harvest

Fall is here! Crisp leaves, warm and cozy afternoons, and squirrels gathering for Winter. I thought that I would create two cozy little bags using our Harvest Collection to tuck a few treats in for later this month.
I started with the lovely plaid patterns in the Harvest Collection (Harvest Four, Harvest Five). There is something about plaid that just screams Fall to me. I used my Silhouette to die cut each bag (Design ID #100592), making sure to enlarge each to get the most of my 12x12 paper.
Each of the two bags has a combination of various die cuts and Details cardstock stickers. I used things that reminded me of Fall, leaves (oak, standard), acorns and feathers.
The edges of all of the die cuts and the bags are all inked to show definition between the layered paper. Not only are the die cuts layered and inked, they are popped up with some dimensional tape to help add some interest.
Some of the larger stickers were a bit too big for this small of a project, so I used my embossing powder tool to make them "unsticky." Now each of the stickers is a die cut!
 Filled with some matching candies, they would make a perfect little hostess gift. 
The best part of this paper is the lovely weight and texture. I know that these little bags will hold a ton of fun goodies. The gorgeous insides are also a fun bonus!
Supplies Used:
Authentique Harvest Collection: Harvest Two, Harvest Three, Harvest Four, Harvest Five, Details 12x12 Adhesive Cardstock
Other Supplies: Silhouette, Silhouette Online Store, dimensional adhesive, ink (Distress Ink), embossing powder tool
I hope that you are enjoying the Fall weather and Harvest Collection! Thank you for stopping by!
Pin It

Tuesday, September 23, 2014

Xyron and Anna Griffin: A Perfect Pairing for Gifts

Sometimes you just need a small gift (thank you, just because, hostess gift). This wonderful pairing of Xyron and Anna Griffin products definitely fits the bill for just that. This little gift set is a box, with four cards in it.
I started by making the box from some of the flocked paper and the amazingly thick, pearlized cardstock. I loved using the luxe flocked paper on the outside of this, as it is really soft. To create the sentiment for this boxed set, I used clear acetate in the "window". This way, I can let the cards shine. Using the Double-Sided High Tack 1/2" Tape made this super easy to put together, as well as let me easily add the acetate into the completed box. 
I created two vertical and two horizontal cards using the Grace Collection and pieces from Anna Griffin's other collections. For the two vertical cards, I started with a base of the thick pearlized papers, then added various patterned and flocked papers, borders, sticker borders and die cuts. Some of the die cuts came dimensional, and some I was able to add layers myself. By running the die cuts through my 3" Sticker Maker, I was able to make sure that they were not going to shift when they were mailed. Rather than pull out my Mega Runner and squish the dimensional die cuts, I just used my Double-Sided High Tack 1/2" Tape to attach them to the cards.
For the two horizontal cards, one had a base from the All About Her Cardmaking Kit, and one I used another piece of the Perfect Palette Cardstock Kit. Then I added more pieces of various die cuts. Lastly, I heat embossed a sentiment from one of Anna's stamp sets in black embossing powder. On these two cards, I really used my Double-Sided High Tack 1/2" Tape. It made the extra embellishments so easy to place. For the embossed section, I ran those two pieces through my 1.5" Sticker Maker before attaching them to the card.
 I really love how easily this small gift came together.
Supplies Used:
Xyron: 1.5" Sticker Maker, 3" Sticker Maker,  Double-Sided High Tack 1/2" Tape
Anna Griffin papers and die cuts    Anna Griffin® Grace Papercrafting Kit,
Anna Griffin® Perfect Palette Cardstock Kit, Anna Griffin® All About Her Cardmaking Kit, Anna Griffin® 60-piece Flocked Paper Collection
Additional Materials: acetate, ribbon, craft foam, Silhouette Cameo Pin It

Monday, September 2, 2013

A little "Thrilling" without the Thrill!

Emily at Authentique challenged each of us to attempt to use the Thrilling Collection in a non-Halloween way. This was perfect for me, as Halloween isn't as huge of a thing in the Pacific Northwest. We hardly have any Trick-or-Treaters... And I even have little ones! For this challenge, I created two fun gift boxes.
Both of these I created using my Silhouette (LOVE that thing!) and some gorgeous May Arts ribbons.
Heart Pillow Box using Mystic and 2" Solid Crushed Wired Ribbon (AW03 - BLUE/LIGHT BLUE).
Star Top Box using Forworn and 2.5" Burlap/Wired Ribbon (398-25)

Check out the rest of the team's projects (they are AMAZING!) over at the Authentique Blog today! They are also giving away a set of Thrilling papers, and they are gorgeous! Pin It

Monday, April 1, 2013

AUTHENTIQUE PAPER: Creating Easy Card Sets

Check out how to make this adorable set of cards on today's Authentique blog!!

Pin It

Monday, January 21, 2013

Boy or Girl? No One Knows... Yet!

Over the weekend, I had the pleasure to attend a baby shower for a lovely family. They don't know the gender of the baby yet, which is super exciting! It will be such a wonderful surprise when their baby comes. I guessed a girl, but I really have no clue... I thought both the girls were boys until our gender peek.

Since no one knows the gender, I tried really hard to make both the card and part of her present gender neutral. My lovely friend Karen got a smoking deal on some Carta Bella Alphabet Junction papers that I used for this project. I really wanted it for the adorable hedgehog that was on the paper. I'm a sucker for hedgies.
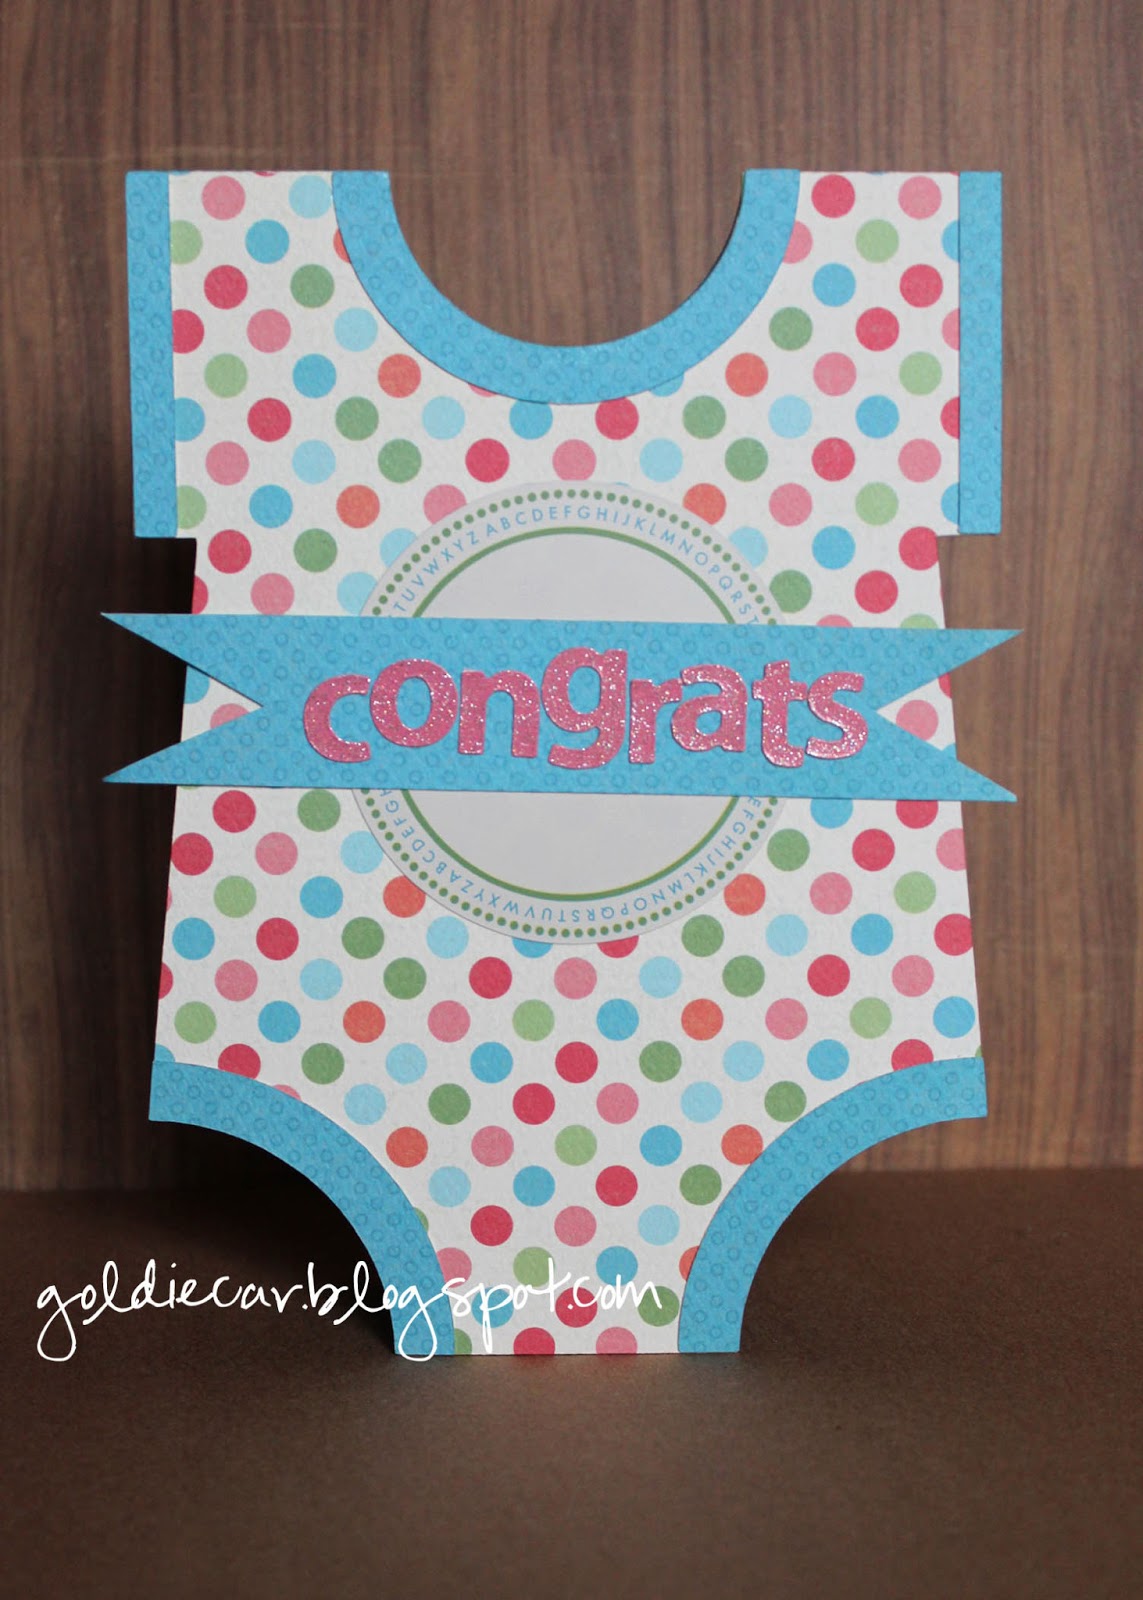
The card itself is a onesie that I cut from my Silhouette. Instead of the emblem that is from the Silhouette file, I used a CB sticker and created a banner from paper. Then used some Sassafras Lass letters that were from my stash. 
The book is ultra cute too! I used a couple of Silhouette files (Little One, Months) and just the CB paper. I lined the inside and outside with some of the 6x6 papers, because they are easier to glue down, and the inside of the book are pieces of cut down 12x12.
Lastly, I have a couple of cards that I used my December Gossamer Blue kits for. I love using all of my scraps and bits for cards. 
I have just a few more thank you cards from Christmas to go out now. I'm getting caught up. Even those this year's Christmas card is going out as a Valentine. Oh well... Can't have everything :) Pin It

Thursday, January 17, 2013

Two Challenges!

For this little project, I used some of my October Afternoon Cakewalk papers. I needed a cute little container for one of my friend's birthdays that is coming up soon. One of my lovely friends (Jen) is over at Pinspired Challenges, a new challenge blog. Here is their first challenge.
The pictures are a little wonky. I really need some sunshine over here!!

The following is a layout created using my January Gossamer Blue kit. I love this kit! It has some beautiful blues, pinks and greens. Perfect for my little girls! I used their first ever sketch challenge for this layout. I did however change it up quite a bit. The norm for me and sketches :)

Pin It

Friday, November 16, 2012

Handmade Holidays Blog Hop 2012

Welcome to the 2nd Annual Handmade Holidays Blog Hop!!!
Calling all crafters! We’ve gathered designers from some of our favorite manufacturers to show you ways to create something from the heart this holiday season. This 3 day Hop includes over 60 stops with inspiration brimming from every corner. Explore all of the thoughtful and frugal handmade gifts you could create for the holidays, all in one place, during our second annual Handmade Holidays Blog Hop!

If you are following along the 2012 Handmade Holiday Hop, you should have come from Jennifer Priest. If you want to start from the beginning, begin at Clearsnap
The Details:
To sweeten the Hop, we’re offering a gift for you! For every comment you leave on the blogs in the Hop, you’ll be entered to win a prize pack from one of the participating manufacturer sponsors! Authentique is giving away four 6x6 pads of their latest collections: Festive, Peaceful, Original and Lovely!
Visit the list of blogs below and leave a comment on each by Nov 27, 2011 at 11:59 PM PST. Each day we will be sharing a brand new list of blogs with brand new projects for you to explore, be inspired by, and create from!

The Blog List:
Donna Salazar Designs – http://donnasalazar.typepad.com
Eileen Hull for Sizzix - http://eileenhull.blogspot.com/
Kristin Wilson – Graphic 45 - http://www.kristinwilsonhandmade.com
Jennie Garcia - Tombow - http://earthyscrap.blogspot.com
Gini Williams Cagle - Hampton Art - http://ginicagle.blogspot.com
Sabrina Alery – Clearsnap – http://Sabrinaalery.blogspot.com
DeeDee Catron - Globecraft Memories - http://umwowstudio.blogspot.com
Michelle Grant – Donna Salazar Designs - http://michellejbg.blogspot.com
Emily Lanham – Authentique Paper - http://www.createserendipity.net
Emma Jeffery – Fiskateers - http://hellobeautifulblog.blogspot.com
Natalie Clause – The Twinery - http://www.southernbellescharm.com
Alberto L Juarez – Graphic 45 http://vintageodyssey.blogspot.com
Jennifer Priest – Clearsnap – http://hydrangeahippo.blogspot.com
You are HERE ---->Heather Conklin – Authentique Paper - http://goldiecar.blogspot.com

The Project:

For this year's Handmade Holidays Blog Hop, I made a "Year in Authentique". Every year I make scrapbook calendars for my mother, mother-in-law and both grandmas. I normally make them out of whatever random papers I have in my stash. This year I decided to make an Authentique specific calendar using a different line for each month. For each of the twelve months, I chose a collection that would make sense for the entire month. I loved revisiting older lines and playing with them again, as well as breaking into the newest line (Lovely) for the first time.
Here is each month in chronological order. After the calendar, I will give you some tips and tricks on making your own calendar, as well as show you my process.
January- "Peaceful"
February- "Lovely"
March- "Carefee"
April- "Delightful"
May- "Splendid"
 
June- "Celebrate"
July- "Glory"
August- "Lively"
September- "Curiosity"
October- "Gathering"
November- "Thankful"
December- "Festive

While it looks daunting, 12 layouts is actually quite easy when you use a collection of papers as nice as those from Authentique. Everything coordinates, so putting each layout together is a breeze. There are a few things that I have realized from my many incarnations of calendar making (I think this is year 4 or 5).

1. Use sketches. Find a good sketch artist and modify their sketches to suit what you may use for pictures. For each of these, I used sketches from ScrapbookSteal's Mid-Week Mojo's, all created by Kristy Lee, the former Mojo Mama. She's pretty fantastic.
2. Don't have photos in mind. It's backwards, I know. But if you are making mulitiple calendars, it just goes quicker. 
3. Make mats for each photo. Since I didn't put photos onto each layout yet, the photo mats create a sense of where photos will go, and will display them nicely.
4. Create interest with die-cuts. I love my Silhouette and used it extensively throughout the process. But paper punches such as those from Fiskars will work just as well! (Or better yet, cardstock stickers like those from Authentique!) Shaped paper also works well in this case.

5. Minimize dimension. Thicker layouts are great, but when there are twelve of them, and you have to write on the backs, it just doesn't work. I did use some dimensional adhesive in places, but used it sparingly. 
6. Add flat interest with inking (I used Imagine Crafts' Memento inks, Distress Ink and Clearsnap's Colorbox Chalk Inks throughout this project), pens (Signo white gel) and fabric tape or washi (Love My Tapes).
7. Get a pre-made calendar base, or create your own using quality cardstock. I used the Kraft Core Nostalgic collection by Core'dinations. This way, I was able to use a color for the month page, and the kraft backing to write on. I chose all of my colors to match collections, and then ordered them by month.
8. If you want to bind your work, you don't have to have a binding system. I make a ton of mini albums, so having a Bind-it-All makes sense for me. If you don't want to invest in a binding system, take your cardstock to a store like Office Depot. For just a few dollars, they can bind your project for you. I suggest doing this BEFORE you create your pages so that the cardstock will lie flat.
9. Use the manufacturer's information part of the cardstock to bind. When you want to put your layouts into your scrapbook, you won't have holes in the layout. Make sure that the paper isn't perforated though. That never goes well.  
   
I hope that this inspires you to make your own presents this year. Especially those that will last all year. Cheers to creating gifts from the heart this holiday season! Since you are at the last stop on the Handmade Holidays Blog Hop, I will wish you a happy season. Make sure that you check out Clearsnap's blog tomorrow for more fun!

Happy Hopping!
Pin It