Monday, January 20, 2020

Challenge #192 - Winter Color Challenge

Hello! Heather here, and I'm so glad that I can share with you today's challenge. I love creating based off of color palettes and images. It's a great way to challenge yourself to use materials or items you normally wouldn't use, create during a rut, or just use up what you have.

Today challenge is all about winter colors, snowflakes, silver, and texture. Or not! It's all about how YOU read the color palette, the reference image, or both! Create something that is inspired by this image and/or color palette.
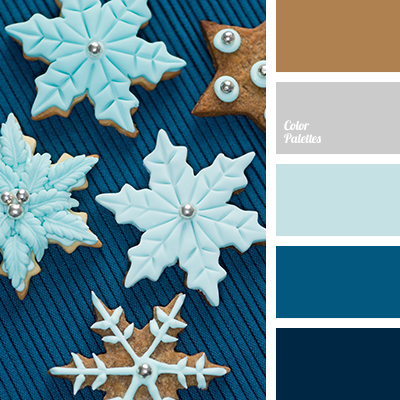
https://colorpalettes.net/color-palette-2499/

Heather
For this project, I combined both the image AND the color palette to create this card. I knew that I wanted to emphasize the texture of this card, so I started by embossing the dark blue cardstock with silver embossing powder. Once that was complete, I die cut the embossed piece, the snowflakes and the sentiment. Once this was complete, I added the burlap ribbon, glued down all of the pieces, and added an enamel dot for interest.

*   *   *   *   *

ARE YOU INTERESTED IN BEING PART OF THE PAPER GIRL CHALLENGE BLOG?
We have spots open on the Design Team for you!
If you are interested in joining a fun team with flexible commitments
(once or twice a month project, and $20 a year donation for follower prizes) 
you can apply now to become a PaperGirl!
To apply just send an email to papergirlschallengeblog@gmail.com 
Deadline is the end of January 2020.
We thank all who apply, and new members will be contacted.

*   *   *   *   *

We want to encourage all of our challenge participants to refer our rules and prize structure here: http://thepapergirlschallenge.blogspot.com/p/how-to-play.html
Also, follow us on Instagram for more chances to win! For this challenge use #PGCBchallenge192 and tag us @papergirlschallengeblog for an extra entry.

Go to the BLOG: http://thepapergirlschallenge.blogspot.com
Pin It

AUTHENTIQUE PAPER: Love Notes Altered Mailbox

After Christmas ends, I love decorating for the winter and then Valentine's Day. Ever since my littlest has started to express opinions, one of them has been to make sure that the house is ready for each holiday. This year, a little mailbox is joining the decor, wrapped up in our new Love Notes Collection
I started with a sweet little mailbox from the Dollar Spot at Target. I have seen similar mailboxes in other big box craft stores as well. 
The mailbox is wrapped in Love Notes Three. In this case, the paper measured 4.5"X12", and wrapped over the entire mailbox.
Right where the flag is was a bit tricky. I cut a straight cut to where the flag and the mailbox connected. Behind the flag is a little hole that I cut out of the paper. Once it was in place, I made sure to add adhesive around the flag and down the length of the cut in order to hide it. To make this perfect, I practiced on a separate piece of paper and traced it onto my Authentique paper.

Adding a few stickers to each side made for some interest, as did the die cut border. The handle for the mailbox is a grouping of stacked buttons. In this case, three buttons in similar colors to the paper were stacked and hot glued together.
The front of the mailbox has a couple of stickers from the Details sticker sheet and a heart die cut from Love Notes Five
A few more stickers from the Details sticker sheet, and this mailbox was complete. 

Thanks for looking at this fun project. I hope this inspires you to find a cute mailbox and alter it yourself!
Supplies Used:
Other Supplies: Mailbox, Scor-Tape, buttons, hot glue
Pin It

Monday, January 6, 2020

PAPER GIRLS CHALLENGE BLOG: Challenge #191: NEW!

I got a few new stamp and die sets during a few of the sales that were going on during the holiday season, and finally got some time to play with some of them. Here is my card using the Stamp Market Color Me Happy Stamp Bundle and some new (but an older collection) paper from Felicity Jane.

Are you interested in playing along with us? We are looking for some new members! 

Design Team Call:
If you are interested in joining a fun team with flexible commitments
(once or twice a month project, and $20 a year donation for follower prizes) 
you can apply now to become a PaperGirl!
To apply just send an email to papergirlschallengeblog@gmail.com 
Deadline is the end of January 2020.
We thank all who apply, and new members will be contacted.

We want to encourage all of our challenge participants to refer our rules and prize structure here: http://thepapergirlschallenge.blogspot.com/p/how-to-play.html

Also, follow us on Instagram for more chances to win! For this challenge use #PGCBchallenge191 and tag us @papergirlschallengeblog for an extra entry.
Pin It

Friday, December 13, 2019

AUTHENTIQUE PAPER: Stamped and Watercolored Wobble Snowfall Collection Tags

Hello! It's getting to the point in the year where the gifts are starting to pile under the tree, and I am starting to run out of gift tags. For today's post, I created a sweet gift tag set using the Snowfall Collection. These are super easy to make, and just take a bit of time.
I started with the cute Snowfall Collection, and then painted the three children to match the colors in the collection. I really loved adding a bit more of the red tones, as they added a cute Christmas flair to this collection. This way I could use the fun colors into the Christmas season.
 
Each of the children images are stamped and cut using the Bundled Up Bundle from Concord and 9th, then painted with Jack Richeson Collegiate paints. The images were just perfect for the Snowfall Collection.
The first tag is created using Snowfall Six with a tag topper of Snowfall Eight. I just loved the sweater texture of Snowfall Eight, and used it as the tag topper for all three tags. 
 The second tag uses Snowfall Five and a few of the Snowfall Elements cardstock dies.
My favorite of the three tags uses Snowfall Seven and features a couple of the Snowfall Elements cardstock dies. Each of the stamped images is popped up with an Action Wobble Spring. Each will move and shake as the tag moves. The ribbons are also just stapled on with the Tiny Attacher. This way the ribbon will not shift. A simple piece of twine or string could attach each of these to a package or present. 
Thanks for stopping by to see today's Christmas tag set. I cannot wait to see what you make with the Snowfall Collection
Authentique Supplies: Snowfall Collection (Five, Six, Seven, Eight, Elements)
Other Supplies: Bundled Up Stamps & Dies (Concord & 9th), Shay Tag Dies (Felicity Jane), Collegiate Watercolor Set (Jack Richeson), Tiny Attacher (Ranger - Tim Holtz), 3/4" Chevron Twill - Green ribbon (May Arts), Action Wobbles - mini (Hampton Arts) Pin It

Monday, November 18, 2019

Paper Girls Challenge #188 - Family

Good Morning! Heather here, and we have a great challenge on the Paper Girls Challenge Blog. Today's challenge is all about Family! Whether it's a card like mine, a tag mini album (I have some ideas!!), a layout, or any other sort of project, it's time to celebrate the people that matter most.
Check out more at the Paper Girls Challenge Blog, and join us in this fun challenge. Today's project uses all Felicity Jane products, including pieces from the Rebekah (paper and embellishments) and Harper (stamp only) Collections. Dies are all Lawn Fawn (Stitched Rectangles, Stitched Scalloped Rectangles) Pin It

Monday, September 16, 2019

PAPER GIRLS CHALLENGE BLOG #184: Anything Goes! & a Taylored Expressions Blender Brush Review

The Paper Girls Challenge Blog is having one of the best challenges ever. Anything Goes! Yup! That means, make anything you want, and share with us. It's a total free-for-all, and I love that, because I was able to have a bit of fun testing out my new Taylored Expressions Blender Brushes and a great new stencil from Neat & Tangled. I also got to finally sit and play with my new Stampin' Up Inks
For the PGCB Challenge #184, I started with the Neat & Tangled Dimensional Triangles Stencil. I then took my Taylored Expressions Blender Brushes and my Stampin' Up Inks in the Classic Stampin' Pad Assortment In Color 2018-2020 and Gorgeous Grape Classic Stampin' Pad.
From red - violet, I blended each color with the correct brush. To make the stencil stick more, I used a bit of spray adhesive to stick the stencil to the paper. I just used what I had, and it was a little TOO sticky... I've heard about the Pixie Spray, and I may try that later on instead.
Make sure to create something for the Paper Girls Challenge Blog! This challenge is Anything Goes, so ANY project that you are working on counts!!

I got these fabulous brushes from a suggestion from a close friend. I had always loved ink blending, but hated the streaking I got from the foam blenders (from dye inks). I'm a bit of a crazy inker, so anything that would make my ideas actually happen the way I imagine is always welcome.
I pre-ordered the Taylored Expressions Blender Brushes last week when they released. Part of the offer was this little silicone scrubber. I haven't used it yet, BUT look how fabulously it fits in the center!! This was a genius bit of design. I love when tools and their extra pieces fit together seamlessly. This means I won't lose it. 
I loved how each color handle of the Taylored Expressions Blender Brushes will work with that color family. I know that the brush looks a little splotchy, but man did they work smoothly. The handles are flexible, which means that you can vary your pressure without worry that one part will be splotchy on your project. The blending was smooth no matter where I worked. And they were SO SOFT! I'm very happy with my purchase, and cannot wait to use them more and more.


Supplies Used:
Stampin' Up Inks: Blueberry Bushel, Pineapple Punch, Grapefruit Grove, Call Me Clover, Lovely Lipstick, Gorgeous Grape
Neat & Tangled Stencil: Dimensional Triangles
Taylored Expressions Blender Brushes
Taylored Expressions Die: Thanks Die Pin It

Monday, July 15, 2019

AUTHENTIQUE PAPER: Scholastic One Page Mini Album

Hello! I know that summer is in full swing, and most everyone is still eating popsicles and hanging out in the sun, but school is coming soon for some. Since I'm a teacher, documenting those fun school events can be daunting, so I like to plan ahead. This one page mini album is a quick and easy way to document some small photos, or have my own kiddos write their own version of fun events. Our new Scholastic Collection is the perfect foil for this mini album.
I looked through Pinterest for some inspiration of mini albums. I liked the smaller ones, and chose to use the tutorial for THIS MINI ALBUM as the base of my mini. It's a simple one sheet mini, that is easily created using a scoreboard and a bone folder.
The main paper was Scholastic Two, scored and folded at the 3", 6", and 9" marks, twisted, then scored again at 5.75". This created the pockets that will hold each larger strip of paper. 
To create more interest with the pockets, I used my paper cutter to create two diagonal cuts on the edge sections, and two different punches to create interest on the inside pockets. 
Each of the pockets in the mini have simple strips of paper that are cut slightly smaller than the pockets. For these, I used Scholastic Five and Six.
The two center strips also use stickers from the Details Sticker Sheet. To help with the stickiness on the back of the sticker that is showing, I punched a circle of paper to stick on the back.
Each of the sections of the mini album uses various pieces from the Scholastic Seven cutapart page and more of the Details Stickers. I also used a couple of smaller mats that are created from Spectrum cardstock in Mustard Seed and Old Glory. I love how there are always Spectrum cardstocks to match each collection. 
These fun vintage images from Scholastic Seven just make me smile. 
The lovely Details Stickers are just the perfect addition. I couldn't resist adding a few more everywhere. And the icon paper that is Scholastic Four is just fabulous. I love all of the cute little details. 
Thanks for looking, and I hope that this inspires you to create your own one page mini album.
Authentique Supplies: Scholastic Collection - One, Two, Four, Five, Six, Seven, Details; Spectrum Collection - Mustard Seed, Old Glory
Other Supplies: paper cutter, scoreboard, bone folder, punches, foam adhesive Pin It