Tuesday, September 23, 2014

Xyron and Anna Griffin: A Perfect Pairing for Gifts

Sometimes you just need a small gift (thank you, just because, hostess gift). This wonderful pairing of Xyron and Anna Griffin products definitely fits the bill for just that. This little gift set is a box, with four cards in it.
I started by making the box from some of the flocked paper and the amazingly thick, pearlized cardstock. I loved using the luxe flocked paper on the outside of this, as it is really soft. To create the sentiment for this boxed set, I used clear acetate in the "window". This way, I can let the cards shine. Using the Double-Sided High Tack 1/2" Tape made this super easy to put together, as well as let me easily add the acetate into the completed box. 
I created two vertical and two horizontal cards using the Grace Collection and pieces from Anna Griffin's other collections. For the two vertical cards, I started with a base of the thick pearlized papers, then added various patterned and flocked papers, borders, sticker borders and die cuts. Some of the die cuts came dimensional, and some I was able to add layers myself. By running the die cuts through my 3" Sticker Maker, I was able to make sure that they were not going to shift when they were mailed. Rather than pull out my Mega Runner and squish the dimensional die cuts, I just used my Double-Sided High Tack 1/2" Tape to attach them to the cards.
For the two horizontal cards, one had a base from the All About Her Cardmaking Kit, and one I used another piece of the Perfect Palette Cardstock Kit. Then I added more pieces of various die cuts. Lastly, I heat embossed a sentiment from one of Anna's stamp sets in black embossing powder. On these two cards, I really used my Double-Sided High Tack 1/2" Tape. It made the extra embellishments so easy to place. For the embossed section, I ran those two pieces through my 1.5" Sticker Maker before attaching them to the card.
 I really love how easily this small gift came together.
Supplies Used:
Xyron: 1.5" Sticker Maker, 3" Sticker Maker,  Double-Sided High Tack 1/2" Tape
Anna Griffin papers and die cuts    Anna Griffin® Grace Papercrafting Kit,
Anna Griffin® Perfect Palette Cardstock Kit, Anna Griffin® All About Her Cardmaking Kit, Anna Griffin® 60-piece Flocked Paper Collection
Additional Materials: acetate, ribbon, craft foam, Silhouette Cameo Pin It

Monday, September 22, 2014

AUTHENTIQUE PAPER: Authentique Paper, May Arts, Imagine Crafts Blog Hop- Create a Fall Wreath with "Harmony

Good Morning!! Check out the Authentique Blog, as we are excited to share our projects also using products made by ImagineCrafts and May Arts. Today, I am sharing a fun Fall wreath using Harmony Collection by Authentique, three May Arts ribbons and my favorite ImagineCrafts Memento Ink. I even have a fun mini-tutorial on the great ribbon flowers!
Be sure to check the Authentique Blog every day this week for more project inspiration! We have an Authentique Prize Pack as well as prizes from May Arts Ribbon & Imagine Crafts to give away to a couple of our lucky commenters on the original blog post.

For another chance to win, make sure you follow us on Instagram @authentiquepaper 

Also, make sure you stop and visit us as well as our friends over at May Arts Ribbon & Imagine Crafts on facebook for prizes and lots of wonderful inspiration coming your way!

Supplies:
 Authentique Harmony Collection: Abundance & Awakening 12x12 Papers, 6x6 Bundle
Additional Supplies: wreath, brad, Xyron 1.5" Sticker Maker, liquid glue, wire, Epiphany Craft's Shape Studio Round 25 tool and epoxy stickers, Kiwi Lane Designer Templates (Scallops)
Pin It

Sunday, August 24, 2014

UPDATED: September Shop Your Stash Kit

UPDATE: Check out THIS PAGE on how to "Shop Your Stash"!! 

I'm on month two... Or at least "Kit Two" of my personal challenge. Nothing official or anything... I just have SO much stuff, and really want to just use it and buy things I really want, or that are multi-use (stamps, tools, etc.) I also have a ton of things that I love... But am hiding away for some obscene reason. No more hoarding pretty things!!

This month's kit was inspired by this picture of the lovely kit from Noel Mignon. (FYI, at this current moment... It's not been released, so this is just a sneak of the Tea for Two Kit). I really loved the colors, the woodgrain (of course!) and the deer. Seriously, the deer. I am going to make a custom deer stamp using some of my Silhouette stamp material, and already have the shape chosen!!
http://www.noelmignon.com/
And... This color inspiration. I found the link on Pinterest, but am posting the original link here.
http://www.ohmylittledears.com/2013/06/painting-rainbow.html
Here's my "kit". Once again, I've not packed a ton of paper into it, but will attempt to use it all... But it is pretty embellishment heavy. My goal, once I've completed quite a few layouts is to use it as a card kit. I love card kits, as all of the pieces go together, and the embellishments are fun.

Paper Top Row L-R:
Parfait (Madeline Collection) - Prima Marketing
Chocolate & Kraft Ribbon Stripe - Canvas Corp.
April Showers (Simply Spring) - WeRMK
Dishes (Nook & Pantry) - Basic Grey
Beaters (Nook & Pantry) - Basic Grey
Living Proof (So Sophie) - My Mind's Eye

Paper Bottom Row L-R:
Lots O' Luck (Hog Heaven) - Sassafras Lass
Beaming (Sunshine Broadcast) - Sassafras Lass
Cinnamon (Nutmeg) - Cosmo Cricket
Lunch Break (Ready Set Go) - American Crafts
Love Letters (Fawnd of You Too) - Sassafras Lass

Cardstock
kraft - American Crafts
darker teal - Bazzill
light teal - American Crafts
butter yellow - American Crafts  

Embellishments:
Some additional scraps of fun wood patterned paper...
Alphabet Stickers (Life of the Party) - Basic Grey
Yellow Tiny Type - Cosmo Cricket
Label Stickers (Lost & Found Two) - My Mind's Eye
Tiny Tags (Serendipity) - Elle's Studio
Chipboard Hearts - Um Wow Studio
Die Cut Kraft Doilies - Maya Road
Rose Ribbon - American Crafts
Stickers (Fawnd of You) - Sassafras Lass
Tickets... ??
Doo-Dads (Woodland Park) - October Afternoon
Vintage Brooch (Soft Pink) - Sassafras Lass
Metal Tabs (Carte Postal) - Basic Grey
Button Market - Bella Blvd
Tags - Martha Stewart
Chipboard Die Cuts - Sassafras Lass
Badges - Studio Calico
Canvas Pieces - Basic Grey
Wood Veneer Butterflies - Studio Calico
Fabric Brads - Basic Grey
Woodgrain Stamp - Hero Arts
Twine - ??

PS. If you're not too big on making everything all matchy-matchy, make sure to check out places like Tuesday Morning, TJ Maxx, Ross, Marshall's, and the clearance racks of places. Quite a few of the items that are here were from those places too! Pin It

Saturday, August 23, 2014

Two More Layouts with My August Faux-Kit... (ScrapbookSteals' Pansy 6 & 8)

I now have completed a total of FIVE layouts (the first three) with my "Faux-Kit" from August! I need to figure out a good name for the "kits" I'm making... Counterfeit Kit is taken. I'm up for ideas...

Anyway, here's my first. I am still in love with this blue polka dot paper. Too bad I finally used it. Although, there MAY be another piece lurking somewhere in my craft room. Who knows at this point... The white button was a fun altered piece. It's one of those buttons with the plastic loop thing in the bottom. I chopped that off with nail clippers, then glued it down. The look of a button, without the silly bottom part.
For this layout, I used the Scrapbook Steals Pansy #6 sketch. I switched a few things around, but that's normal for me.
http://scrapbook.steals.com/wp/2014/08/06/teresa-collins-daily-stories-mid-week-mojo-pansy-6/
This next layout was a little troublesome at first. Mainly because of the Amy Tangerine paper. I like it, but the LOVE cutout kept throwing me off. It's right in the spot that I usually scrap in, so I tried to incorporate it into the layout instead. I backed the love with the pink polka dot paper, and did some faux stitching with a silver gel pen. I don't normally use yellow, so tried to tie in all of the yellow with some additional yellow enamel dots. I even used the Lawn Fawn stamps!!
For this layout, I used the ScrapbookSteals Pansy #8. Thanks Melodee for the fun sketches! I am really going to try to get them all done on time this session!
http://scrapbook.steals.com/wp/2014/08/20/fancy-pants-designs-everyday-circus-mid-week-mojo-pansy-8/

Watch tomorrow for my September "Faux-Kit". Pin It

Friday, August 22, 2014

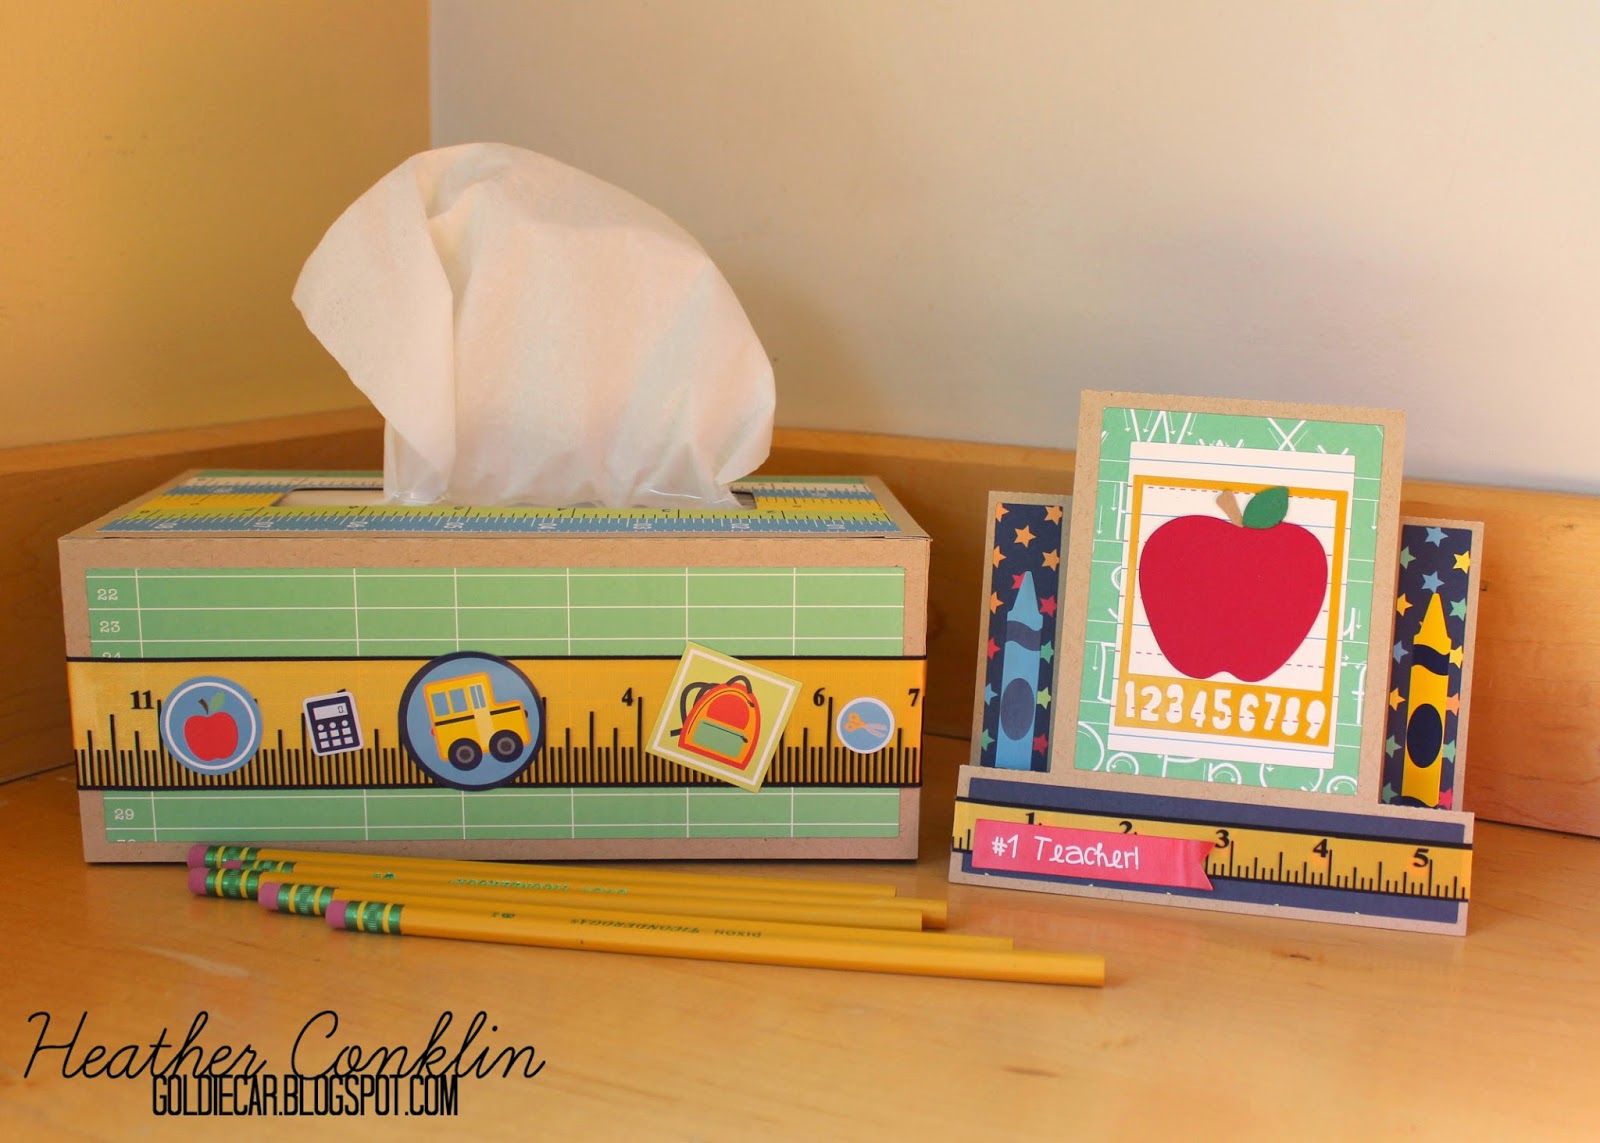
XYRON: Gearing up for Kindergarten with Back to School Teacher Gifts

As a high school teacher, I never really use any of the cute school related papers and crafting supplies. However, my oldest is starting Kindergarten this year and I finally get to break out my cute supplies! For today, I made two little things for her new teacher: an easel card, and a cover for the classroom tissue box.
I started with the fun Square Center Step Card by Lori Whitlock. I started with a base of kraft paper, then added quite a few pieces from the Pebbles Back to School Collection (Apples, Notebook, Accent & Phrase Stickers). In order to make the apple pop, I layered pieces of Bazzill cardstock, and framed it with a Studio Calico Frame Sticker. To piece everything together, I used my Xyron 3" Sticker Maker. Since the Offray ribbon was a little thinner, I used my Xyron 1.5" Sticker Maker, attached, then trimmed the edges.
The 3D Rectangle Tissue Box by Jamie Cripps was a super fun project to put together. To add some cohesion between the projects, I started again with a base of kraft paper, then added more of the Pebbles Back to School Collection (Scissors, Rulers, Accent Stickers, Accent & Phrase Stickers) using my Xyron 9" Creative Station. Before I placed the stickers all around the box, I ran a wider piece of ribbon through my Xyron 3" Sticker Maker and wrapped it around the box. Then I placed quite a few of the Accent Stickers around the box.
The best part of this project, the "box" comes right off, and can be placed on a new box of tissues when this one is used. No more ugly boxes of tissues! I also kept the top pretty simple, since I knew little hands would be touching it quite often. 
Hope your Back to School is going smooth!

Supplies:
Xyron: 3" Sticker Maker, 1.5" Sticker Maker, 9" Creative Station
Other: Pebbles Back to School Collection (patterned paper and stickers), Studio Calico Stickers (Teach Kids Frames), Bazzill cardstock, Mohawk Via Vellum (kraft), Offray ribbons (Measure Up), tissue box Pin It

Wednesday, August 20, 2014

Lawnscaping Challenge No. 88: Texture Anyone?

I really loved this challenge... I had made a similar card (Popping Up to Say Get Well Soon), but wanted to really change it up and incorporate the fun texture idea of this week's Lawnscaping Challenge No. 88: Texture Anyone?
http://lawnscaping.blogspot.com/2014/08/lawnscaping-challenge-texture-sponsored.html
I started by recreating the same folded card, that was then cut using the Stitched Party Banner Lawn Cuts. This time, I really wanted the banner holes cut, so didn't put anything between the two layers. I then inked up my Darice woodgrain embossing folder and then ran the card through my die cut machine. Stamped up the Fox from my LF Into the Woods set, and colored using Spectrum Noir pens. I fussy cut and then attached it to the stitched circle.

I then took some of the Into the Woods paper (Sycamore), and die cut the Scripty Hello Lawn Cut. I then used my Xyron 1.5" Sticker Maker to attach it. I then sprinkled some Lawn Ornaments all over the card, and tied it together with twine.
See how running the ink pad over the embossing folder, then running the entire thing gave it some amazing texture and shine?!?!?! I cannot remember where I saw this technique, but I love it!! If I can remember where I found it... Probably Jennifer McGuire or Kristina Werner. I tend to watch their videos late at night before I fall asleep.

Supplies:
Lawn Fawn: Into the Woods Stamp set, paper and Lawn Ornaments, Lawn Cuts (Scripty Hello & Stitched Party Banners)
Other Supplies: Mohawk Via Vellum (kraft), AC cardstock, Neenah Solar White Cover, Spectrum Noir pens, Xyron 1.5" sticker maker & Adhesive Dots, ImagineCrafts Delicata Ink (Golden Glitz) Pin It

Tuesday, August 19, 2014

Popping Up to Say "Get Well Soon!

I just love when an idea actually happens the way that I thought it would. I love this Lawn Fawn set (Love 'N Breakfast). It's one of my firsts... I kind of found it behind a few things, under some more in a local store. I haven't really used it to it's full potential though, probably because it's intend is more "love" based. I do love trying to find new ways to use it.
I started by making my card base. I folded an A2 card (Via Vellum-kraft), then placed the fold right inside of the cut line of my largest Lawn Fawn Lawn Cut Stitched Party Banner. Once that was complete, I stamped my images (Love 'N Breakfast) onto some Neenah Solar White paper, then colored them in with Spectrum Noir pens. I used sentiments from both the Love 'N Breakfast and the Get Well Soon sets. Once it was complete, it was a little too white, so I used some Distress Ink (Frayed Burlap) on the white banner. Then I needed some contrast between the two kraft colors, so cut and attached some white, striped paper behind and glued it all down. Last, I added two enamel dots in the holes that didn't cut all the way on the top of the banner.

Supplies: Lawn Fawn (Love 'N Breakfast, Get Well Soon, Stitched Party Banners), ImagineCrafts (Tuxedo Black Ink), Distress Ink (Frayed Burlap), Neenah Cover (Solar White), Mohawk (Via Vellum-kraft), enamel dots, Spectrum Noir pens, patterned paper Pin It